- Open the Style Manager, and create a Property Set Definition that applies to Hatch objects. I called mine HatchObjects (demonstrating my incredible creativity), and will use that name in the balance of this article. If you already have a Property Set that applies to Hatch Objects, you can add the required properties to it. If you name yours differently, substitute your name for HatchObjects wherever you see it here.
- In the HatchObjects Property Set Definition, create an Automatic Property that references the Handle Automatic Property source, if one does not already exist. Select the Add Automatic Property Definition tool on the Definition tab of the HatchObjects Property Set Definition (second from the top, at the left side of the tab, with the lightning bolt icon). Select the toggle to the right of the Hatch source to put a check mark in it, then select the OK button. I chose to leave the name of the property at the default value of Handle.

- In the HatchObjects Property Set Definition, create a Formula Property.
- Enter a name for the property in the Name edit box at the top; I used HatchArea (creativity gone wild).
- Uncheck the Use formula for description toggle (unless you really want the formula to be the description; I almost never do).
- Enter the formula in the Formula edit box. If you like, you can cut and paste the formula from the code box below. Note that the [Handle] text has to be a properly created reference to the Handle Property created in Step 2. That is done by selecting it in the Insert Property Definitions pane in the lower left corner of the Formula Property Definition dialog. You can substitute that for the pasted text, or you can follow the instructions in this blog article, if you like.
Set acadApp = GetObject(,"AutoCAD.Application")
Set hatchObj = acadApp.ActiveDocument.HandleToObject( "[Handle]" )
RESULT = hatchObj.Area / 144.0
When done correctly, the [Handle] text will have a light gray background and will be treated as one item, not individual characters. See image of dialog below. - The formula is setting the variable acadApp to the AutoCAD Application, and then getting the Hatch Object associated with the value of the Handle property (which is the Hatch Object to which the Property Set is attached). The RESULT of the formula is then set to the value of the Area property of the Hatch, which will be a real number representing the area of the Hatch, in square drawing units. My sample file used imperial units, with one unit equal to one inch. Since I wanted the Area value in square feet, I divided the raw value by 144.0 to get square feet. If you are not using imperial units, or want to show the Area in some other area unit, adjust the RESULT line to do what is necessary to get the area value in the desired units.
- Your Formula Property Definition dialog should look similar to the image below. If so, select the OK button to save the changes to the HatchArea Formula Property.

- Back in the Style Manager, on the Definition tab, assign the desired Property Data Format to the newly created Formula Property.
- If you need additional properties for your Hatch Objects, you can add them now. When done, select the OK button to accept the changes made, close the Style Manager and return to editing the drawing.
- Attach the Property Set to one or more Hatches in your file. Select the Hatch and note the value of the Area property (under the Geometry category) on the Design tab of the Properties palette. Then select the Extended Data tab and verify that the value shown matches (allowing for any rounding/formatting of the value by the chosen Property Data Format).
Showing posts with label Formula. Show all posts
Showing posts with label Formula. Show all posts
February 01, 2020
ACA: Property for Area of a Hatch Object
A question regarding tagging Hatch objects and being able to display the area of the hatch arose the other day. My initial response was, sure, that should not be a problem in AutoCAD® Architecture. Upon actually trying to do that, I found that there is no Area Automatic Property for Hatches. While that seems like an oversight, I then checked the object properties of Hatches and found that there is an Area property that is available through ActiveX. That is, no doubt, what drives the Area property of Hatches in the Properties palette. So while it was not quite as easy as I originally thought, it is possible to do, by creating a Formula Property that extracts the Area of the Hatch object to which the Property's Property Set is attached. Here is how to do that:


September 11, 2019
ACA: Rotation Property for Multi-View Blocks
Robin Capper made the observation in a post to the AutoCAD Architecture Forum that Multi-View Block References do not have an automatic property for Rotation, unlike Block References or MInsert Blocks. I was surprised to see that was true, but figured that a Formula Property would be able to get the value, if it is exposed.
A quick check using the "vlax" functions in AutoLISP verified that the Rotation property is exposed in the API. I have gotten a little rusty on the specifics of accessing data from the drawing in a Formula Property, but after a few searches of this blog, I had enough to refresh my memory and come up with this as the formula for a Formula Property in a Property Set Definition that applies to Multi-View Block References:
Before you create the Formula Property, add an instance of the ObjectID automatic property to the same Property Set Definition. In the formula, [ObjectID] needs to be a reference to that property, created by double clicking on the property in the Insert Property Definitions area of the Formula Property Definition dialog. You cannot just type [ObjectID] in the formula. When the reference is added, it will have a light gray background.
The angle value obtained from the Multi-View Block Reference object is in radians; I chose to convert that value to degrees. If radians will suit your needs better, you can delete the first line and, in the RESULT line, delete * 180.0 / pi. After posting my reply, I came across a better way to generate the value for pi:
A quick check using the "vlax" functions in AutoLISP verified that the Rotation property is exposed in the API. I have gotten a little rusty on the specifics of accessing data from the drawing in a Formula Property, but after a few searches of this blog, I had enough to refresh my memory and come up with this as the formula for a Formula Property in a Property Set Definition that applies to Multi-View Block References:
pi = 3.141592653589793238462643383
Set acadApp = GetObject(,"AutoCAD.Application")
Set mvbObj   = acadApp.ActiveDocument.ObjectIDToObject( [ObjectID] )
RESULT = CDbl(mvbObj.Rotation * 180.0 / pi)
Before you create the Formula Property, add an instance of the ObjectID automatic property to the same Property Set Definition. In the formula, [ObjectID] needs to be a reference to that property, created by double clicking on the property in the Insert Property Definitions area of the Formula Property Definition dialog. You cannot just type [ObjectID] in the formula. When the reference is added, it will have a light gray background.

The angle value obtained from the Multi-View Block Reference object is in radians; I chose to convert that value to degrees. If radians will suit your needs better, you can delete the first line and, in the RESULT line, delete * 180.0 / pi. After posting my reply, I came across a better way to generate the value for pi:
pi = 4 * Atn( 1.0 )
January 14, 2019
ACA: Accessing AEC Data in Formula Properties for Multiple Versions
2019-09-09: Updated to include AutoCAD Architecture 2020.
Some "advanced" formula properties (see this blog post for an example) that pull in AEC Data not available in the automatic properties have to reference one of the AEC modules, and need to include the first two version numbers for the current version of AutoCAD® Architecture or AutoCAD® MEP that is running. The version numbers can be obtained by running the AECVERSION command in a given version. For example, AecX.AecBaseApplication.8.1 is the Aec Base Application module for the 2019 version.
If you want a formula property to work across multiple versions, it has to know what version is running to be able to call the correct application version. For a small number of versions, that can be built into the formula property without too much difficulty or confusion (see previously linked example). But I recently had a reason to revisit a formula that retrieved the elevation of a ceiling object (based on the Wall elevation formula in the example blog post), and, over ten years later, there are more than a small number of versions that could be supported. In this case, I decided that it made more sense to pull out the code to determine the AECVERSION numbers into a separate formula property. This would be particularly effective if multiple formula properties needed to access it. Taking it one step farther, the following code will give you just the numeric suffix, which the primary formula property could then concatenate with the name of the Aec Application being referenced. Versions 2008 through 2019 are supported by this code.
Note that any line beginning with a single quote is a comment, and is ignored when the VBScript code is evaluated. The ACADVER values shown in the initial comments could be removed; I like to keep them for easy reference, as I tend to forget the ACADVER value for any given release.
Some "advanced" formula properties (see this blog post for an example) that pull in AEC Data not available in the automatic properties have to reference one of the AEC modules, and need to include the first two version numbers for the current version of AutoCAD® Architecture or AutoCAD® MEP that is running. The version numbers can be obtained by running the AECVERSION command in a given version. For example, AecX.AecBaseApplication.8.1 is the Aec Base Application module for the 2019 version.
If you want a formula property to work across multiple versions, it has to know what version is running to be able to call the correct application version. For a small number of versions, that can be built into the formula property without too much difficulty or confusion (see previously linked example). But I recently had a reason to revisit a formula that retrieved the elevation of a ceiling object (based on the Wall elevation formula in the example blog post), and, over ten years later, there are more than a small number of versions that could be supported. In this case, I decided that it made more sense to pull out the code to determine the AECVERSION numbers into a separate formula property. This would be particularly effective if multiple formula properties needed to access it. Taking it one step farther, the following code will give you just the numeric suffix, which the primary formula property could then concatenate with the name of the Aec Application being referenced. Versions 2008 through 2019 are supported by this code.
Set acadApp = GetObject(,"AutoCAD.Application")

'ACADVER values:
'ACD-A2008 = "17.1s (LMS Tech)"
'ACD-A2009 = "17.2s (LMS Tech)"
'ACD-A2010 = "18.0s (LMS Tech)"
'ACD-A2011 = "18.1s (LMS Tech)"
'ACD-A2012 = "18.2s (LMS Tech)"
'ACD-A2013 = "19.0s (LMS Tech)"
'ACD-A2014 = "19.1s (LMS Tech)"
'ACD-A2015 = "20.0s (LMS Tech)"
'ACD-A2016 = "20.1s (LMS Tech)"
'ACD-A2017 = "21.0s (LMS Tech)"
'ACD-A2018 = "22.0s (LMS Tech)"
'ACD-A2019 = "23.0s (LMS Tech)"
'ACD-A2020 = "23.1s (LMS Tech)"

acadVerString = acadApp.ActiveDocument.GetVariable("ACADVER")

'Set ACD-A application string, based on version running:
Select Case acadVerString
 Case "17.1s (LMS Tech)"
  RESULT = ".5.5"
 Case "17.2s (LMS Tech)"
  RESULT = ".5.7"
 Case "18.0s (LMS Tech)"
  RESULT = ".6.0"
 Case "18.1s (LMS Tech)"
  RESULT = ".6.5"
 Case "18.2s (LMS Tech)"
  RESULT = ".6.7"
 Case "19.0s (LMS Tech)"
  RESULT = ".7.0"
 Case "19.1s (LMS Tech)"
  RESULT = ".7.5"
 Case "20.0s (LMS Tech)"
  RESULT = ".7.7"
 Case "20.1s (LMS Tech)"
  RESULT = ".7.8"
 Case "21.0s (LMS Tech)"
  RESULT = ".7.9"
 Case "22.0s (LMS Tech)"
  RESULT = ".8.0"
 Case "23.0s (LMS Tech)"
  RESULT = ".8.1"
 Case "23.1s (LMS Tech)"
  RESULT = ".8.2"
 Case Else
  RESULT = "Unknown"
End Select
Note that any line beginning with a single quote is a comment, and is ignored when the VBScript code is evaluated. The ACADVER values shown in the initial comments could be removed; I like to keep them for easy reference, as I tend to forget the ACADVER value for any given release.
May 23, 2017
ACA: Wall Rotation Property
I came across a request today from someone who wanted to be able to set up a Display Theme based on the rotation of Walls, to graphically call out any that were close to, but not quite orthogonal. Rotation is not one of the automatic property sources for Walls, but it is a property of a Wall and that data can be extracted using a Formula property. The raw data is in radians, but you can apply the appropriate factor to covert that to degrees in the Formula property. Here are the formulas I created to make the Wall rotation value available as a property that could then be the basis of a Display Theme:
Radians
Degrees
In both cases, the formulas above assume that, in the same Property Set Definition, an automatic property called ObjectID has been added, referencing the ObjectID automatic property source. The reference to this property in the formula needs to be made by double clicking on that property in the lower left pane of the Formula Property Definition dialog, when creating the Formula property.
Please note that I have had issues with Formula properties that use the Set acadApp = GetObject(,"AutoCAD.Application") line to get the AutoCAD application object, when multiple versions of AutoCAD are open at the same time. Something to keep in mind, should you see Formula properties failing, particularly ones that had worked before. (I am not certain whether the same effect occurs if you have multiple instances of the same version running simultaneously; I rarely do that, but often have multiple versions running at the same time.)
Radians
On Error Resume Next
Set acadApp = GetObject(,"AutoCAD.Application")
Set wallObj = acadApp.ActiveDocument.ObjectIDToObject( [ObjectID] )
RESULT = CDbl( wallObj.Rotation )
Degrees
On Error Resume Next
Set acadApp = GetObject(,"AutoCAD.Application")
Set wallObj = acadApp.ActiveDocument.ObjectIDToObject( [ObjectID] )
pi = 4 * Atn( 1.0 )
RESULT = CDbl( (wallObj.Rotation * 180.0) / pi)
In both cases, the formulas above assume that, in the same Property Set Definition, an automatic property called ObjectID has been added, referencing the ObjectID automatic property source. The reference to this property in the formula needs to be made by double clicking on that property in the lower left pane of the Formula Property Definition dialog, when creating the Formula property.
Please note that I have had issues with Formula properties that use the Set acadApp = GetObject(,"AutoCAD.Application") line to get the AutoCAD application object, when multiple versions of AutoCAD are open at the same time. Something to keep in mind, should you see Formula properties failing, particularly ones that had worked before. (I am not certain whether the same effect occurs if you have multiple instances of the same version running simultaneously; I rarely do that, but often have multiple versions running at the same time.)
December 30, 2013
Revit: Restricting a User-Input Value to a Specific Increment
There are times when you are creating a family to represent an object that can have multiple values for a particular parameter, such as a length, that you would prefer not to create a type for each possible length. Using an instance-based parameter allows you to do so, as this allows the end user to set the value as needed on each instance. But what if the object you are modeling only comes in specific increments? How can you prevent the end user from entering a value that is not available? You can add another instance-based parameter and by entering a formula, you can round the user-input value to the desired increment. If the user could enter values that would be invalid, such as zero or negative values for a length parameter, or a value outside of the range available for the object, you can add one or more additional instance parameters and use a formula to assure an invalid value is not used.
As an example, I created an upside-down "T" shaped Generic Model Family, where the length is restricted to 6" increments, while the width can be any value. The rounding functions in Revit®, Round, Roundup and Rounddown, require a unit-free number as an argument, so in the formula for the LengthRounded parameter, the user-input value is divided by 6". This value is then rounded (up in this case) and that result is multiplied by 6" to restore the units and get the rounded value. The LengthActual parameter then checks the rounded result and passes that value through if it is greater than 0 feet; otherwise the minimum value of 6" is set. The Length Actual parameter is what drives the family geometry.

Since formula-driven, instance-based length parameters will not generate stretch grips in Revit, I added an additional reference plane, UserInputEnd, and assigned the LengthUser parameter to a dimension between it and the Front reference plane so that stretch grips for the length would appear in a project. None of the family geometry is locked to the UserInputEnd reference plane. You can see the family and the family in a project in the following Chronicle.
As an example, I created an upside-down "T" shaped Generic Model Family, where the length is restricted to 6" increments, while the width can be any value.


Since formula-driven, instance-based length parameters will not generate stretch grips in Revit, I added an additional reference plane, UserInputEnd, and assigned the LengthUser parameter to a dimension between it and the Front reference plane so that stretch grips for the length would appear in a project. None of the family geometry is locked to the UserInputEnd reference plane. You can see the family and the family in a project in the following Chronicle.
December 12, 2013
ACA: Formula Property to Determine if a Block Instance is a Dynamic Block
You can use the following code in an AutoCAD® Architecture Formula Property in a Property Set that applies to Block References to determine if the Block Reference is a Dynamic Block.
As in the previous example, [ObjectID] is a properly created property reference to an automatic property in the same Property Set, named ObjectID, which references the Object ID automatic property source. This formula will return a value of TRUE if the block reference is a Dynamic Block and FALSE if the block is a "regular" block. The property can be used as the condition for an IF Statement, if you need another Formula property to take different actions based on whether or not the block reference is a dynamic block.
set acadApp = GetObject(,"AutoCAD.Application")
set obj = acadApp.ActiveDocument.ObjectIDToObject( [ObjectID] )
RESULT = obj.IsDynamicBlock
As in the previous example, [ObjectID] is a properly created property reference to an automatic property in the same Property Set, named ObjectID, which references the Object ID automatic property source. This formula will return a value of TRUE if the block reference is a Dynamic Block and FALSE if the block is a "regular" block. The property can be used as the condition for an IF Statement, if you need another Formula property to take different actions based on whether or not the block reference is a dynamic block.
December 10, 2013
ACA: Obtaining the Effective Name of a Dynamic Block in a Formula Property
While Dynamic Blocks and ACA do not always play nicely, there are some who want to take advantage of both Dynamic Blocks and the AutoCAD® Architecture Schedule feature. One challenge is that the Name automatic property source may return an anonymous block name rather than the Dynamic Block name; for example, when a Dynamic Block with a stretch action is stretched. Fortunately, you can obtain the orignal block name from the EffectiveName property of the Dynamic Block instance, in a Formula property, using the the following VBScript code:
The Property Set Definition that includes the Formula property will also need to have a property that references the Object ID automatic property source. In the example code above, this property has the default ObjectID name, and the [ObjectID] text in the formula represents a properly created property reference, created by double-clicking the property name in the Insert Property Definitions box in the lower left of the Formula Property Definition dialog.
set acadApp = GetObject(,"AutoCAD.Application")
set obj = acadApp.ActiveDocument.ObjectIDToObject( [ObjectID] )
RESULT = obj.EffectiveName
The Property Set Definition that includes the Formula property will also need to have a property that references the Object ID automatic property source. In the example code above, this property has the default ObjectID name, and the [ObjectID] text in the formula represents a properly created property reference, created by double-clicking the property name in the Insert Property Definitions box in the lower left of the Formula Property Definition dialog.
June 24, 2012
ACA: Occupancy Load Calculations and Division by Zero
A question concerning occupancy load calculations and how to handle Spaces to which an occupant load of "0" has been assigned was posted to a thread in the Autodesk AutoCAD® Architecture Discussion Group. Dividing the Space's area by the occupant load causes an error in the formula when the occupant load is zero. As noted in my response, which includes a sample file done in ACA 2011, a simple If statement cannot be used test for a zero value and then avoid the calculation, because VBScript will evaluate the entire statement, including logical paths that would not be taken, and still end up in an error condition.
My solution was to use a variable (called occLoad in the example) to hold the occupant load property value and two If statements. The first tests for a zero value and sets a variable (called doCalc in the example) to indicate whether or not a calculation should be done. If it finds a zero value, the doCalc variable is set to 0 (do not calculate) AND the occLoad value is changed from 0 to 1. If occLoad is not zero, the first If statement only sets doCalc to 1 (do calculate).
The second If statement then tests the value of doCalc: if it is 1, it returns the result of dividing the area by the occupant load; if it is 0, it returns 0. Because the first If statement assures that the occLoad value will not be zero, the division in the second If statement never results in an error condition, and the desired result for an occupant load of zero is returned.
The example file also shows how a Property Data Format can be used to round any result with a fractional amount up to the next highest integer, since you would want that when calculating occupant loads for egress analysis. It also demonstrates using a style-based Property Set to hold the occupant load property, so that the occupant load value only needs to be added to the Space Style, and not to each individual Space.
My solution was to use a variable (called occLoad in the example) to hold the occupant load property value and two If statements. The first tests for a zero value and sets a variable (called doCalc in the example) to indicate whether or not a calculation should be done. If it finds a zero value, the doCalc variable is set to 0 (do not calculate) AND the occLoad value is changed from 0 to 1. If occLoad is not zero, the first If statement only sets doCalc to 1 (do calculate).
The second If statement then tests the value of doCalc: if it is 1, it returns the result of dividing the area by the occupant load; if it is 0, it returns 0. Because the first If statement assures that the occLoad value will not be zero, the division in the second If statement never results in an error condition, and the desired result for an occupant load of zero is returned.
occLoad = [SpaceStylesCalcs:Occupant_Load]

If occLoad = 0 Then
 doCalc = 0
 occLoad = 1
Else
 doCalc = 1
End If

If doCalc = 1 Then
 RESULT = [SpaceStyles:BaseArea] / occLoad
Else
 RESULT = 0
End If
The example file also shows how a Property Data Format can be used to round any result with a fractional amount up to the next highest integer, since you would want that when calculating occupant loads for egress analysis. It also demonstrates using a style-based Property Set to hold the occupant load property, so that the occupant load value only needs to be added to the Space Style, and not to each individual Space.
February 12, 2012
ACA: Extracting Text from a Style Name
In a recent reply post in the Getting steel beam size thread in the Autodesk AutoCAD® Architecture Discussion Group, Dallas asked if there was a way to automatically extract a value embedded in the name of a Structural Member Style. The specific example was if the style name were to include the shape size followed by the depth in parentheses: W16x45 (16.13).
I replied with a file attachment that had a sample file demonstrating that this was possible. The style-based StrMembStyles01 Property Set Definition, which applies to Structural Member Styles, in that file contains an Automatic property called Style that uses the Style automatic property source to make the style name available. The MemberDepth property uses the following VBScript code to extract the value between the parentheses in the style name and convert it to a real number:
I replied with a file attachment that had a sample file demonstrating that this was possible. The style-based StrMembStyles01 Property Set Definition, which applies to Structural Member Styles, in that file contains an Automatic property called Style that uses the Style automatic property source to make the style name available. The MemberDepth property uses the following VBScript code to extract the value between the parentheses in the style name and convert it to a real number:
styleName = "[Style]"
startChar = InStr( "[Style]",  "(" ) +1
endChar = InStr(  "[Style]",  ")" )
strLen = endChar - startChar

If strLen <= 0 Then
 memberDepth = 0
Else
 memberDepth =  Mid( styleName, startChar, strLen )
End If

If Not IsNumeric( memberDepth ) Then
 memberDepth = 0
End If

RESULT = CDbl(memberDepth)Notes:- The first line assigns the text string in the [Style] property to the variable styleName. As always, you cannot simply type or paste a property reference in a formula property. You have to insert them by placing your cursor in the upper left edit box and then double click the property in the list in the lower left box.
- The second line uses the VBScript InStr function to determine the position of the first character of the depth value embedded in the style name, which is presumed to be the first character after the first open parenthesis character, "(", found in the string. This is saved in the variable startChar.
- The third line also uses the InStr function to save the position of the first close parenthesis character, ")", to the variable endChar. In both the second and third lines, I probably should have used the styleName variable in lieu of additional references to the [Style] property.
- The fourth line assigns difference between startChar and endChar to the variable strLen, which is the length of the string that gives the member depth. Using the InStr function with delimiter characters avoids the need to have a fixed number of characters before the depth value and a fixed number of characters for the depth. The only requirement is that the first "(" character in the name immediately precede the depth value, and the first ")" character immediately follow the depth value.
- At this point, we have all of the information we need to get the string representing the member depth. If the Property Set gets attached to a Structural Member Style whose name is not properly formatted (no parentheses, first "(" is either preceded by or immediately followed by the first ")", one or more non-numeric characters between the first "(" and ")") and the resultant string is converted to a double precision number, an error will result. The formula property is set up to return a depth of 0 for improperly formatted style names. All of the mentioned error conditions except for non-numeric characters will result in a string length of 0 or less. The first If statement checks for this condition and sets variable memberDepth to 0 if true; otherwise it extracts the string between the first "(" and first ")".
- The second If statement tests the extracted string to verify it either is numeric or is a string that can be evaluated as numeric using the IsNumeric function, preceded by the Not operator. If the extracted string is not numeric, the value of memberDepth is reset to 0, otherwise, it is left as is.
- At this point, the value of memberDepth is either 0 or a numeric string, and can be converted to a double precision real number using the CDbl function. It is up to whatever additional use you make of this property to determine how to handle a value of 0.
September 16, 2008
Z-Coordinates of Aec Objects
A recent thread in the Autodesk AutoCAD® Architecture Discussion Group reminded me that I had never followed up on another thread, in which a solution to the inability to extract coordinate values from the Location property of an Aec Object. In particular, the Z-coordinate was of interest, because there is no automatic property for the elevation.
The VarType and TypeName functions indicate that the Location property contains an array of doubles, but the individual values could not be extracted directly. Thanks to the code that BHashman posted, the coordinate values can be extracted by making use of the ConvertToVariantArray method of the Utility object of the AecBaseDocument object. (The ConvertToVariantArray is not listed in the Help.) Here is a variation on that code, to extract the elevation of a Wall, with an added test for the current version running, so that the same Formula property can work in both 2008 and 2009.
A sample file can be found in a reply to this thread. I left in a lot of the test formulas I used along the way - the WallElevation-Location property has the Formula shown above, and there are three walls at three different elevations which show that the Z-coordinate is being extracted. The WallElevation-StartPoint property does the same thing, but uses the StartPoint property, which is the same as the Location property for Walls. Most AEC "real-world" objects have a Location property, so that may be a better starting point when adapting this for other objects. Be certain to check the properties available on the AEC object of interest in the AutoCAD Architecture ActiveX Reference section of the Help to determine what property to use.
The VarType and TypeName functions indicate that the Location property contains an array of doubles, but the individual values could not be extracted directly. Thanks to the code that BHashman posted, the coordinate values can be extracted by making use of the ConvertToVariantArray method of the Utility object of the AecBaseDocument object. (The ConvertToVariantArray is not listed in the Help.) Here is a variation on that code, to extract the elevation of a Wall, with an added test for the current version running, so that the same Formula property can work in both 2008 and 2009.
Set acadApp = GetObject(,"AutoCAD.Application")
'ACADVER values:
'ACD-A2008 = "17.1s (LMS Tech)"
'ACD-A2009 = "17.2s (LMS Tech)"
acadVerString = acadApp.ActiveDocument.GetVariable("ACADVER")

'Set ADT application string, based on version running:
Select Case acadVerString
 Case "17.1s (LMS Tech)"
  aecBaseVer = "AecX.AecBaseApplication.5.5"
 Case "17.2s (LMS Tech)"
  aecBaseVer = "AecX.AecBaseApplication.5.7"
 Case Else
  aecBaseVer = "Unknown"
End Select

If aecBaseVer = "Unknown" Then
 RESULT = "Unknown Version"
Else
 Set aecBase = acadApp.GetInterfaceObject(aecBaseVer)
 aecBase.Init acadApp
 Set wallObj = acadApp.ActiveDocument.ObjectIDToObject( [ObjectID] )
 Set utilObj = aecBase.ActiveDocument.Utility
 wallLocation = utilObj.ConvertToVariantArray(wallObj.Location)
 RESULT = wallLocation(2)
End If
The code needed for this to work in 2007 is not exposed, so this will only work in 2008 or 2009. Assuming that the code will continue to work in future releases, all that would be necessary would be to determine the value of the ACADVER sytem variable and the AecX.AecBaseApplication version number and then add an additional Case statement to support that release.A sample file can be found in a reply to this thread. I left in a lot of the test formulas I used along the way - the WallElevation-Location property has the Formula shown above, and there are three walls at three different elevations which show that the Z-coordinate is being extracted. The WallElevation-StartPoint property does the same thing, but uses the StartPoint property, which is the same as the Location property for Walls. Most AEC "real-world" objects have a Location property, so that may be a better starting point when adapting this for other objects. Be certain to check the properties available on the AEC object of interest in the AutoCAD Architecture ActiveX Reference section of the Help to determine what property to use.
July 28, 2008
Copy/Paste and Formulas
If you have ever set up a "test" Property Set Definition to work out a Formula property, then wanted to copy and paste the final formula to a Formula property in another Property Set Definition, you may have noticed that while the text will copy and paste just fine, the all-important references to other properties get converted to inactive text. For example, suppose I wanted to copy and paste the HeightSchedule formula shown in the image below.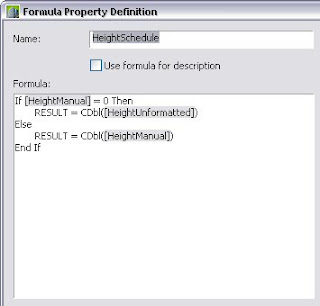 If I simply highlight the formula text, copy it to the clipboard with a CTRL-C, and then paste it into a new Formula property with a CTRL-V, I will get the following:
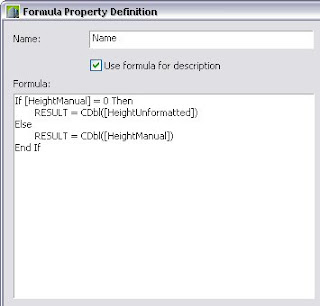
While I could highlight each former reference, then double click that property in the Insert Property Definitions area to replace the text version with an active property reference, that could become tedious, particularly if there were a large number of references to replace. The following technique can ease the pain, by avoiding the need to carefully highlight each individual reference. All you need to do is start the new Formula property, add a property reference for each instance in the original formula (I like to add a few returns first)...
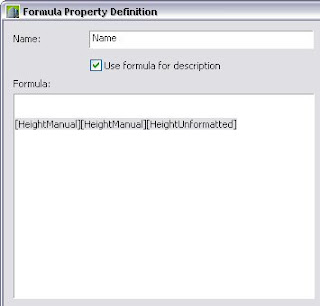 ...and then paste the formula in front of the property references you added. You will get something like this,
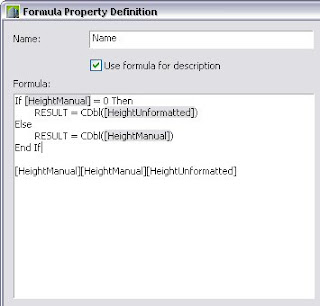 where the references in the pasted formula become active, while the previous references revert to inactive text, all nicely grouped together at the end, just waiting for you to highlight them all at once and delete them.
I have no idea why this works, but it does, and can be quite a time saver. I "discovered" this one time when I was pasting part of a formula that happened to have a property reference that was also repeated later on, after the part I was pasting. I was amazed that an active property reference pasted, annoyed when I noticed that the later one had become inactive and finally thrilled when I realized I could make use of that phenomenon to make pasting formulas easier.
 If I simply highlight the formula text, copy it to the clipboard with a CTRL-C, and then paste it into a new Formula property with a CTRL-V, I will get the following:
While I could highlight each former reference, then double click that property in the Insert Property Definitions area to replace the text version with an active property reference, that could become tedious, particularly if there were a large number of references to replace. The following technique can ease the pain, by avoiding the need to carefully highlight each individual reference. All you need to do is start the new Formula property, add a property reference for each instance in the original formula (I like to add a few returns first)...
 ...and then paste the formula in front of the property references you added. You will get something like this,
 where the references in the pasted formula become active, while the previous references revert to inactive text, all nicely grouped together at the end, just waiting for you to highlight them all at once and delete them.
I have no idea why this works, but it does, and can be quite a time saver. I "discovered" this one time when I was pasting part of a formula that happened to have a property reference that was also repeated later on, after the part I was pasting. I was amazed that an active property reference pasted, annoyed when I noticed that the later one had become inactive and finally thrilled when I realized I could make use of that phenomenon to make pasting formulas easier.
June 16, 2008
Text Case and the Quantity Column
A recent thread in the Autodesk AutoCAD® Architectural Discussion Group called my attention to the fact that, like the way real numbers are evaluated when including a quantity column in a Schedule Table, text strings are also evaluated using the "raw," or input value, and not the value that results from applying the Property Data Format assigned to the property (or to the property's column in the Schedule Table Style).
So, for example, even though the Schedule Table displays your text value in all capital letters, if the data is entered in different mixes of upper and lower case letters, only those objects whose data were entered identically will be collapsed into one line. In the example files I posted to the thread noted above, I created a manual, text-type property in an object-based property set, and applied the out-of-the-box Case - Upper Property Data Format. I entered the characters, but all upper case for some and all lower case for others. I kept the Case - Upper formatting on the column in my Schedule Table Style, and even though the data appears identical in the Schedule Table, the values entered in upper case collapsed into one line and those entered in lower case collapsed into another.
Fortunately, the workarounds similar to those suggested for real numbers will also work for text values that you can not guarantee will be uniform. If you can not use a List to assure that all values are entered identically, and you have a Property Data Format that formats the text the way you want, simply set up a formula property and pass through the formatted manual property enclosed in double quotation marks. For a manual property called WindowType, the formula would look like this:
"[WindowType]"
where [WindowType] is a property reference selected from the pane below the formula editing pane.
If you need to force all upper case or all lower case text, and do not want to create or rely on a Property Data Format, then you could use the UCase or LCase VBScript functions to achieve that result, respectively:
UCase ("[WindowType]")
While you might be able to replicate sentence case or title case with a more complicated VBScript statement, I would recommend creating a Property Data Format that applies the desired format to the manual property and then pass through the value in quotation marks for either of these formats.
Keep in mind that in later releases, you can choose to not display the formula property in the Properties palette or in the Edit Property Data dialog. The user can not edit the value anyway, and omitting it here will reduce clutter as well as eliminate inquiries as to why there are two properties with what appears to be the same value. Just remember to use the formula property in your Schedule Table Style, not the manual one.
So, for example, even though the Schedule Table displays your text value in all capital letters, if the data is entered in different mixes of upper and lower case letters, only those objects whose data were entered identically will be collapsed into one line. In the example files I posted to the thread noted above, I created a manual, text-type property in an object-based property set, and applied the out-of-the-box Case - Upper Property Data Format. I entered the characters, but all upper case for some and all lower case for others. I kept the Case - Upper formatting on the column in my Schedule Table Style, and even though the data appears identical in the Schedule Table, the values entered in upper case collapsed into one line and those entered in lower case collapsed into another.
Fortunately, the workarounds similar to those suggested for real numbers will also work for text values that you can not guarantee will be uniform. If you can not use a List to assure that all values are entered identically, and you have a Property Data Format that formats the text the way you want, simply set up a formula property and pass through the formatted manual property enclosed in double quotation marks. For a manual property called WindowType, the formula would look like this:
"[WindowType]"
where [WindowType] is a property reference selected from the pane below the formula editing pane.
If you need to force all upper case or all lower case text, and do not want to create or rely on a Property Data Format, then you could use the UCase or LCase VBScript functions to achieve that result, respectively:
UCase ("[WindowType]")
While you might be able to replicate sentence case or title case with a more complicated VBScript statement, I would recommend creating a Property Data Format that applies the desired format to the manual property and then pass through the value in quotation marks for either of these formats.
Keep in mind that in later releases, you can choose to not display the formula property in the Properties palette or in the Edit Property Data dialog. The user can not edit the value anyway, and omitting it here will reduce clutter as well as eliminate inquiries as to why there are two properties with what appears to be the same value. Just remember to use the formula property in your Schedule Table Style, not the manual one.
July 25, 2007
Pasting Formulas
Perhaps you have found the code for a formula property in a posting in an Autodesk Discussion Group or an AUGI Forum, and you wanted to add that formula to a Property Set Definition of your own. Someone else has already done all of the typing - why not just cut and paste the code and move on to your next task? Even if you already had - or just created - all of the other properties referenced by the sample code, you will find that cutting and pasting code from another source does not work. That is because property references have to be created by selecting them from the pane below the formula editing pane; you can not simply type in the name of the property, enclosed in square brackets: [MyPropertyReference]. Cut and paste will not work even if the source is another formula property, that has working property references!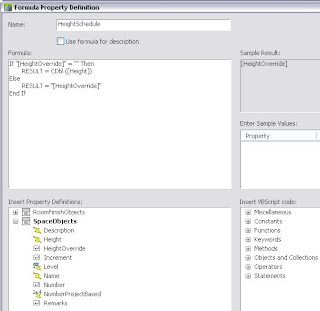
The image above shows a formula property being edited, with text cut from Notepad and pasted into the edit pane. As you can see, the property references (text enclosed in square brackets) do not have the tell-tale gray background of a working property reference. (For ADT 2004 and 2005, the working property references appear in bold type.) After pasting, you could individually highlight each property reference and then double click on the corresponding property in the lower pane to replace the text with a working reference. In my simple example, that would only require three operations and would not be all that onerous. But for a more complex formula, there could be many more references, and the chore more tedious.
Fortunately, there is an alternative. You will need to scan through the code you intend to paste and identify all of the property references, but you would have to do that anyway, to make certain that all of those properties already existed. Keep a count of how many times each property is referenced. (If any one property is referenced more than two times, you may want to consider setting a variable to the value of that property up front, then using the variable in lieu of reading in the value multiple times.) As shown in the image below, add the property references in the code you intend to paste, one reference for each reference in the code, by double-clicking on the corresponding property in the lower pane. The sample code references the [HeightOverride] property twice and the [Height] property once, so that is what was added. Note the gray background behind the property references.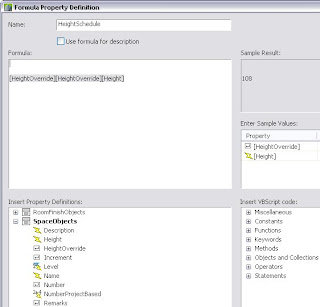
Now position the cursor before/above the property references you added. I like to throw a blank line or two before the references to be certain I am above them, and to make the final cleanup that much easier. Paste your code into the edit window and "presto-chango" - the code reference text you pasted in is now magically transformed into working code references, and the code references added prior to pasting are now plain text, as seen below.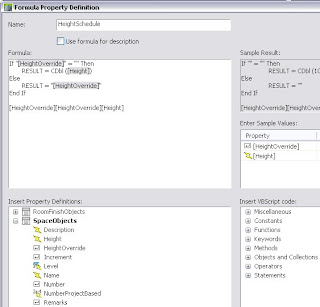
All that remains is to highlight the extra lines and now useless text at the end of the formula and delete it.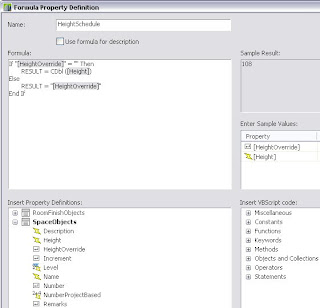
Note: If the names of the properties in the code to be pasted are different from the equivalent properties in your Property Sets, you will need to paste the code to Notepad or a similar program and edit the name text to match your names before pasting it into the formula property, or this technique will not work.

The image above shows a formula property being edited, with text cut from Notepad and pasted into the edit pane. As you can see, the property references (text enclosed in square brackets) do not have the tell-tale gray background of a working property reference. (For ADT 2004 and 2005, the working property references appear in bold type.) After pasting, you could individually highlight each property reference and then double click on the corresponding property in the lower pane to replace the text with a working reference. In my simple example, that would only require three operations and would not be all that onerous. But for a more complex formula, there could be many more references, and the chore more tedious.
Fortunately, there is an alternative. You will need to scan through the code you intend to paste and identify all of the property references, but you would have to do that anyway, to make certain that all of those properties already existed. Keep a count of how many times each property is referenced. (If any one property is referenced more than two times, you may want to consider setting a variable to the value of that property up front, then using the variable in lieu of reading in the value multiple times.) As shown in the image below, add the property references in the code you intend to paste, one reference for each reference in the code, by double-clicking on the corresponding property in the lower pane. The sample code references the [HeightOverride] property twice and the [Height] property once, so that is what was added. Note the gray background behind the property references.

Now position the cursor before/above the property references you added. I like to throw a blank line or two before the references to be certain I am above them, and to make the final cleanup that much easier. Paste your code into the edit window and "presto-chango" - the code reference text you pasted in is now magically transformed into working code references, and the code references added prior to pasting are now plain text, as seen below.

All that remains is to highlight the extra lines and now useless text at the end of the formula and delete it.

Note: If the names of the properties in the code to be pasted are different from the equivalent properties in your Property Sets, you will need to paste the code to Notepad or a similar program and edit the name text to match your names before pasting it into the formula property, or this technique will not work.
July 01, 2007
Anchor Property Sample
In response to a question in the Schedule PSD thread in the AutoCAD Architecture 2008 Discussion Group, I posted a file done in ADT 2007 that demonstrates that an Anchor property can be used in a Property Set Definition attached to to a Window object to read in property data from the Wall object and use that to calculate the necessary window opening.
Two different options are given, one that assumes a style-naming convention that has the name of all stud wall styles starting with the letters "stud", and another that assumes that a manual property attached to the wall style contains the string "STUD" for all stud walls. The formulas associated with each method pass through the value of the automatic WidthUnformatted property for stud walls and add 3" to the width for all other wall types.
Use of a Anchor property, introduced in the 2007 release, makes this task much easier. Previous releases would have required a formula property to dig through the drawing database, to find the associated value.
Two different options are given, one that assumes a style-naming convention that has the name of all stud wall styles starting with the letters "stud", and another that assumes that a manual property attached to the wall style contains the string "STUD" for all stud walls. The formulas associated with each method pass through the value of the automatic WidthUnformatted property for stud walls and add 3" to the width for all other wall types.
Use of a Anchor property, introduced in the 2007 release, makes this task much easier. Previous releases would have required a formula property to dig through the drawing database, to find the associated value.
June 16, 2007
Rounded Values and the Quantity Column
Many times you may have objects and associated data that you would like to document in a Schedule Table, but there are large numbers of "identical" objects - all the data in each objects row is the same - and you really do not need to show each line. This is just the situation that the quantity column was meant to handle - check the box on the Columns tab when creating or editing your Schedule Table Style to add a Quantity column, as shown in the image below. With a quantity column in your schedule table, all identical rows will "collapse" into a single row, with the total number of objects represented listed in the quantity column. If you do not want to display the actual quantity, simply hide the quantity column.
An interesting question came up in this thread in the Autodesk Architectural Desktop 2007 & Prior Discussion Group. The images in this blog post were taken from the ADT 2006 drawing file I posted in reply. The goal was to list spaces and their areas in a schedule table, using a quantity column to collapse spaces of the same type and area onto one line. Unfortunately, there were slight differences in the actual areas of the spaces, such as those in my sample file, as illustrated by the schedule table below. I created an "unformatted" automatic property to which I assigned a Property Data Format that is a copy of the Standard Property Data Format, with the precision set to eight decimal places. There are two different types of spaces: offices, at a nominal 100 square feet, and conference rooms, at a nominal 150 square feet. Intentional (in my case) stretching of the spaces by varying small amounts resulted in the slightly different areas shown, and preventing any lines from collapsing. Given the obviously different values, this is not surprising.
The discussion group poster noted that he had created a Property Data Format for his area properties that rounded the values to the nearest whole number, but this still was not allowing the rows to collapse, despite the apparently identical values. As shown below, I was able to reproduce that in my sample file. ADT is using the raw automatic property value, before the application of the Property Data Format, to determine whether rows are identical, as can be seen in the schedule table shown below.
Fortunately, there is a way to achieve the desired result, other than insisting on precise drafting. And while that is something of a pet peeve of mine, there certainly could be situations where there are legitimate small variations in a given value, that disappear when rounded to the desired accuracy for reporting the value. I can think of two ways to achieve the desired result, both of which involve the use of a formula property. Which works best for you will depend upon the specifics of your situation.
The first formula uses the unformatted automatic property and applies the Round function to get the desired precision, as seen below. For whole number precision, the Fix function may also work, although that will simply truncate any fractional amount, rather than round it. The advantage of using an unformatted property to get a numeric value, then applying the Round function in a formula property is that you can control the desired precision, and, with a little math, can even get a precision greater than whole number. For example, if you wanted to have the area value rounded to the nearest 50 square feet, you could do something like this:
Round( [NetAreaUnformatted]/50, 0 ) * 50
By dividing the value by 50, rounding, then multiplying the value by 50, you will get the value, rounded to the nearest 50. One thing to note for the Round function is that if the value of the digit beyond the one being rounded is exactly 5, the digit being rounded will round up if the digit is odd and down if the digit is even (that is, the result will always be an even digit). The results of using that formula in the schedule table can be seen below - the values for all four offices and all four conference rooms are now the same, so they collapse onto two lines, one for each type.
The second formula assumes that you can achieve the desired rounding with a Property Data Format, and simply takes the formatted version of the automatic property and passes it through the formula, enclosed in double quotation marks, to convert it to a string value, like this:
"[NetArea]"
Since the Property Data Format made the displayed values for each space type the same, the string will be the same, and the rows will collapse, as seen in the image below.
 If you are interested, you can download the sample file I posted to the thread and take a look at the formulas "live".
 With a quantity column in your schedule table, all identical rows will "collapse" into a single row, with the total number of objects represented listed in the quantity column. If you do not want to display the actual quantity, simply hide the quantity column.
An interesting question came up in this thread in the Autodesk Architectural Desktop 2007 & Prior Discussion Group. The images in this blog post were taken from the ADT 2006 drawing file I posted in reply. The goal was to list spaces and their areas in a schedule table, using a quantity column to collapse spaces of the same type and area onto one line. Unfortunately, there were slight differences in the actual areas of the spaces, such as those in my sample file, as illustrated by the schedule table below. I created an "unformatted" automatic property to which I assigned a Property Data Format that is a copy of the Standard Property Data Format, with the precision set to eight decimal places.
 There are two different types of spaces: offices, at a nominal 100 square feet, and conference rooms, at a nominal 150 square feet. Intentional (in my case) stretching of the spaces by varying small amounts resulted in the slightly different areas shown, and preventing any lines from collapsing. Given the obviously different values, this is not surprising.
The discussion group poster noted that he had created a Property Data Format for his area properties that rounded the values to the nearest whole number, but this still was not allowing the rows to collapse, despite the apparently identical values. As shown below, I was able to reproduce that in my sample file. ADT is using the raw automatic property value, before the application of the Property Data Format, to determine whether rows are identical, as can be seen in the schedule table shown below.

Fortunately, there is a way to achieve the desired result, other than insisting on precise drafting. And while that is something of a pet peeve of mine, there certainly could be situations where there are legitimate small variations in a given value, that disappear when rounded to the desired accuracy for reporting the value. I can think of two ways to achieve the desired result, both of which involve the use of a formula property. Which works best for you will depend upon the specifics of your situation.
The first formula uses the unformatted automatic property and applies the Round function to get the desired precision, as seen below. For whole number precision, the Fix function may also work, although that will simply truncate any fractional amount, rather than round it.
 The advantage of using an unformatted property to get a numeric value, then applying the Round function in a formula property is that you can control the desired precision, and, with a little math, can even get a precision greater than whole number. For example, if you wanted to have the area value rounded to the nearest 50 square feet, you could do something like this:
Round( [NetAreaUnformatted]/50, 0 ) * 50
By dividing the value by 50, rounding, then multiplying the value by 50, you will get the value, rounded to the nearest 50. One thing to note for the Round function is that if the value of the digit beyond the one being rounded is exactly 5, the digit being rounded will round up if the digit is odd and down if the digit is even (that is, the result will always be an even digit). The results of using that formula in the schedule table can be seen below - the values for all four offices and all four conference rooms are now the same, so they collapse onto two lines, one for each type.

The second formula assumes that you can achieve the desired rounding with a Property Data Format, and simply takes the formatted version of the automatic property and passes it through the formula, enclosed in double quotation marks, to convert it to a string value, like this:
"[NetArea]"
Since the Property Data Format made the displayed values for each space type the same, the string will be the same, and the rows will collapse, as seen in the image below.
 If you are interested, you can download the sample file I posted to the thread and take a look at the formulas "live".
April 15, 2007
ACA 2008/ADT 2007: Setting a Different Property Data Format in a Formula Property
A new feature added to Autodesk® Architectural Desktop 2007 and also available in AutoCAD® Architecture 2008 builds on the addition of the Sample Value pane to the Formula Property Definition dialog in the 2006 release. The Sample Value pane allows you to test the formula you have written by entering sample values for the other properties referenced by the formula. The 2006 release listed the Property Data Format [PDF] that was assigned to each referenced property; starting in the 2007 release, you can change that initial assignment to any of the other PDFs defined in the current drawing.
Not only does the PDF assigned in the Sample Value pane affect the way the sample value is displayed in the Formula Property Definition dialog, it affects the way the value is input to the formula itself. Furthermore, the PDF assigned in the Sample Value pane works on the "raw" value of the referenced property, BEFORE the PDF assigned to the property is assigned. This means that you no longer need to create an unformatted version of a property for use in a formula calculation as well as a formatted version for display in a Schedule Tag or the Properties palette. This can be a big time saver if you never need your formula properties to work in versions of ADT prior to 2007. Since saving back to prior releases without exploding ADT objects is generally a difficult thing to do, most using 2007 or 2008 should be able to take advantage of this feature.
It also means that if you set up a formula that references a property, then later decide to change the PDF assigned to that property, you will also have to go back to the formula property and change the PDF there if you want the changed PDF to be used in the formula property as well. This is how I "discovered" this feature - I had set up a property in ADT 2007, used it in a formula, realized I needed to increase the precision of the PDF assigned to the property, and was surprized to find that the formula property was still acting as though the precision had not been changed. After poking around a bit in the file and making certain that I had actually changed the precision on the property, I finally opened the formula and noticed that the PDF showing in the Sample Value pane was still set to the "old" value, that I could change the PDF to any other one in the file, and that the assigned PDF was what governed the way the data was brought into the formula. I currently use ADT 2004 on a day-to-day basis at work, so it may be possible that back when 2007 came out, I was aware of being able to set a PDF in the Formula Property Definition dialog, but I am fairly certain that I did not understand exactly what that meant until yesterday.
The following screen captures illustrate the potential for this feature. A drawing file was created and the units set to inches, Engineering format, with a precision of eight decimal places, so that the effects of varying precision in the PDF would not be masked by the units or precision in the drawing file. A wall was drawn, with a length of one hundred and five one-hundred-millionths inches [8'-4.00000005"] and a height of one hundred and one two-hundred-fifty-sixth inches [8'-4.00390625"]. The image below shows part of the Design tab of the Properties palette with this wall selected, and shows the length and width in Engineering units, with eight-decimal-place precision.
Two new Property Data Formats were created: Length - Extremely Short, a copy of Length - Short, with the precision increased to 1/256 of an inch...
...and Standard-8, a copy of Standard, with the precision increased to eight decimal places and no zero suppression. [Click on any reduced image to see a full-size version.]
A new Property Set Definition called WallObjectsTest01 was created, and properties referencing the Height and Length automatic property sources were added to it. The Length - Extremely Short PDF was assigned to the Height property and the Standard-8 PDF was assigned to the Length property. Five formula properties were added to the Property Set Definition, to demonstrate the effects of various PDF assignments in the Sample Value pane. Each of the five formula properties simply passes through one of the automatic property values and is assigned the Standard-8 PDF, so that it will display at maximum precision in the Properties palette. A summary of the properties in the WallObjectsTest01 Property Set Definition can be seen in the image below.
The Height-LengthExtremelyShort formula property keeps the default Length - Extremely Short PDF assigned to the Height value.
The Height-Standard formula property changes the PDF assigned to the Height property value in the formula to Standard.
The Height-Standard-8 formula property changes the PDF assigned to the Height property value in the formula to Standard-8.
The Length-Standard formula property maintains the Standard PDF assigned to the Length property.
The Length-Standard-8 formula property changes the PDF assigned to the Length property value in the formula to Standard-8.
The image below shows the values returned by each of the properties in the WallObjectsTest01 Property Set Definition for the test wall previously described. Note the following results:
Not only does the PDF assigned in the Sample Value pane affect the way the sample value is displayed in the Formula Property Definition dialog, it affects the way the value is input to the formula itself. Furthermore, the PDF assigned in the Sample Value pane works on the "raw" value of the referenced property, BEFORE the PDF assigned to the property is assigned. This means that you no longer need to create an unformatted version of a property for use in a formula calculation as well as a formatted version for display in a Schedule Tag or the Properties palette. This can be a big time saver if you never need your formula properties to work in versions of ADT prior to 2007. Since saving back to prior releases without exploding ADT objects is generally a difficult thing to do, most using 2007 or 2008 should be able to take advantage of this feature.
It also means that if you set up a formula that references a property, then later decide to change the PDF assigned to that property, you will also have to go back to the formula property and change the PDF there if you want the changed PDF to be used in the formula property as well. This is how I "discovered" this feature - I had set up a property in ADT 2007, used it in a formula, realized I needed to increase the precision of the PDF assigned to the property, and was surprized to find that the formula property was still acting as though the precision had not been changed. After poking around a bit in the file and making certain that I had actually changed the precision on the property, I finally opened the formula and noticed that the PDF showing in the Sample Value pane was still set to the "old" value, that I could change the PDF to any other one in the file, and that the assigned PDF was what governed the way the data was brought into the formula. I currently use ADT 2004 on a day-to-day basis at work, so it may be possible that back when 2007 came out, I was aware of being able to set a PDF in the Formula Property Definition dialog, but I am fairly certain that I did not understand exactly what that meant until yesterday.
The following screen captures illustrate the potential for this feature. A drawing file was created and the units set to inches, Engineering format, with a precision of eight decimal places, so that the effects of varying precision in the PDF would not be masked by the units or precision in the drawing file. A wall was drawn, with a length of one hundred and five one-hundred-millionths inches [8'-4.00000005"] and a height of one hundred and one two-hundred-fifty-sixth inches [8'-4.00390625"]. The image below shows part of the Design tab of the Properties palette with this wall selected, and shows the length and width in Engineering units, with eight-decimal-place precision.

Two new Property Data Formats were created: Length - Extremely Short, a copy of Length - Short, with the precision increased to 1/256 of an inch...

...and Standard-8, a copy of Standard, with the precision increased to eight decimal places and no zero suppression. [Click on any reduced image to see a full-size version.]

A new Property Set Definition called WallObjectsTest01 was created, and properties referencing the Height and Length automatic property sources were added to it. The Length - Extremely Short PDF was assigned to the Height property and the Standard-8 PDF was assigned to the Length property. Five formula properties were added to the Property Set Definition, to demonstrate the effects of various PDF assignments in the Sample Value pane. Each of the five formula properties simply passes through one of the automatic property values and is assigned the Standard-8 PDF, so that it will display at maximum precision in the Properties palette. A summary of the properties in the WallObjectsTest01 Property Set Definition can be seen in the image below.

The Height-LengthExtremelyShort formula property keeps the default Length - Extremely Short PDF assigned to the Height value.

The Height-Standard formula property changes the PDF assigned to the Height property value in the formula to Standard.

The Height-Standard-8 formula property changes the PDF assigned to the Height property value in the formula to Standard-8.

The Length-Standard formula property maintains the Standard PDF assigned to the Length property.

The Length-Standard-8 formula property changes the PDF assigned to the Length property value in the formula to Standard-8.

The image below shows the values returned by each of the properties in the WallObjectsTest01 Property Set Definition for the test wall previously described.
 Note the following results:
- The Height automatic property reports the height in architectural imperial units with a precision of 1/256 of an inch, in this case, the exact value is reported, since the height was set to exactly 8'-4 1/256".
- The Height-LengthExtremelyShort formula property returns a value of 8. This is an improvement over earlier releases, where the presence of the embedded double quotation mark used as an inch symbol would have caused an error, but the value would likely not result in a correct calculation. Beware using formatted values in formula properties.
- The Height-Standard formula property returns a somewhat more accurate value, but it is rounded at the third decimal place, because the Standard PDF has a precision of three decimal places. That may well work for certain calculations, but if you need greater precision for a given calculation, you will want to create a PDF that provides it.
- The Height-Standard-8 formula property returns the full decimal equivalent value, because the eight-decimal-place precision of the Standard-8 PDF is capable of delivering it.
- The Length automatic property reports a length of 100. This is because it has the Standard PDF assigned, so the precision is limited to three decimal places and trailing zeros are suppressed.
- The Length-Standard property also reports a length of 100. This is because Standard PDF is applied to the Length value, resulting in a value of 100. When this value is returned from the formula property, it is interpreted as an integer, and the eight-decimal-place precision for real numbers in the Standard-8 format, which is assigned to the formula property itself, does not come into play. If the formula property were amended to include a CDbl function to force the Length value to be interpreted as real number, the result would be 100.00000000, as the five hundred-millionths would have already been lost when the Standard PDF was applied to the Length value.
- The Length-Standard-8 property reports the actual length of the wall, including the five hundred-millionths, despite the fact that the fractional amount was lost in the reported value of the Length property itself.
April 10, 2007
Multiple-Line Room Tags
There have been several recent requests for information on creating multi-line room tags in ADT/ACA. I thought I would collect the links I have been posting in a single article here, to make replying to future requests easier and to make certain I do not forget one or more of the resources.
Using Multiple Manual Properties to Enter the Room Name, And Then Combining Them in a Formula Property
This thread contains a sample file of an early version, done in ADT 2004, that supports two-line room names, from June 6, 2003. Download the sample from the file reposted on August 24, 2004.
In this thread, you will find a more clever formula, which supports three lines and could be easily expanded to even more lines, from January 25, 2005. That thread was also discussed in two blog articles, on July 4, 2005 and July 9, 2005.
Using a Single Manual Property to Enter the Room Name with MTEXT Codes, And Then Stripping the MTEXT Codes With a Formula Property
This Autodesk Knowledge Base article contains instructions on how to create a multi-line room tag using this approach.
Using a Single Manual Property [Driven by a List Definition in 2007 or Later], an Index Number and Multiple Formula Properties
Tomaslav Zigo posted this article to his blog showing a way to have a two-line room name tag populated from a single source and split at a user designated place without the need to type in MTEXT codes. This allows the use of List Definitions for the room name [and index] in 2007 and later, contrary to this previous post.
Multi-Line Attributues
Unfortunately, the new multi-line attributes added to AutoCAD® 2008 are not active when incorporated into a view block of a Multi-View Block Schedule Tag in AutoCAD® Architecture 2008. Here is hoping that feature makes its way into next year's release, so that a single attribute that does not need to be repostitioned can display multi-line room names and eliminate the need for fancy formulas.
Using Multiple Manual Properties to Enter the Room Name, And Then Combining Them in a Formula Property
This thread contains a sample file of an early version, done in ADT 2004, that supports two-line room names, from June 6, 2003. Download the sample from the file reposted on August 24, 2004.
In this thread, you will find a more clever formula, which supports three lines and could be easily expanded to even more lines, from January 25, 2005. That thread was also discussed in two blog articles, on July 4, 2005 and July 9, 2005.
Using a Single Manual Property to Enter the Room Name with MTEXT Codes, And Then Stripping the MTEXT Codes With a Formula Property
This Autodesk Knowledge Base article contains instructions on how to create a multi-line room tag using this approach.
Using a Single Manual Property [Driven by a List Definition in 2007 or Later], an Index Number and Multiple Formula Properties
Tomaslav Zigo posted this article to his blog showing a way to have a two-line room name tag populated from a single source and split at a user designated place without the need to type in MTEXT codes. This allows the use of List Definitions for the room name [and index] in 2007 and later, contrary to this previous post.
Multi-Line Attributues
Unfortunately, the new multi-line attributes added to AutoCAD® 2008 are not active when incorporated into a view block of a Multi-View Block Schedule Tag in AutoCAD® Architecture 2008. Here is hoping that feature makes its way into next year's release, so that a single attribute that does not need to be repostitioned can display multi-line room names and eliminate the need for fancy formulas.
April 01, 2007
ADT 2006 & Prior - Angular Automatic Properties
Here is a heads up for anyone using ADT 2006 and prior and making use of any of the automatic property sources that report the measurement of an angle, such as the Included Angle of an Arc, the Rotation of a Block Reference or the Roll of a Structural Member. The angular value will be reported based on the current setting of the AUNITS System Variable, and for any setting other than 0 [decimal degrees], the value will have non-numeric formatting attached - a suffix of "r" for radians; a suffix of "g" for grads; "d", "'" and """ for degrees/minutes/seconds; and "d", "'" and """ plus "N" or "S" and "E" or "W" for surveyor. The precision of the number will be based on that of the AUPREC System Variable, not that of the Property Data Format assigned to the automatic property.
If you want to use the anglar value for mathematical calculations in a formula property, assuming that AUNITS is set to 0 and AUPREC is set to a sufficiently high value will cause problems if AUNITS is set to anything else and may cause problems with accuracy if AUPREC is set too low. Also keep in mind that the VBScript angle functions take angular input in radians, so even if you have decimal degrees with appropriate precision, you will need to convert the value to radians first. There does not appear to be a constant for the value of PI in VBScript, so you will need to type that into your formulas manually, with sufficient precision for the task at hand. 3.14159265358979323846264...
The good news is that in ADT 2007, the value of angular automatic property sources are reported in unformatted radians, using the real number precision set in the assigned Property Data Format. If you are migrating formulas from 2004-2006 to 2007 or later that use automatic angles, you will have to adjust them to the changed source value, but at least you will have a consistent value from which to start.
If you want to use the anglar value for mathematical calculations in a formula property, assuming that AUNITS is set to 0 and AUPREC is set to a sufficiently high value will cause problems if AUNITS is set to anything else and may cause problems with accuracy if AUPREC is set too low. Also keep in mind that the VBScript angle functions take angular input in radians, so even if you have decimal degrees with appropriate precision, you will need to convert the value to radians first. There does not appear to be a constant for the value of PI in VBScript, so you will need to type that into your formulas manually, with sufficient precision for the task at hand. 3.14159265358979323846264...
The good news is that in ADT 2007, the value of angular automatic property sources are reported in unformatted radians, using the real number precision set in the assigned Property Data Format. If you are migrating formulas from 2004-2006 to 2007 or later that use automatic angles, you will have to adjust them to the changed source value, but at least you will have a consistent value from which to start.
March 20, 2007
Another Formula Property Override Example

A sample file showing how a style-based manual property holding room finish information and attached to a Space style can be overridden using an object-based Property Set Definition [PSD] with a manual override property and a formula property can be found in a reply I made to the ADT2006 Preset style based room finish PSD's thread in the Autodesk Architectural Desktop 2007 & Prior Discussion Group. Look for the FloorFinishOverrideTest.zip attachment.
The four Spaces in the file all use the Office Space Style, which has a PSD called SpaceStyles-FloorFinish attached. The sole property in that PSD, FloorFinish, is set to "CARPET" for that style. Each Space has the object-based SpaceObjects-FloorFinish PSD attached. In addition to containing Name and Number manual properties, that PSD also contains a manual property called FloorFinishOverride, which, surprisingly enough, serves as the manual override property. The default value of FloorFinishOverride is an empty string [""]. A formula property, called FloorFinishSchedule, is the property that appears in the right column of the Schedule Table in the file. The formula tests the value of FloorFinishOverride; if it is an empty string, the formula passes through the value of the style-based FloorFinish property. Otherwise, it passes through the override value entered in the FloorFinishOverride property. The formula looks like this:
If "[FloorFinishOverride]" = "" Then
 RESULT = "[SpaceStyles-FloorFinish:FloorFinish]"
Else
 RESULT = "[FloorFinishOverride]"
End If
In the sample file, rooms 102 and 103 do not have an override value set, and so the "CARPET" value is passed through the formula property, while rooms 101 and 104 have overrides set, and those values are passed through the formula property. This technique is fairly easy to set up initially, and can allow you to take advantage of having style-based manual properties, avoiding the need to enter often-repeated data for each instance, while still having the flexibility to have selected instances vary, without having to create a new style for each unique case. For room finishes, this becomes even more critical when you add in wall base, wall and ceiling finishes - you would either have a large number of Space Styles or you would end up making the properties object-based and have to enter and maintain the data for each instance.
You can find more information on If Then Else Statements in formula properties and their use in overriding another property here and here.
February 16, 2007
Dealing With "*Xxx not found*" Location Property Result
Update for 2007 and later:
Change the formula properties in the examples below (or in the sample file downloaded from the Discussion Group) to test for "*Space not found*", rather than "*Area not found*". Area objects were merged into the new-and-improved Space object in 2007, so opening the sample file in 2007 or later will convert the Area objects in the sample file to Space objects, and the "not found" return value will change to "*Space not found*".
A location property will return *Xxx not found*, where Xxx is Space, Area or AEC Polygon, if the location grip for the object to which the location property is attached can not find an object of the type specified in the location property. This value is not a string - the VBScript TypeName and VarType functions crash when evaluating this value, so I have no idea what it actually is.
A denizen of the Autodesk Architectural Desktop Discussion Group posted a request for a method of dealing with this return value. The situation was one where a location property was being used with Areas, so that, where appropriate, a subordinate Area's area could be read into the main Area's properties and shown on a schedule. There would be main Areas, however, that would not have subordinate Areas; these would get the dreaded *Area not found* in the Location property and seing that in the schedule was not acceptable. When writing a Formula property to return "-" when there was no subordinate Area, the formula crashed when trying to compare the Location property value to *Area not found*. I have posted a sample file, done in ADT 2004, in a reply to that thread, that addresses the issued raised and also shows how you can create a Formula property from the Location that has a real number value with which calculations can be done. In the "not found" case, the real number is set to zero. Please note that the sample file was created to show possibilities, and the properties included are not optimized to a specific need. Some of the "formatted" properties would not be needed if the values were not being displayed in a Schedule Tag, as the "Unformmated" version could be placed as a column in a Schedule Table Style and a Property Data Format applied there. Some of the Formula properties might also be combined if there were no need for the intermediate results. Also note that the sample file was done in imperial units; the same concepts should apply to metric unit drawings as well. The image above shows the test objects in my sample file. There are three Area objects, two ten-foot square Areas, Living Room 100 and Bedroom 101, and a fifteen square foot Area for Balcony 101A. As you can see, Balcony 101A is subordinate to Living Room 100, as the Living Room Area's location grip is positioned over the Balcony Area. Neither the Balcony nor the Bedroom have a subordinate Area. For scheduling purposes, I created a Classification Definition that applies to Area objects, with two classifications - Main and Subordinate. The Living Room and Bedroom objects use an Area Style that has been classified as Main; the Balcony's Area Style is classified as Subordinate. This makes including only Main Areas in a Schedule Table easy, even if the Schedule Table is not in the same file as the Areas.
Writing an if condition to test the value of the Location property is fairly easy. Simply enclose the Location property and the test phrase in double quotation marks, and VBScript will do a text comparison. The problem is how to return the Location property value when an Area is found in a usable data format. You can not pass through the "raw" Location property value, as VBScript evaluates the entire formula, not just the logical path followed for each object, and *Area not found* will result in an error for Areas with no subordinate area. If the only need is a string which can be displayed in a Schedule Table, the solution is easy and the same as that for the if condition - enclose the property in double quotation marks. In the sample file, I have two location properties - SubordinateAreaFormatted and SubordinateAreaUnformatted. Both reference the BaseAreaUnformatted property of the subordinate Area; the formatted version uses the out-of-the-box Area Property Data Format; the unformatted version uses a custom Property Data Format called Standard-8, which is a copy of the Standard Property Data Format with the precision set to eight decimal places to maintain maximum precision, and, in this case, no zero suppression. The SubordinateAreaModified01 Formula property uses these two properties to test for "*Area not found*" and return "-" if found or the SubordinateAreaFormatted property as a string if an area is found. The formula is shown below:
This property can then be added to a Schedule Table, as shown below:
That is all well and fine if all you want to do is display the subordinate area in a Schedule Table. But what if you wanted to be able to have the Area as a numeric value, with which you could do some calculation? The same limitations encountered above will apply, and the solution used in the sample file is to accept that the Location property will have to be converted to a string to avoid an error in the formula, then to take that string and convert it into real number. In the sample file, this is handled by two separate Formula properties; you could easily combine them into one Formula property that does it all. The SubordinateAreaModified02 Formula property looks remarkably similar to the previous one, with the exception that the result when an Area is not found is "0.0" rather than "-" and the unformatted Location property is used. That is because we want to convert these values to real numbers, and non-numeric characters will cause an error.
The text values of the property would appear like the image below, if it were added to a Schedule Table.

The SubordinateAreaReal Formula property takes the value of the SubordinateAreaModified02 Formula property and uses the CDbl function to convert the strings to real numbers. Be aware that if you pass a string that contains any non numeric characters, other than an initial minus sign or a decimal point, using CDbl will result in an error. That is why the unformatted version of the Location value is used in the SubordinateAreaModified02 Formula property. The image below shows this property in a Schedule Table.
CDbl ( [SubordinateAreaModified02] )

A combined Formula property, not included in the sample file, might look something like this:
Now that we have a real number value, we can do math! [Trust me, that is a good thing.] Suppose that for rental purposes, the area of the balcony gets included at 75% of its actual area, along with the main area. The TotalAreaUnformatted Formula property is a simple, one-line calculation that does just that, and leaves the result unformatted should there be a need to do further mathematical operations on the result.
[BaseAreaUnformatted] + ( 0.75 * [SubordinateAreaReal] )
The TotalAreaFormatted Formula property simply passes through the value of the TotalAreaUnformatted property, applying the Area Property Data Format to it. If you are not going to include this value in a Schedule Tag, you could omit this property and use the TotalAreaUnformatted value as a column in your Schedule Table Style, changing the Property Data Format for the column to Area. The image below shows the formatted value in a Schedule Table.

You can click on the image below to see a larger version of the entire table, with some explanatory text below each column, or download the sample file from the Discussion Group thread and look at it live.

Change the formula properties in the examples below (or in the sample file downloaded from the Discussion Group) to test for "*Space not found*", rather than "*Area not found*". Area objects were merged into the new-and-improved Space object in 2007, so opening the sample file in 2007 or later will convert the Area objects in the sample file to Space objects, and the "not found" return value will change to "*Space not found*".
A location property will return *Xxx not found*, where Xxx is Space, Area or AEC Polygon, if the location grip for the object to which the location property is attached can not find an object of the type specified in the location property. This value is not a string - the VBScript TypeName and VarType functions crash when evaluating this value, so I have no idea what it actually is.
A denizen of the Autodesk Architectural Desktop Discussion Group posted a request for a method of dealing with this return value. The situation was one where a location property was being used with Areas, so that, where appropriate, a subordinate Area's area could be read into the main Area's properties and shown on a schedule. There would be main Areas, however, that would not have subordinate Areas; these would get the dreaded *Area not found* in the Location property and seing that in the schedule was not acceptable. When writing a Formula property to return "-" when there was no subordinate Area, the formula crashed when trying to compare the Location property value to *Area not found*. I have posted a sample file, done in ADT 2004, in a reply to that thread, that addresses the issued raised and also shows how you can create a Formula property from the Location that has a real number value with which calculations can be done. In the "not found" case, the real number is set to zero. Please note that the sample file was created to show possibilities, and the properties included are not optimized to a specific need. Some of the "formatted" properties would not be needed if the values were not being displayed in a Schedule Tag, as the "Unformmated" version could be placed as a column in a Schedule Table Style and a Property Data Format applied there. Some of the Formula properties might also be combined if there were no need for the intermediate results. Also note that the sample file was done in imperial units; the same concepts should apply to metric unit drawings as well.
 The image above shows the test objects in my sample file. There are three Area objects, two ten-foot square Areas, Living Room 100 and Bedroom 101, and a fifteen square foot Area for Balcony 101A. As you can see, Balcony 101A is subordinate to Living Room 100, as the Living Room Area's location grip is positioned over the Balcony Area. Neither the Balcony nor the Bedroom have a subordinate Area. For scheduling purposes, I created a Classification Definition that applies to Area objects, with two classifications - Main and Subordinate. The Living Room and Bedroom objects use an Area Style that has been classified as Main; the Balcony's Area Style is classified as Subordinate. This makes including only Main Areas in a Schedule Table easy, even if the Schedule Table is not in the same file as the Areas.
Writing an if condition to test the value of the Location property is fairly easy. Simply enclose the Location property and the test phrase in double quotation marks, and VBScript will do a text comparison. The problem is how to return the Location property value when an Area is found in a usable data format. You can not pass through the "raw" Location property value, as VBScript evaluates the entire formula, not just the logical path followed for each object, and *Area not found* will result in an error for Areas with no subordinate area. If the only need is a string which can be displayed in a Schedule Table, the solution is easy and the same as that for the if condition - enclose the property in double quotation marks. In the sample file, I have two location properties - SubordinateAreaFormatted and SubordinateAreaUnformatted. Both reference the BaseAreaUnformatted property of the subordinate Area; the formatted version uses the out-of-the-box Area Property Data Format; the unformatted version uses a custom Property Data Format called Standard-8, which is a copy of the Standard Property Data Format with the precision set to eight decimal places to maintain maximum precision, and, in this case, no zero suppression. The SubordinateAreaModified01 Formula property uses these two properties to test for "*Area not found*" and return "-" if found or the SubordinateAreaFormatted property as a string if an area is found. The formula is shown below:
If "[SubordinateAreaUnformatted]" = "*Area not found*" Then
 RESULT = "-"
Else
 RESULT = "[SubordinateAreaFormatted]"
End If
This property can then be added to a Schedule Table, as shown below:

That is all well and fine if all you want to do is display the subordinate area in a Schedule Table. But what if you wanted to be able to have the Area as a numeric value, with which you could do some calculation? The same limitations encountered above will apply, and the solution used in the sample file is to accept that the Location property will have to be converted to a string to avoid an error in the formula, then to take that string and convert it into real number. In the sample file, this is handled by two separate Formula properties; you could easily combine them into one Formula property that does it all. The SubordinateAreaModified02 Formula property looks remarkably similar to the previous one, with the exception that the result when an Area is not found is "0.0" rather than "-" and the unformatted Location property is used. That is because we want to convert these values to real numbers, and non-numeric characters will cause an error.
If "[SubordinateAreaUnformatted]" = "*Area not found*" Then
 RESULT = "0.0"
Else
 RESULT = "[SubordinateAreaUnformatted]"
End If
The text values of the property would appear like the image below, if it were added to a Schedule Table.

The SubordinateAreaReal Formula property takes the value of the SubordinateAreaModified02 Formula property and uses the CDbl function to convert the strings to real numbers. Be aware that if you pass a string that contains any non numeric characters, other than an initial minus sign or a decimal point, using CDbl will result in an error. That is why the unformatted version of the Location value is used in the SubordinateAreaModified02 Formula property. The image below shows this property in a Schedule Table.
CDbl ( [SubordinateAreaModified02] )

A combined Formula property, not included in the sample file, might look something like this:
If "[SubordinateAreaUnformatted]" = "*Area not found*" Then
 RESULT = 0.0
Else
 RESULT = CDbl( "[SubordinateAreaUnformatted]" )
End If
Now that we have a real number value, we can do math! [Trust me, that is a good thing.] Suppose that for rental purposes, the area of the balcony gets included at 75% of its actual area, along with the main area. The TotalAreaUnformatted Formula property is a simple, one-line calculation that does just that, and leaves the result unformatted should there be a need to do further mathematical operations on the result.
[BaseAreaUnformatted] + ( 0.75 * [SubordinateAreaReal] )
The TotalAreaFormatted Formula property simply passes through the value of the TotalAreaUnformatted property, applying the Area Property Data Format to it. If you are not going to include this value in a Schedule Tag, you could omit this property and use the TotalAreaUnformatted value as a column in your Schedule Table Style, changing the Property Data Format for the column to Area. The image below shows the formatted value in a Schedule Table.

You can click on the image below to see a larger version of the entire table, with some explanatory text below each column, or download the sample file from the Discussion Group thread and look at it live.

Subscribe to:
Posts (Atom)