September 28, 2010

ACA 2011 Update 1

Update 1 for AutoCAD® Architecture 2011 is now available, here.

The Readme (be sure to read it, especially the parts on installation and backing up of your custom files) indicates that the following ACA issues have been resolved:

3D Modeling
  • Components whose display has been turned off are shown on converting an AEC object to a 3D Solid.

Curtain Walls
  • Custom model components in a curtain wall may display incorrect material assignments in different display configurations in 3D views.

Dimensions
  • Associative dimensions may not update when walls are moved.

Drawing Management
  • Redefining an existing model space view causes AutoCAD Architecture to crash.

General UI
  • AutoCAD Architecture may crash on launching the Style Manager.

Help
  • Third-party applications based on AutoCAD Architecture cannot access their Help files through the application.

IFC
  • Some roofs may change position after executing the IFCEXPORT command.

Materials
  • The MATERIALLIST command reports the volume of only the first object in a multiple selection.

Modify
  • AutoCAD Architecture may crash while trimming entities.

Performance
  • Sometimes memory usage increases when switching back and forth between the tabs of the Properties Palette.

Renovation
  • A wall with display overrides displays incorrectly when modified in the renovation mode.

Sections
  • Creating a horizontal section may cause AutoCAD Architecture to crash.

Slabs
  • No style information is available in the Properties Palette for a slab created by applying the properties of the Slab tool to linework and walls.

Walls
  • Trimming a wall may cause doors and windows in the wall to move or disappear.

  • Walls that clean up correctly in a previous version may not clean up correctly in AutoCAD Architecture 2011.

  • Wall cleanup EIP functions such as Merge, Subtract, Fillet, and Chamfer do not work in a custom UCS.


A number of AutoCAD fixes are also listed in the Readme.
September 11, 2010

Revit® Architecture Dependent Views and Revision Clouds

Another interesting Revit® Architecture discovery I made the other day while scrambling to get some revised drawings plotted in time to reissue them yesterday. The floor plans and reflected ceiling plans of this project are shown at 1/4" = 1'-0", and three separate drawing sheets are required to do so. (See this article for the key plan from that project.)

One of the long sides of the building has an array of typical patient rooms, and there was a change to the location of the light fixtures at the patient room entrance alcoves along that entire side, due to a conflict with ductwork. We have a ceiling plan view of the entire floor, and that view has three dependent views, each cropped to one of the three sectors. Annotation placed in the dependent view shows in the parent view, and vice versa, so I often work in the parent view, since that gives access to the entire floor.

I thought I would be "efficient" to put all of the revision clouds for the revised entrance alcove lighting in one revision cloud object. You can draw multiple, separate revision clouds in sketch mode in a single revision cloud object. So I drew them all in one object on one floor, added revision tags to each sub-cloud (you have to reclick the tag tool in the ribbon for each additional tag to be added to the same object) and then clipboard copied the object and tags and pasted it aligned to the other floor. I was so proud of how efficient I had been, until I checked one of the sheets and found that the revision clouds did not show up! Then I opened each of the dependent views and saw that the revision clouds were not visible there, either.

I double-checked to see that other revision clouds I had done as individual clouds did in fact show in both the parent and dependent views (they did) and was on the verge of getting disfunctionally frustrated when it occurred to me that perhaps the reason why the clouds were not showing in the dependent views was because one cloud object had graphics that were beyond the clip boundary of each dependent view. I made two additional copies of the cloud object on one of the floors - so that I would have one for each depenent view. Then I edited each of the copies, deleting all of the clouds that were not in the dependent view to be served by that copy. Once that was done, the clouds showed up in the dependent views and I was back in business, after adding tags to the two copies and then deleting the mega-cloud on the other floor and copying the three new clouds and tags to the other floor.

In hindsight, it makes sense that an annotation object that falls outside of the annotation crop boundary would not show up in a particular dependent view, but that did not occur to me when I started the clouding task. I will have to keep that in mind in the future.

September 04, 2010

Hatch Editing With Grips - 2010 & Later

Here is an AutoCAD® feature that has been around since the 2010 release, and now that I am using that in the office, I thought it worth a mention, given how easy it makes updating non-associative hatches - even those created in previous releases. Given the problems associative hatches can have when an external reference or an AEC object is part of the boundary (when opening the file, the hatch often tries to resolve itself before all of the bounding objects have been loaded and resolved), I had taken to drawing polyline boundaries on a non-plotting layer and making hatches associative to that, so that I could edit the boundary easily should the area of hatch need to be changed in the future. Having been on the 2004 release for quite some time for production work, I was not able to take advantage of the ability to generate a boundary of an existing, non-associative hatch and make the hatch associative to it. The new grip editing feature makes this additional step unecessary.

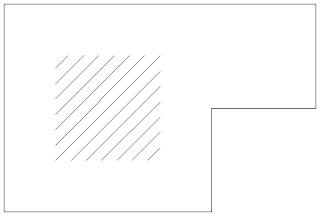
To demonstrate the grip editing feature, I have created a square, non-associative hatch (and deleted the original bounding polyline), and drawn another polyline, to which I will extend the hatch, using grip edits.
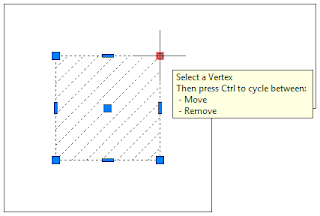
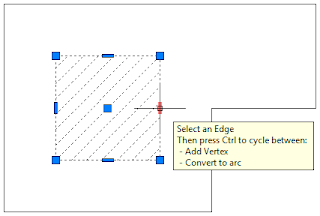
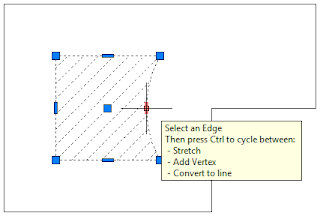
Selecting the hatch reveals a number of grips. The center grip allows you to move the entire hatch, and was present in releases previous to 2010. The Vertex and Edge grips are new in 2010 (and are also present in 2011). ACA users should be familiar with hovering the cursor over a grip to get a tooltip, possibly listing options, and that technique works here as well.Hovering over a square grip at the perimeter of the hatch (Vertex) reveals that selecting that grip will allow you to initially move the Vertex to a new location, and pressing the CTRL key will cycle to the Remove option, allowing you to delete the Vertex.Hovering over a rectangular Edge grip on a straight segment at the hatch perimeter shows that the intial action on selecting the grip will be to add a new Vertex, and that pressing the CTRL key will cycle to converting that Edge to an arc.Hovering over the rectangular grip of an arc Edge of a hatch indicates that the initial action is to stretch the arc and that you can use the CTRL key to cycle to add a new Vertex and then to convert the arc to a line.

ACA users that have used grip edits on AEC objects will have to remind themselves that the Edge grips can NOT be used to stretch a straight segement, as they can for AEC Polygons.

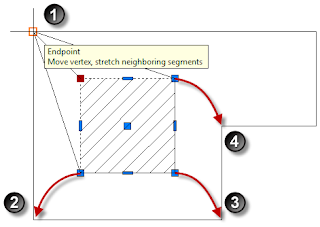
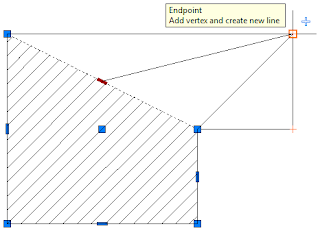
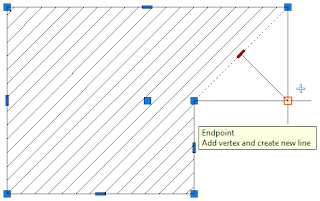
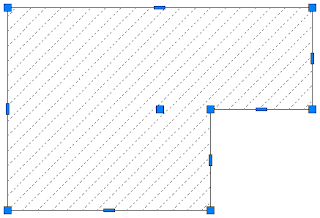
To make the square hatch fill the drawn polyline with grip editing, use the Move option to relocate the four existing Vertices to Vertices on the polyline.To fill in the remainder, select the Edge grip that is not on a segment of the polyline and use the Add Vertex mode to add a fifth......and sixth Vertex......filling the polyline.
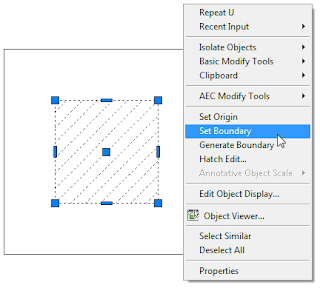
You can, of course, accomplish this simple edit in one step, by selecting the original square hatch, right clicking, choosing Set Boundary from the context menu and then picking the polyline.But in a typical drawing, where you have a lot more linework and, perhaps, several adjoining hatches, and where the linework defining the hatch edges is not a single polyline, I have found grip editing of hatches to be a very useful feature, and one that has virtually eliminated the need to delete an existing hatch and then rehatch the area.