Previous post in series [AecLineworkCrop]
The AecLineworkArray command can be found on the Home ribbon tab, on the Modify panel flyout, by selecting the AEC Array tool from the Array flyout. If the AEC Array tool is not displayed on the Array flyout, select the right side of the split button (down arrow icon) to deploy the flyout and choose the AEC Array tool.


AecLineworkArray Command Notes:
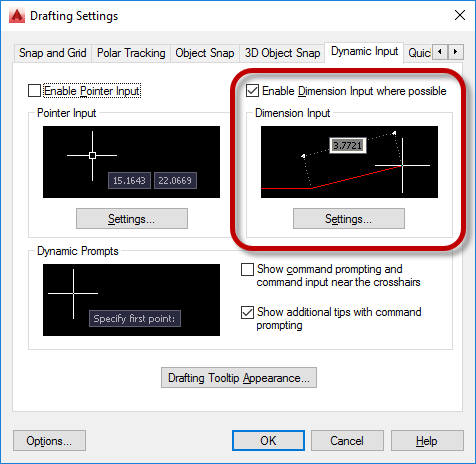
- If you do not typically work with Dynamic Input turned on, you will want to to have it on when using this command, as that will allow you to key in the spacing value; otherwise, you will need to use the Pick array distance command line option and then pick two points to define the spacing value. Verify that the Enable Dimension Input where possible toggle is checked on the Dynamic Input tab of the Drafting Settings dialog and that Dynamic Input is enabled (DYNMODE system variable is set to 2 or, if you also want pointer input, 3). With Dynamic Input so enabled, you will see a dimensional input on the screen when you are in the command, and can change the value on the fly and see the potential effect on screen before committing to the array.

- The initial prompt, Select an edge to array from or Enter to pick two points:, is asking you to define a line in the drawing. The array will run perpendicular to this line, so, for objects that are anchored to a Wall, you will want this line to be perpendicular to the Wall, so that the array projects out along the length of the Wall. A jamb line would be an appropriate choice; just hover your cursor over one until you see the highlight line, then left click to select that line. If you prefer, you can press the ENTER key and then select two points in the drawing to define the "edge to array from".
- Once the "edge to array from" is established, you will be prompted to "Drag out array elements" or choose one of the command line options. The initial spacing value and spacing method will be whatever was used for the previous use of the command. Moving your cursor away from the edge by the spacing amount will result in a two-element array; as you move the cursor even farther away, additional elements will be added. Preview graphics, in the form of a bounding box indicating the overall extents of the arrayed object(s), will show you what you will get at the current cursor position. Selecting a point when you have what you want will end the command and create the array.
- As previously noted, you can key in a spacing value to set the distance at which the array elements are spaced, if Dynamic Input is turned on and Dimension Input is enabled. The preview graphics will update accordingly.
- There are two different ways in which the spacing value is applied, and you can choose one of the two command line options to select the desired method. The Offset method arrays the elements such that the distance from a given point on one object to the same point on the next instance of that object is the spacing value. The dimension of the arrayed item(s) in the direction of the array is included within the spacing value. The Clear distance method arrays the selected objects such that the distance between the objects in the direction of the array is the spacing value. The dimension of the arrayed item(s) in the direction of the array is added to the spacing value..
- The Pick array distance command line option can be used to set the spacing value by picking points in the drawing canvas, rather than keying in a value. This can be useful if you want the spacing value to match a distance that is already constructed in the drawing, particularly if it is not a nice, round number. It can also be used if you do not want to enable Dynamic Input.
- The Enter count command line option allows you to key in the number of instances in the final array, rather than setting this by dragging your cursor on screen. This can be useful if you have a relatively large number of items in the array, and do not want to count the items in the on-screen preview to be certain you have the right amount. The initial default value for the count will be based on how many items are currently in the array based on the cursor position and spacing value. Note that once you set the count number, the command will finish and the array will be created, so be certain to have the desired spacing value and spacing method set prior to using the Enter count command line option.
- The Clear distance spacing method uses the overall dimension of the arrayed object(s), which may or may not be the "Width" dimension for a Door or Window. If the "Measure to" property of a Door or Window is set to Inside of frame, as my firm does with Doors, then you will need to take into account the additional width of the frame component at each jamb when determining the spacing value when the Clear distance method is used.