The first step is to create a Fill Pattern that defines the ceiling grid. I am assuming that you have a Fill Pattern file (PAT) that defines a Model type of pattern (as it represents a real-world object, a ceiling grid, that wants to hold the same dimensions, no matter the scale of the view in which it is seen). For the purposes of this example, I am using a custom Fill Pattern that is called Ceiling_4-24x24_1-48x6. It has four rows of 2'-0" x 2'-0" tiles, and then a row of 6" x 4'-0" tiles, as seen in the image below.

- On the Manage ribbon tab, on the Settings panel, select the Additional Settings tool to deploy the menu, and then choose Fill Patterns from the menu.

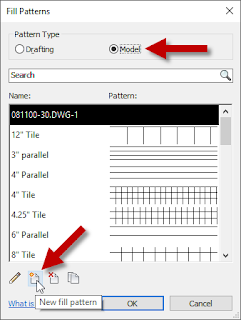
- In the Fill Patterns dialog, set the Pattern Type to Model. Then select the New fill pattern tool.
- In the Add Surface Pattern dialog, set the Type to Custom. Then select the Browse button.

- In the Import Fill Pattern dialog, navigate to the location where you saved the Ceiling_4-24x24_1-48x6.pat file, and select it. Select the Open button.
- Back in the Add Surface Pattern dialog, verify that the Name is what you want (it will default to the pattern name) and the Import scale is set to 1.00 (since this is a model pattern, and the pattern was created at full size). Select the OK button to add the Fill Pattern and dismiss the Add Surface Pattern dialog.
NOTE: This example uses a PAT file that only defines one pattern, so the desired pattern is already selected. If your desired pattern is in a PAT file that defines two or more patterns, then you will need to find and select your pattern in the list box to the left of the Browse button. Revit will only display patterns of the type selected (Model, here), and will sort them in the list alphabetically. The first pattern on the list will be selected initially, but that may not be the one you want. You can use the Search box above the list box to type in part of the pattern name you seek to make it easier to find, if the file contains a lot of Model patterns.

- You should see the newly added model pattern in the Fill Patterns dialog. Select the OK button to accept the added pattern and return to the Revit model.


Part 2 will cover creating a Material which will use the newly created Fill Pattern.