June 01, 2006

ADT/ABS Community Launch at AUGI


Today marks the launch of a new "community" at the AUGI Website. Joining the existing communities for AutoCAD and Revit is one for users of Autodesk Architectural Desktop and Autodesk Building Systems. The new community provides easy access to the ADT/ABS Forums - including the addition of three new Forums under the ADT/ABS General category: ADT/ABS Community Gallery, The Watering Hole and The WhiteBoard.

Check it out by logging in to AUGI, selecting the Product Communities link (on the left, just below the orange AUGI banner), then choosing the Architectural Desktop & Building Systems link in the left sash.

Not a member yet? It's free, and easy, just click here to get started.

May 31, 2006

Need a Date?

There are, no doubt, many ways to get a date (ask her out, already, will you?). In AutoCAD and Architectural Desktop, you can use DIESEL (Direct Interpretively Evaluated String Expression Language - not the motor fuel) to generate a formatted date string, which can be used in a menu macro or within an AutoLISP-defined command or subroutine. If you are not familiar with DIESEL, the ADT Help has detailed instructions under AutoCAD Help > Customization Guide > DIESEL.

As noted in the Help, DIESEL expressions "take strings as input and generate string results." Two DIESEL functions are needed to generate a formatted date (or time) string, "getvar" and "edtime". As you might expect, "getvar" allows you to retrieve the value of the Date AutoCAD System Variable, which the "edtime" function can then process and return as a string in the desired format.

getvar DIESEL Function:
$(getvar, varname)
returns the value in the system variable named in the varname argument.

edtime DIESEL Function:
$(edtime, time, picture)
returns a formatted date/time based on the AutoCAD Julian date specified in the time argument and the format specified by the picture argument. There are predefined codes for various date and time output (see below); any other characters are copied directly into the string. If you want a comma in your string, enclose it with double quotation marks to avoid having it be interpreted as an argument separator.

The following formatting codes are recognized by the edtime DIESEL function; output assumes that the date and time are Saturday, 3 June 2006 4:53:17.506.

Format CodeOutput Value
D3
DD03
DDDSat
DDDDSaturday
M6
MO06
MONJun
MONTHJune
YY06
YYYY2006
H4
HH04
MM53
SS17
MSEC506
AM/PMAM
am/pmam
A/PA
a/pa

The only case-sensitive formatting codes are the last four; the others generate the same output whether entered in upper or lower case ("dddd" is the same as "DDDD"). If one of the "am or pm" codes is used, the hour value will be based on a twelve-hour clock; if not, the hour value will be based on a twenty-four hour clock.

DIESEL was set up for menu macros; you can access it in an AutoLISP expression by using the menucmd AutoLISP function. The following example sets the variable sdate to a string showing the current date in "mm/dd/yyyy" format.

(setq sdate (menucmd "M=$(edtime,$(getvar, date),MO/DD/YYYY)"))


You can then use that value in your AutoLISP routine, for example, by using it as the value of an attribute in a block that your routine inserts in a drawing. You can find an example of that in this thread in the Autodesk Architectural Desktop Discussion Group. Download the ProgressDate.zip file attached to my second reply to that thread.
May 23, 2006

Retrieving the Door Type of a Door Style 2

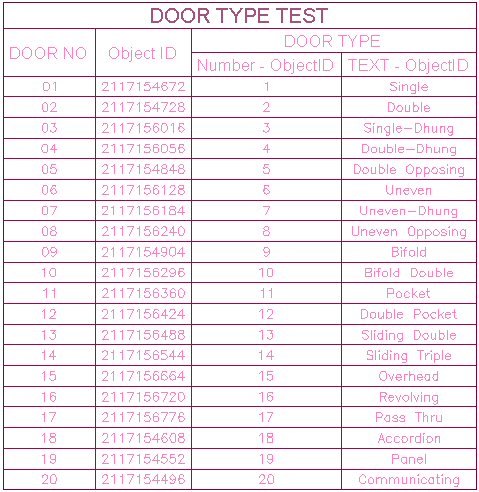
This is a follow up to my previous article on Retrieving the Door Type of a Door Style. The alternate method available to users of 2006 and 2007 mentioned does work across external references; it involves using the ObjectID Automatic Property Source, rather than the Handle Automatic Property Source, as the means for accessing the door object. The following code and images are from a test using ADT 2006. I have yet to find time to install 2007, but expect that it would work there, as well.

I have posted the sample files I used in 2006 in an additional reply to the same thread in the Autodesk Architectural Desktop Discussion Group as before. The sample file contains a modified version of the original file, with an Automatic property for the ObjectID Automatic Property Source and two formula properties, one that returns the Door Type number and one that converts that to the text string used on the Design Rules tab, in the Property Set Definition called "DoorStyles4". There is also a second file that has the sample file attached as an external reference.

The "DoorTypeNumber-ObjectID" formula looks something like this:
Set acadApp = GetObject(,"AutoCAD.Application")
Set doorObj = acadApp.ActiveDocument.ObjectIDToObject( [ObjectID] )
Set doorStyle = doorObj.Style
doorTypeInt = doorStyle.Type
RESULT = doorTypeInt


The "DoorTypeText-ObjectID" formula starts out the same, but adds a Select Case statement to return the appropriate text string:
Set acadApp = GetObject(,"AutoCAD.Application")
Set doorObj = acadApp.ActiveDocument.ObjectIDToObject( [ObjectID] )
Set doorStyle = doorObj.Style
doorTypeInt = doorStyle.Type

Select Case doorTypeInt
Case "0"
RESULT = "Custom"
Case "1"
RESULT = "Single"
Case "2"
RESULT = "Double"
Case "3"
RESULT = "Single-Dhung"
Case "4"
RESULT = "Double-Dhung"
Case "5"
RESULT = "Double Opposing"
Case "6"
RESULT = "Uneven"
Case "7"
RESULT = "Uneven-Dhung"
Case "8"
RESULT = "Uneven Opposing"
Case "9"
RESULT = "Bifold"
Case "10"
RESULT = "Bifold Double"
Case "11"
RESULT = "Pocket"
Case "12"
RESULT = "Double Pocket"
Case "13"
RESULT = "Sliding Double"
Case "14"
RESULT = "Sliding Triple"
Case "15"
RESULT = "Overhead"
Case "16"
RESULT = "Revolving"
Case "17"
RESULT = "Pass Thru"
Case "18"
RESULT = "Accordion"
Case "19"
RESULT = "Panel"
Case "20"
RESULT = "Communicating"
Case Else
RESULT = "Unknown Door Type"
End Select


The image below shows the Schedule Table in the file, and shows that both methods work when the objects are in the same file as the Schedule Table.

The Handle-based Formula properties fail when the file with the objects is externally referenced into another file, as you can see in the sample file. The image below shows just the ObjectID-based properties.

9/15/2008 Update: Using this formula in a property assigned to both Doors and Door/Window Assemblies (or any other object type where the object style does not have a type property)? Have a look at this article for how to deal with that situation.

May 22, 2006

Formula Properties Course

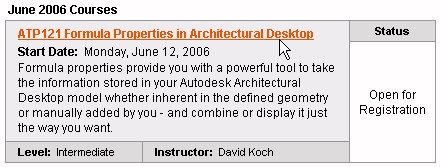
For anyone interested in learning more about the Formula property in ADT [and ABS], I will be teaching a course through the AUGI Training Program starting June 12, 2006, ATP121, "Formula Properties in Architectural Desktop".

The course is free, but does require membership in AUGI, which is also free. If you are not already a member, you can join AUGI at this site.

To sign up for the class, log in to the AUGI Website then choose the Education link under the main AUGI logo. In the left sash, choose the AUGI Training Program link and then choose the Current ATP Coruses link. Scroll down to the June 2006 courses, if necessary, and find the ATP121 course.

Click on the "ATP121 Formula Properties in Architectural Desktop" link, read the course description and then click on the Register button at the bottom of the window to register for the class.

On Monday, June 12, 2006, the course forum will open and the first segment of the course will be available for downloading, from your "My ATP" page. [Login to the AUGI Website, select the Education, AUGI Training Program and My ATP links in sequence.] I look forward to interacting with you in the class forum.

May 04, 2006

Retrieving the Door Type of a Door Style

On several occasions, I have responded to questions in the Autodesk Architectural Desktop Discussion Groups regarding whether the Door Type, which you set on the Design Rules tab of the Door Style, is available as an Automatic property type. My responses had always been, "No." It still is not (or so I am told, I have not checked 2007 yet myself), but having recently worked with methods of retrieving data from the drawing file in a Formula property for a class I will be teaching, it occurred to me this evening that I should be able to get the Door Type for a given door using a Formula property. I can report that it is possible, and have done so in ADT 2004, with one limitation: it will not work through external references, only when the Schedule Table is in the same file as the doors. There is an alternate method for users of 2006 and 2007 which should work across external references; I will confirm that in a future article, when I have time to test it.

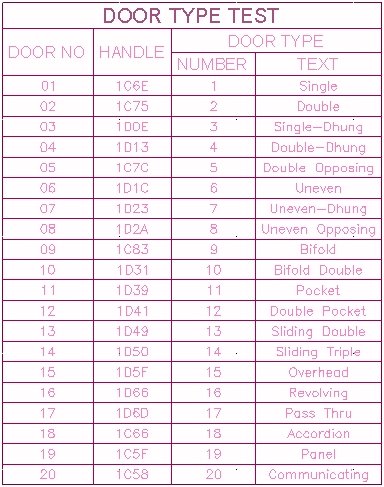
You can find the sample file that generated the images below in this thread in the Autodesk Architectural Desktop Discussion Group. The sample file contains a Door Style for each of the twenty Door Types that exist in ADT 2004, an instance of each Door Style and a custom Property Set Definition called "DoorStyles4".


The Door Styles were made by copying the Standard door style, attaching the DoorStyles4 Property Set Definition, and setting the Door Type. All other settings remain as per the Standard door style. The DoorStyles4 Property Set Definition has one Automatic property, "Handle", that uses the Handle Automatic Property Source. This allows the other two properties to access the data for each door in the drawing. Those two properties are Formula properties, called "DoorTypeNumber" and "DoorTypeText" and are independent of each other. "DoorTypeNumber" returns the quoted string stored in the Type property of the Door Style of the door. "DoorTypeText" takes that same value and uses a Select Case statement to return the "name" of the Door Type, as shown in the list box on the Design Rules tab.

The "DoorTypeNumber" formula looks something like this:
Set acadApp = GetObject(,"AutoCAD.Application")
Set doorObj = acadApp.ActiveDocument.HandleToObject( "[Handle]" )
Set doorStyle = doorObj.Style
doorTypeInt = doorStyle.Type
RESULT = doorTypeInt


The "DoorTypeText" formula starts out the same, but adds a Select Case statement to return the appropriate text string:
Set acadApp = GetObject(,"AutoCAD.Application")
Set doorObj = acadApp.ActiveDocument.HandleToObject( "[Handle]" )
Set doorStyle = doorObj.Style
doorTypeInt = doorStyle.Type

Select Case doorTypeInt
Case "0"
RESULT = "Custom"
Case "1"
RESULT = "Single"
Case "2"
RESULT = "Double"
Case "3"
RESULT = "Single-Dhung"
Case "4"
RESULT = "Double-Dhung"
Case "5"
RESULT = "Double Opposing"
Case "6"
RESULT = "Uneven"
Case "7"
RESULT = "Uneven-Dhung"
Case "8"
RESULT = "Uneven Opposing"
Case "9"
RESULT = "Bifold"
Case "10"
RESULT = "Bifold Double"
Case "11"
RESULT = "Pocket"
Case "12"
RESULT = "Double Pocket"
Case "13"
RESULT = "Sliding Double"
Case "14"
RESULT = "Sliding Triple"
Case "15"
RESULT = "Overhead"
Case "16"
RESULT = "Revolving"
Case "17"
RESULT = "Pass Thru"
Case "18"
RESULT = "Accordion"
Case "19"
RESULT = "Panel"
Case "20"
RESULT = "Communicating"
Case Else
RESULT = "Unknown Door Type"
End Select


The image below shows the Schedule Table in the sample file that displays the results of the formulas. I tagged each door with the ADT 2004 out-of-the-box, non-project door tag, and set the door numbers equal to the number corresponding to the Door Type.


5/23/2006 Update: Using ADT 2006 or later and need to have this formula work across external references? Have a look at this article.

May 01, 2006

Using Property Data Formats to Force Real Number Interpretation

When passing a numeric property through as the RESULT of a formula property to which you want to apply real-number formatting, you may have found that if the value is a whole number, the real number formatting is not applied. This is because the value gets interpretted as an integer, since it is a whole number. One common way around that is to use the CDbl conversion function to force the numeric value to be interpreted as a real number.

But what if the Reference Property value is numeric sometimes, but could be a string value other times? If you use the CDbl conversion, the formula will fail when the value is a string. One occasion when you could have this is if you change the "Undefined" value in a Property Data Format from the default ? [without quotation marks] to a string value. You would need to do this if you try to use a Formula property to combine properties from a number of different Property Set Defintions that apply to different object types, so the values can be combined into one column of a schedule. That Formula property would need to reference properties from each of the various object types, so there would be undefined references on every object. If you leave the undefined value as ?, then every single formula will fail, and you would not get any usable results. By replacing the ? with a string value, you avoid the automatic failure, but now you can not use the CDbl function to force whole numbers to be read as real numbers. See the CostObjects example in Scott Arvin's Property Data Enhancements Brain Dump for an example of this.

What to do? In the Property Data Format which is applied to the source Property being referenced, turn off zero suppression of trailing zeros, and be certain to select a Precision with at least one decimal place. Then make certain that the source Property value is forced to a real number. That way, a whole number will be formatted with a decimal point and as many trailing zeros as you specify for your Precision, and the value will be interpreted as a real number by any Formula property that references it.

April 28, 2006

Stud Size Offset

3/5/2009 UPDATE: If you are using ACA 2010 or later, you can achieve the same results using Wall Cleanup Edit in Place.

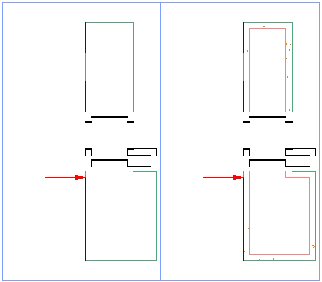
In order to avoid finished surface offsets within a room, a change of stud sizes is often made at the intersection of a perpendicular wall. When this is not possible, and you end up with two wall styles that are identical except for the stud size, with one finished face aligned, you will end up with a cleanup error, as shown below (Low Detail on the left, High Detail on the right). The problem is that the finish materials on the offset side do not align, and ADT does not know how to resolve that.

You could apply a wall merge to resolve the cleanup issue, and the Low Detail graphics are acceptable, but the High Detail graphics are not, as seen below.

If you want to have the wall appear cleaned up and have the components align, with the finish material wrapping the end of the wider stud and aligning with the finish material on the narrower stud, you will have to resort to a little "trickery". The first thing you need to know is that you can create an "open" endcap for a wall, by giving the defining polyline a non-zero thickness at any segment you wish to be invisible. The second thing you need to know is that you can specify a negative offset on an endcap, which pushes the endcap graphics out beyond the end of the wall graph line. This allows you to get the appearance of having the two walls meet WITHOUT having the graphlines touch, which would trigger a cleanup attempt, which would fail - and prevent the endcaps from showing.

The image below shows the two walls, with the endcaps applied, but separated so you can see what each end is doing. The left viewport shows Low Detail, the right viewport shows High Detail. I separated the polylines that make up the endcaps so you can clearly see each line. The narrower partition has a simple, straight-line open endcap, where the polylines are single-segment with a non-zero width. The left polyline at the wider partition projects the finish material on the side that aligns by the thickness of the finish material; the end segment has a non-zero width. The stud component polyline offsets by the difference in stud size, then projects forward by the thickness of the finish material. The segment that abuts the narrower stud has a non-zero thickness. The finish material that offsets wraps around the stud offset; the end is composed of two segments; the left segment is the width of the finish material and has a non-zero thickness; the right segment length is the difference in stud sizes and has a zero width, so that you get a line at that portion.

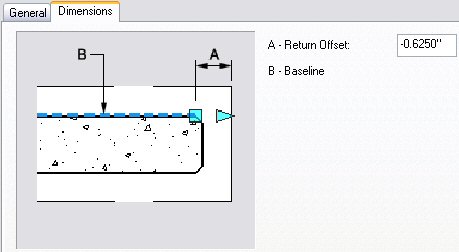
Simply drawing the polylines with the thickness of the finish material does NOT offset the endcap; if you use the Calculate Automatically option from the right-click context menu for walls, the graphline will initially extend to the end of the visible graphics. In the image above, the red arrow points to the end of the graphline, which is inset 5/8" from the end of the visible graphics. This was achieved by editing the Wall Endcap Style in the Style Manager after the endcap was created, and, on the Dimensions tab, setting a Return Offset value of -0.625", as shown below.

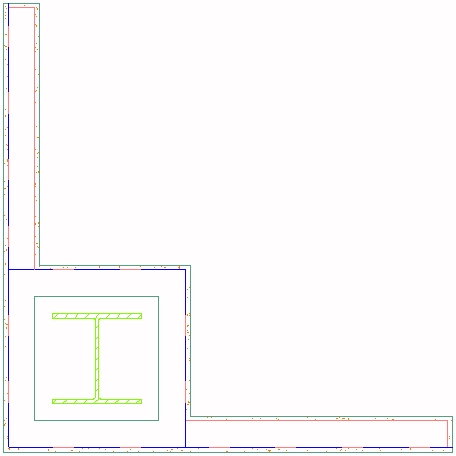
The final result can be seen below, with, as before, the Low Detail on the left and the High Detail on the right. Remember that the graphline of the narrower partition stops even with the finished face of the returning finish material; the graphline of the wider partition stops even with the end of the stud. The 5/8" gap keeps the walls from cleaning up, and the open endcaps make it look like they do clean up.

I initially tried doing the offset on the narrower partition, but got an undesirable result, as shown below. For some reason, the Shrink Wrap gets applied to the lateral offset of the narrower stud. This is particularly noticeable in Low Detail but is also present in the High Detail and would plot with the heavier Shrink Wrap lineweight. You can download a sample file that has the wall and endcap styles used to create the graphics in this article in the Cleanup at Stud Size Change thread in the Autodesk Architectural Desktop Wishes Discussion Group. Get the StudSizeOffset2.zip from my last post in that thread - Apr/27/06 - 23:34 (GMT) or 19:34 (EDT).

April 27, 2006

Stacking Properties in a Schedule Table

There is currently no ability to "stack" properties in an ADT Schedule Table, that is, to have a row where one column has one property on top of another property. But by using a Formula property, you can easily combine the values in two separate properties into one property, to be displayed in a single column. Toss in a line feed character, and you will get one property stacked on top of the other - without a dividing line, but hey, this is not Excel.

Here is an example for a Room Finish Schedule. You can get the source file that contains the formulas that generated the image below in the Split Cells in Schedule thread in the Autdesk Archtitectural Desktop Discussion Group. The formula for the "North Matl North Fin" column looks like this:

"[NorthMaterial]" & Chr(10) & "[NorthFinish]"

"[NorthMaterial]" and "[NorthFinish]" are property references. You MUST add property references by double clicking on them in the Property Definitions box [at the bottom of the Formula Property Definition dialog in 2004/2005] or the Insert Property Definitions box [at the bottom left of the Formula Property Definition dialog in 2006/2007]. Enclosing the reference in double quotation marks tells the formula to interpret the value in the NorthMaterial property as a string.

& is the concatenation operator. It tells VBScript to combine the string value in front of it with the one behind it into one string.

Chr (10) is a use of the VBScript Chr function, which takes a decimal number as an argument and returns the associated ASCII character. "10" is the ASCII character for a line feed, so this inserts a line feed character into the string, and is what causes the balance of the string to appear on a second line in the schedule table.

April 21, 2006

Wall "Bumpouts"

There are many ways to get a wall to "bumpout", whether for a column enclosure, a chase, or some other interruption. Each has its advantages and disadvantages, but my preferred way of dealing with this in metal stud and gypsum wallboard [GWB] construction is to have wall styles with GWB on only one side of the stud and "build" the bumpout just like it would be built in the real world.

This does add more walls to your drawing, including some short ones, but it offers great flexibility:
  • Draw the enclosure at any size.
  • Draw the enclosure in most any shape.
  • Position the enclosure anywhere along the length of a wall, including at the ends.
  • Edit the far ends of abutting walls without worrying whether the enclosure will be affected.
  • Edit the enclosure easily, on screen, without dialogs or in-place editing.
You can find the sample file that generated the image below in this thread in the Autodesk Architectural Desktop Discussion Group.

April 13, 2006

Matt Dillon on "Revit vs ADT"

And/or "ADT vs Revit". Read his thoughts here, and look forward to more insight from someone who uses and teaches both programs.