You can now also create multiple versions of the Quick Access toolbar as components of the CUI file, then assign one to each Workspace you define (rather than defining the Quick Access toolbar right in the Workspace, as was done in 2009). That would allow you to have the same Quick Access toolbar in multiple Workspaces and only need to edit it once to make changes to all.
If you are also a user of Inventor, or have friends or colleagues who are, you can now export Inventor part files and assemblies to AutoCAD Architecture as Multi-View Blocks.
Walls have been enhanced by adding fillet and chamfer to the list of commands available when editing wall endcaps in place. The one major, non-Ribbon feature added in this release is the ability to edit Wall cleanup in place, on a component-by-component basis, as shown in the following example.
Two stud Walls, with similar components, but different stud widths, where one face of stud aligns, will still not clean up automatically if there is no perpendicular Wall at the place where the two Walls meet.

In previous releases, one workaround for this was to simulate cleanup by creating open ended Wall Endcaps and offsetting one of them so that the linework was continuous, but the Wall graphlines did not meet.
In AutoCAD Architecture 2010, the new cleanup edit-in-place feature can be used to get the cleanup you want, without the need to create offset Wall Endcaps, and then fuss with the location of the graphline endpoints (and hope no one else messes with the results). This new feature is similar to the Wall Endcap edit-in-place feature that was greatly improved in the 2009 release.
- Select the Wall with the wider stud. Notice that the contextual Wall Ribbon tab appears and becomes active. In the Cleanup panel, select the Cleanup Edit in Place icon.
 The Wall Ribbon tab is replaced by the Edit in Place: Wall Cleanup contextual Ribbon tab. A number of commands related to editing cleanups in place can be found in this tab, but the edits needed for this task can be done using grip edit options.
 - The first component of the Wall will initially be selected. While this component will need to be modified eventually, edit the stud component first, to avoid warning messages about having the GWB component, with its higher priority number, overlapping the stud component.
 The cyan circle grips represent vertices; the cyan rectangle grips allow you to operate on the edge on which it lies. As with other edit-in-place operations, you can use the Ctrl key to cycle through options once a grip has been selected. Notice that a vertex has been conveniently placed at the location where the adjacent Wall’s stud component ends, anticipating the edit to the stud component in the Wall being edited.
 - Hover over the left edge grip and notice the options that the tool tip gives for editing that edge.
 Offset is the initial action, and is the one needed. Select the grip, and move the cursor "up" (away from the Wall end and the narrower Wall). Key in an offset value equal to the thickness of the GWB component, in this case 5/8". (I had polar tracking turned on, and 90 degrees was one of the angles. If you do not usually have polar or ortho turned on, you may want to check to be certain the offset distance is as desired, or explicitly key it in as @0,5/8). The editing of the stud component is now complete.
- Select the left GWB component. Hover over the right vertex grip and notice the options the tool tip gives for editing the vertex.
 Vertices have only two options, Move and Remove. Select the right vertex grip and move it “up” 5/8” by snapping to the endpoint of the offset stud component.
- Now select the edge grip. Press Ctrl twice to cycle to Add Vertex. Snap to the right endpoint of the offset stud edge.

- Select the edge grip on the angled edge. Press Ctrl twice to cycle to Add Vertex. Snap to the right endpoint of the narrower stud. The GWB component is now complete.

- Select the Finish icon in the Edits panel of the of the Edit in Place: Wall Cleanup tab to save the changes made. The GWB component on the side where the stud width changes now wraps the offset stud and cleans up with that of the narrower Wall.
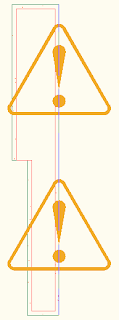
 The cleanup alert triangles are now gone.
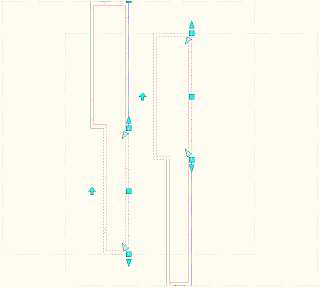
The dashed gray lines indicate that there is a cleanup override. These only show when the Graph Display Representation is active (when the Wall Justification Display is toggled on) and are on a non-plotting layer in the out-of-the-box display settings. There is also an additional cyan rectangular grip when the Graph Display Representation is active, which allows you to delete the cleanup override. NOTE: This grip will be coincidental with the end grip for the wall to which the overrides are attached, and therefore will not be selectable. Select the other wall, or select the dashed gray lines to choose the other wall and have access to the rectangular Remove Component Overrides grip. Do not use a crossing window on gray lines, as that will select both walls.
The image below has two pairs of walls, both with the offset on the wider stud as described above and the Wall Justification Display toggled on. In the pair to the left, the narrower stud wall is selected, and the rectangular Remove Component Overrides grip can be seen at the top end of the wider stud wall. In the pair to the right, the wider stud wall is selected, and the rectangular Remove Component Overrides grip is hidden by the Wall End grip. (You can tell there are at least two active grips there because no tool tip displays when hovering over the Wall End grip.)

The screen captures above were made with an earlier version of the Beta. The Ribbon icon for the Add Selected command on the Wall ribbon, partial visible in the screen capture above, has been changed in the final Beta. Since this is not the focus of this article, I did not see the need to create a new screen capture. I walked through the above steps in the final Beta and did not notice any other variation from the images shown. As always, you can click on any reduced image to see the full-size version; use the Back function of your browser to return to the main article.
No comments:
Post a Comment