Showing posts with label Wall Endcap Style. Show all posts

February 08, 2007

Creating a Wall Style with Actual Masonry Widths

The imperial masonry wall styles that ship with ADT use nominal dimensions for the masonry components; for example, an 8" CMU component is given a width of 8". Some may prefer to have the actual component widths used, 7 5/8" for the 8" CMU noted previously. A question came up in a thread in the Autodesk Architectural Desktop Customization Discussion Group from someone setting up such a wall style, having started from one of the out-of-the-box styles. After changing the widths of the masonry components, as well as reducing the Air Gap to 1", the wall endcap did not appear as desired. I posted a response and a sample file illustrating the need to create a new wall endcap style for the modified wall style, as ADT will scale the polyline graphics used to create the endcap for each component, to suit the actual width of the component. Since the two masonry components got 5/8" narrower, the scaled-down version of the original wall endcap resulted in the masonry component endcaps being "shorter" than those for the insulation, metal furring and GWB, whose widths remained the same. Here is how I created the new wall style, wall endcap style and wall opening endcap style in ADT 2004 for the modified wall. These same concepts can be applied any time you make a copy of an existing wall style and modify the widths of one or more components.

I used the out-of-the-box CMU-8 Rigid-1.5 Air-2 Brick-4 Furring wall style as my starting point, using the Style Manager to copy it from the out-of-the-box source file to a new file started with an ADT template file. I then copied and pasted that style in the new drawing file, renaming the style to CMU-7.625 Rigid-1.5 Air-1 Brick-3.625 Furring and editing the description of the wall style to match the planned changes. I also copied the associated CMU-8 Rigid-1.5 Air-2 Brick-4 Furring (End 1) wall endcap style and CMU-8 Rigid-1.5 Air-2 Brick-4 Furring (End 1)(2-Sided) wall opening endcap style to create the CMU-7.625 Rigid-1.5 Air-1 Brick-3.625 Furring (End 1) wall endcap style and the CMU-7.625 Rigid-1.5 Air-1 Brick-3.625 Furring (End 1)(2-Sided) wall opening endcap style, respectively. I edited the new wall opening endcap style to reference the new wall endcap style at the jamb start and jamb end. I then edited the CMU-7.625 Rigid-1.5 Air-1 Brick-3.625 Furring wall style and assigned the new wall endcap style and new wall opening endcap style on the Endcaps / Opening Endcaps tab as shown in the image belowand edited the widths and offsets of the components on the Components tab, changing the widths of the Brick to 3 5/8", the Air Gap to 1" and the CMU to 7 5/8" and the offsets to coordinate, as shown in the image below. You can also see my preference for using engineering units rather than architectural units; I believe that the file I posted is set to architectural units.Note that even though new endcap/opening endcap styles were created and assigned, the actual endcap remains identical to the original, out-of-the-box version. I created the copies and assigned them up front in order to make it easy to generate the new endcap style using the Endcaps > Calculate Automatically option from the wall-object context [right click] menu. The default action there is to redefine the current wall endcap style, so by having a placeholder style with the desired name already in place, I need only to say "Yes" to the prompt and I am done.

The image below shows one end of a wall drawn with the original, out-of-the-box CMU-8 Rigid-1.5 Air-2 Brick-4 Furring wall style, with the polylines that define its wall endcap style positioned just above the end and a dimension string showing the widths of the various components. I generated the polylines using the as Pline option of the WallEndcap command. This typically inserts the polylines all "bunched up" and oriented for the right side of a horizontal wall; I rotated the polylines and lined them up relative to each one's respective component.

The next image shows what a wall using the new CMU-7.625 Rigid-1.5 Air-1 Brick-3.625 Furring wall style but with the out-of-the-box CMU-8 Rigid-1.5 Air-2 Brick-4 Furring (End 1) wall endcap style would look like. Notice that the ends of the Brick and CMU components are inset from the ends of the other components, due to the scaling of the defining polylines to match the reduced widths of those components. This is the condition that the new wall endcap style will need to address.
The final image shows the new wall style with the new wall endcap style. I copied the polylines from the original, out-of-the-box wall endcap style, then edited the polylines for the Brick and CMU components to reflect the modified component widths and moved them all to properly align with the wall components. I also copied and modified the dimension string, to show the changes in the example file and in the image below. Finally, I selected the wall, right clicked, and chose Endcaps > Calculate Automatically from the context menu. Following the prompts on the command line, I selected the polylines, chose not to erase them [as I wanted to keep them for the sample file - you may want to delete them if you are certain they are correct, or keep them and erase them later after you are certain the endcap is correct], said "Yes" to modify the current endcap style [but only do so if you have already assigned a new wall endcap style to the wall, as noted above - otherwise you would be changing the wall endcap style assigned to the original wall style, which would likely not be something you want to do] and asked that the "new" [modified] wall endcap style be applied as the wall style default. And that is it - except for editing the end of the example wall back to its original position, as I had the polylines in the position shown when I updated the wall endcap style, and ADT will extend the wall to align with the polylines when the WallAutoEndcap command ends. WallAutoEndcap, by the way, is the command that is executed by the Calculate Automatically menu choice; if you are allergic to the context menus or prefer to set up a tool palette tool, toolbar tool or a keyboard short cut to initiate the Calculate Automatically process, WallAutoEndcap is the command you will need to reference.
Download the sample file I posted in the Discussion Group thread if you want to see it live.

December 16, 2006

Wall Corner Condition

I was reading a thread titled Wall Corner Condition in the Autodesk Architectural Desktop Discussion Group in which "adtcad" posted an image of a multi-component wall where the brick offset at an outside corner on both walls, and asked how to achieve that result. The image below is similar to the one attached by "adtcad". (Click on any image to see a larger version.)


John Mumaw suggested using plan modifiers. Not having much opportunity to do so as part of my work, I took the opportunity to explore his suggested method and failed miserably. I am hoping that he or someone else with extensive plan modifier experience can post a working example of his approach so that I (and others) can reverse engineer what was done and add another weapon to my ADT arsenal.

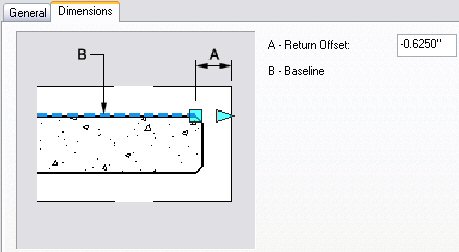
Undeterred, I fell back on a technique that I have had many occasions to use, wall endcaps. One feature of wall endcaps with which you may be unfamiliar is the option to set a "return offset" on the Dimensions tab when editing a Wall Endcap Style. If you provide a positive number, the endcap moves away from the end of the wall, toward the middle of the wall. A negative number, on the other hand, will move the endcap beyond the end of the wall, and is key to using wall endcaps to simulate cleanup or to get wall components to offset at wall ends, as endcaps are not shown at wall ends that clean up with another wall.

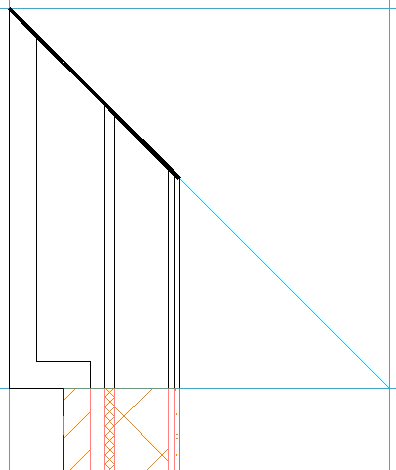
I posted a sample file as a reply in that thread, which includes the walls that generated the image above, as well as the polylines I drew to create the endcap, as shown in the following image.

Note that the polylines all start and end on a line drawn perpendicular to the length of the wall, and that all of the polyline segments have a width of zero, except for the ones along the 45-degree angle. Zero-width segments will be drawn as component edges, when those are set to display. Segments with a width will not be drawn, creating an open condition at the component which can be used to simulate cleanup between walls that have adjoining endcaps.

I used the wall context menu Endcaps > Calculate Automatically to generate the Wall Endcap Style from the polylines I drew, setting it to be an override, as I chose not to make this the style's default endcap condition.

This will create the endcap, but not the offset, and will extend the wall used to create the endcap so that the endcap appears on top of where the polylines were drawn.

Then I opened the Style Manager and found my newly created Wall Endcap Style, under the Architectural Objects folder. In the sample file I posted, the Wall Endcap Style is called "CMU-8 Rigid-1.5 Air-2 Brick-4 Furring Four-Foot Brick Pier Open End Beveled - Projected 56 (End 1)". On the Dimensions tab, I set a Return Offset of -56", so that the entire endcap would project beyond the end of the drawn wall.
That much of a projection would not be necessary - if you keep the cleanup radii of both walls at zero, any negative projection would do - but I chose to do that so that the wall end has meaning, relative to the brick offset. If you look closely at the first image, you can see that I had the wall graph display toggled on, and the wall end occurs right where the brick offsets. The walls were drawn left justified, so the wall graph line occurs at the outside face of the brick.

Finally, I stretched the wall back down 56" to get the endcap back to its original position and added a second wall, applying the same endcap to the adjoining end.

Check out the Wall Corner Condition thread if you are interested in seeing the sample for yourself, or just to take a good, long laugh at my pathetic attempt to follow Mr. Mumaw's suggestion, as I left those in the file, as well.

April 28, 2006

Stud Size Offset

3/5/2009 UPDATE: If you are using ACA 2010 or later, you can achieve the same results using Wall Cleanup Edit in Place.

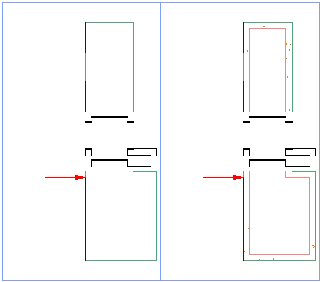
In order to avoid finished surface offsets within a room, a change of stud sizes is often made at the intersection of a perpendicular wall. When this is not possible, and you end up with two wall styles that are identical except for the stud size, with one finished face aligned, you will end up with a cleanup error, as shown below (Low Detail on the left, High Detail on the right). The problem is that the finish materials on the offset side do not align, and ADT does not know how to resolve that.

You could apply a wall merge to resolve the cleanup issue, and the Low Detail graphics are acceptable, but the High Detail graphics are not, as seen below.

If you want to have the wall appear cleaned up and have the components align, with the finish material wrapping the end of the wider stud and aligning with the finish material on the narrower stud, you will have to resort to a little "trickery". The first thing you need to know is that you can create an "open" endcap for a wall, by giving the defining polyline a non-zero thickness at any segment you wish to be invisible. The second thing you need to know is that you can specify a negative offset on an endcap, which pushes the endcap graphics out beyond the end of the wall graph line. This allows you to get the appearance of having the two walls meet WITHOUT having the graphlines touch, which would trigger a cleanup attempt, which would fail - and prevent the endcaps from showing.

The image below shows the two walls, with the endcaps applied, but separated so you can see what each end is doing. The left viewport shows Low Detail, the right viewport shows High Detail. I separated the polylines that make up the endcaps so you can clearly see each line. The narrower partition has a simple, straight-line open endcap, where the polylines are single-segment with a non-zero width. The left polyline at the wider partition projects the finish material on the side that aligns by the thickness of the finish material; the end segment has a non-zero width. The stud component polyline offsets by the difference in stud size, then projects forward by the thickness of the finish material. The segment that abuts the narrower stud has a non-zero thickness. The finish material that offsets wraps around the stud offset; the end is composed of two segments; the left segment is the width of the finish material and has a non-zero thickness; the right segment length is the difference in stud sizes and has a zero width, so that you get a line at that portion.

Simply drawing the polylines with the thickness of the finish material does NOT offset the endcap; if you use the Calculate Automatically option from the right-click context menu for walls, the graphline will initially extend to the end of the visible graphics. In the image above, the red arrow points to the end of the graphline, which is inset 5/8" from the end of the visible graphics. This was achieved by editing the Wall Endcap Style in the Style Manager after the endcap was created, and, on the Dimensions tab, setting a Return Offset value of -0.625", as shown below.

The final result can be seen below, with, as before, the Low Detail on the left and the High Detail on the right. Remember that the graphline of the narrower partition stops even with the finished face of the returning finish material; the graphline of the wider partition stops even with the end of the stud. The 5/8" gap keeps the walls from cleaning up, and the open endcaps make it look like they do clean up.

I initially tried doing the offset on the narrower partition, but got an undesirable result, as shown below. For some reason, the Shrink Wrap gets applied to the lateral offset of the narrower stud. This is particularly noticeable in Low Detail but is also present in the High Detail and would plot with the heavier Shrink Wrap lineweight. You can download a sample file that has the wall and endcap styles used to create the graphics in this article in the Cleanup at Stud Size Change thread in the Autodesk Architectural Desktop Wishes Discussion Group. Get the StudSizeOffset2.zip from my last post in that thread - Apr/27/06 - 23:34 (GMT) or 19:34 (EDT).

January 19, 2006

Half-inch GWB on Stud Wall Style

The out-of-the-box imperial walls styles use 5/8" GWB. That works fine for me, as that is my office's standard. If you want to use 1/2" GWB, you can easily make your own styles by using the following procedure. The example starts with a 3 1/2" stud, but you can apply the principles to any of the stud styles. Styles with multiple layers of GWB will require that the endcap polylines of several components be modified.

  1. Using the Style Manager or the Content Browser, bring the Stud-3.5 GWB-0.625 Each Side Wall Style into a new drawing. In the Style Manager [Walls category, under Architectural objects], edit the wall style.

  2. On the General tab, rename the style to Stud-3.5 GWB-0.5 Each Side. Edit the description to indicate 1/2" GWB.

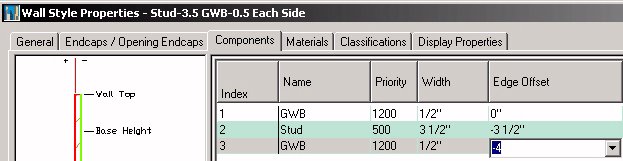
  3. On the Components tab, change the width of the GWB components [numbers 1 and 3] to 1/2". Change the edge offset of Component 3 to -4". OK out to your drawing.

  4. Draw a "vertical" segment of the wall using the new style, from a point [say 0,0,0] to "@0,60". Zoom in on the upper end and note the gap in the endcap. This is because the endcap is was designed for 5/8" GWB, so ADT is scaling the endcap components down to make it fit 1/2" GWB, and that shortens up the part that is reaching across the stud.

  5. Still zoomed in, select the wall, right click and choose Endcaps > Edit In Place from the context menu. Select a point near the top end. If the left GWB component endcap polyline is highlighted, proceed, otherwise, hit Esc to deselect the right GWB component endcap polyline and select the left one. Grip edit the right end and stretch it to the right until it touches the left side of the right polyline. Click on the Save All Changes button of the In-Place Edit toolbar to save you changes.

  6. Open the Style Manager. In the Wall Endcap Styles category, rename the Stud-3.5 GWB-0.625 Each Side (End 1) style to Stud-3.5 GWB-0.5 Each Side (End 1), as you have changed the style to work with 1/2" GWB. Finally, in the Wall Opening Endcap Styles category, rename the Stud-3.5 GWB-0.625 Each Side (End 1)(2-Sided) style to Stud-3.5 GWB-0.5 Each Side (End 1)(2-Sided).

Now you can copy the modified wall style back to a source file [whether the out-of-the-box source file or one of your own, to make tracking your custom styles easier] and create a Tool palette tool from the new style. If you need to do this for many wall styles, you can save some time and rename the Wall Endcap Style at the same time you edit the Wall Style.

August 07, 2005

Modifying an Out-of-the-box Wall Style and Endcap

In response to a thread in the Autodesk Architectural Desktop 2006 Discussion Group, I posted a sample file and explanation of one way to take one of the out-of-the-box wall styles that has an endcap, and modify both the wall style and create a new endcap for the modified style. The example shows converting a wall style with 5/8" GWB on a metal stud to 1/2" GWB on the same metal stud.

The original poster managed to resolve his problem using in-place editing; my post explains how to use the WallEndcap command to generate the defining polylines of an existing Wall Endcap Style, then use those to create a new Wall Endcap Style for the modified wall style.