In order to avoid finished surface offsets within a room, a change of stud sizes is often made at the intersection of a perpendicular wall. When this is not possible, and you end up with two wall styles that are identical except for the stud size, with one finished face aligned, you will end up with a cleanup error, as shown below (Low Detail on the left, High Detail on the right). The problem is that the finish materials on the offset side do not align, and ADT does not know how to resolve that.

You could apply a wall merge to resolve the cleanup issue, and the Low Detail graphics are acceptable, but the High Detail graphics are not, as seen below.
If you want to have the wall appear cleaned up and have the components align, with the finish material wrapping the end of the wider stud and aligning with the finish material on the narrower stud, you will have to resort to a little "trickery". The first thing you need to know is that you can create an "open" endcap for a wall, by giving the defining polyline a non-zero thickness at any segment you wish to be invisible. The second thing you need to know is that you can specify a negative offset on an endcap, which pushes the endcap graphics out beyond the end of the wall graph line. This allows you to get the appearance of having the two walls meet WITHOUT having the graphlines touch, which would trigger a cleanup attempt, which would fail - and prevent the endcaps from showing.
The image below shows the two walls, with the endcaps applied, but separated so you can see what each end is doing. The left viewport shows Low Detail, the right viewport shows High Detail. I separated the polylines that make up the endcaps so you can clearly see each line. The narrower partition has a simple, straight-line open endcap, where the polylines are single-segment with a non-zero width. The left polyline at the wider partition projects the finish material on the side that aligns by the thickness of the finish material; the end segment has a non-zero width. The stud component polyline offsets by the difference in stud size, then projects forward by the thickness of the finish material. The segment that abuts the narrower stud has a non-zero thickness. The finish material that offsets wraps around the stud offset; the end is composed of two segments; the left segment is the width of the finish material and has a non-zero thickness; the right segment length is the difference in stud sizes and has a zero width, so that you get a line at that portion.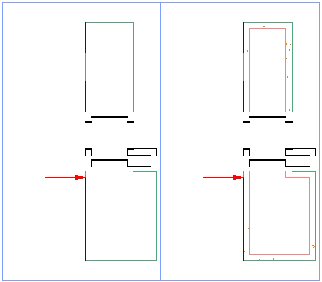
Simply drawing the polylines with the thickness of the finish material does NOT offset the endcap; if you use the Calculate Automatically option from the right-click context menu for walls, the graphline will initially extend to the end of the visible graphics. In the image above, the red arrow points to the end of the graphline, which is inset 5/8" from the end of the visible graphics. This was achieved by editing the Wall Endcap Style in the Style Manager after the endcap was created, and, on the Dimensions tab, setting a Return Offset value of -0.625", as shown below. 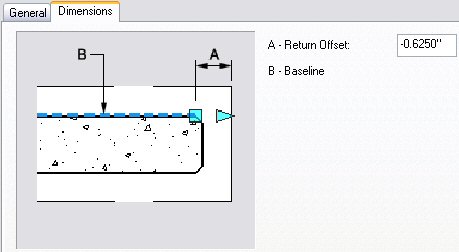
The final result can be seen below, with, as before, the Low Detail on the left and the High Detail on the right. Remember that the graphline of the narrower partition stops even with the finished face of the returning finish material; the graphline of the wider partition stops even with the end of the stud. The 5/8" gap keeps the walls from cleaning up, and the open endcaps make it look like they do clean up.
I initially tried doing the offset on the narrower partition, but got an undesirable result, as shown below. For some reason, the Shrink Wrap gets applied to the lateral offset of the narrower stud. This is particularly noticeable in Low Detail but is also present in the High Detail and would plot with the heavier Shrink Wrap lineweight. You can download a sample file that has the wall and endcap styles used to create the graphics in this article in the Cleanup at Stud Size Change thread in the Autodesk Architectural Desktop Wishes Discussion Group. Get the StudSizeOffset2.zip from my last post in that thread - Apr/27/06 - 23:34 (GMT) or 19:34 (EDT).
No comments:
Post a Comment