A unit block is an AutoCAD block definition in which all of the graphics are drawn within the confines of a one-unit by one-unit area (or, for 3D blocks, a one-unit by one-unit by one-unit volume). The block can then be inserted with X- and Y-scale factors (or X-, Y- and Z- scale factors in the case of a 3D block) equal to the actual size of that instance.
For example, HVAC supply diffusers are often represented by a rectangle with opposite corners connected by diagonal lines
You could set up a number of blocks for all of the different sizes you would need (or, in more recent versions, master the creation of dynamic blocks). Or, you can create a single, unit block and then set the X- and Y- scale values to get the size needed for a particular instance.
The unit block concept remains useful, even with the advent of dynamic blocks, as ACA objects that use blocks (such as for the view blocks of Multi-View Blocks or for custom display blocks added to many object types) often can take advantage of the unit block concept, and dynamic blocks will not remain dynamic when nested within an ACA object.
September 02, 2011
August 30, 2011
Early AU Registration for AU Members
"Early" registration for AU 2011 is now open for AU members. Regular registration starts September 7. Register at the AU website.
August 17, 2011
Autodesk University 2011 Course Catalog
The class catalog is out for Autodesk University 2011.
Anyone still wondering where Autodesk's priorities lie may want to consider that setting Autodesk Revit Architecture as the Software and leaving all other filters set to All (or, for Keywords, blank) returns 137 hits.
Doing the same for AutoCAD Architecture returns 22 hits. Of those 22 hits, a number are actually Revit Architecture classes incorrectly classified or are about making the transition from ACA to RA. Two are AMEP classes. Quite a few others are about some other topic but mysteriously list AutoCAD Architecture as the software.
So ACA actually only has one hands-on lab and four lectures (one of which mentions ACA in the title but lists Navisworks as the primary software). Yet somehow they managed to set up the schedule such that there are two time conflicts, so at most you could take three ACA-related classes. Hardly worth the cab fare from the airport.
No doubt there are misclassifications in the 137 hits for Revit Architecture, and there are unconference and virtual classes in there too, but I bet you can fill just about every class slot with something related to Revit Architecture.
Anyone still wondering where Autodesk's priorities lie may want to consider that setting Autodesk Revit Architecture as the Software and leaving all other filters set to All (or, for Keywords, blank) returns 137 hits.
Doing the same for AutoCAD Architecture returns 22 hits. Of those 22 hits, a number are actually Revit Architecture classes incorrectly classified or are about making the transition from ACA to RA. Two are AMEP classes. Quite a few others are about some other topic but mysteriously list AutoCAD Architecture as the software.
So ACA actually only has one hands-on lab and four lectures (one of which mentions ACA in the title but lists Navisworks as the primary software). Yet somehow they managed to set up the schedule such that there are two time conflicts, so at most you could take three ACA-related classes. Hardly worth the cab fare from the airport.
No doubt there are misclassifications in the 137 hits for Revit Architecture, and there are unconference and virtual classes in there too, but I bet you can fill just about every class slot with something related to Revit Architecture.
July 23, 2011
ACA: Adding a Style-Based Property Set
A style-based Property Sets is handy in that you only need to attach it to the Style or Definition once, and then it travels with the Style without any additional effort on your part. Most automatic properties are good candidates for a style-based Property Set, as are manual properties whose values remain constant for all instances of the Style or Definition. Location properties should generally be in object-based Property Sets, since the location grip will not be generated unless the object has at least one Location property in an object-based Property Set.
Creating a style-based Property Set is quite easy. When creating the Property Set Definition in the Style Manager, indicate that it should apply to Styles and Definitions by using the radio button at the top of the Applies To tab.
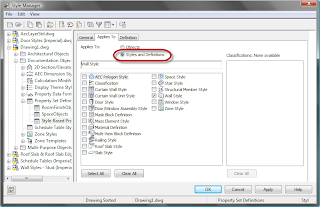
Then pick the object type(s) to whose style(s)/definition(s) the Property Set Defintion is to apply. Go to the Definition tab and add the properties you want in the set, if you have not already done so.
Now that you have a style-based Property Set Definition, you need to attach it to one or more styles/definitions (of the type you chose on the Applies To tab). In the Style Manager, create/edit such a style or definition. On the General Tab
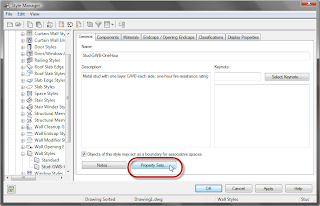
click on the Property Sets... button. This will open the Edit Property Set Data dialog. If your style or definition does not already have a style-based Property Set attached, the dialog will be blank. Click on the Add Property Sets button (right button at the lower left corner). Note that the button will not be active if there are no style-based Property Sets in the current drawing that apply to the object style/definition being edited and that have not already been added. In the Add Property Sets dialog, review the list of eligible Property Sets and make certain that a check mark is in front of all those you wish to add (and not in front of any you do not want to add), and then click OK to add the Property Sets.
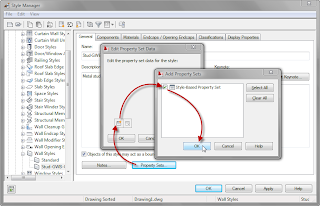
This will return you to the Edit Property Set Data dialog, and you can review the attached properties and, if there are manual properties, you can set the desired values. Also note that now that this style has a Property Set added, the Remove Property Sets button is now active (right button at lower left, next to Add Property Sets button). Click OK to accept the changes you made, and now your style-based Property Set is attached and the Properties therein are available to Schedule Tables and Schedule Tags.
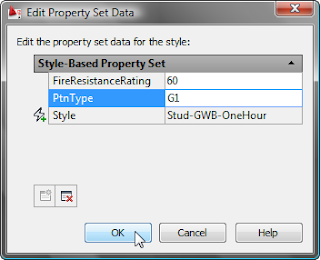
For office-standard style-based Property Sets, you will want to add the set to your style/definition source file, so when users add the style/definition to a drawing, the Property Set is already attached.
Creating a style-based Property Set is quite easy. When creating the Property Set Definition in the Style Manager, indicate that it should apply to Styles and Definitions by using the radio button at the top of the Applies To tab.

Then pick the object type(s) to whose style(s)/definition(s) the Property Set Defintion is to apply. Go to the Definition tab and add the properties you want in the set, if you have not already done so.
Now that you have a style-based Property Set Definition, you need to attach it to one or more styles/definitions (of the type you chose on the Applies To tab). In the Style Manager, create/edit such a style or definition. On the General Tab
click on the Property Sets... button. This will open the Edit Property Set Data dialog. If your style or definition does not already have a style-based Property Set attached, the dialog will be blank. Click on the Add Property Sets button (right button at the lower left corner). Note that the button will not be active if there are no style-based Property Sets in the current drawing that apply to the object style/definition being edited and that have not already been added. In the Add Property Sets dialog, review the list of eligible Property Sets and make certain that a check mark is in front of all those you wish to add (and not in front of any you do not want to add), and then click OK to add the Property Sets.
This will return you to the Edit Property Set Data dialog, and you can review the attached properties and, if there are manual properties, you can set the desired values. Also note that now that this style has a Property Set added, the Remove Property Sets button is now active (right button at lower left, next to Add Property Sets button). Click OK to accept the changes you made, and now your style-based Property Set is attached and the Properties therein are available to Schedule Tables and Schedule Tags.
For office-standard style-based Property Sets, you will want to add the set to your style/definition source file, so when users add the style/definition to a drawing, the Property Set is already attached.
June 06, 2011
Revit Tip - Unwanted Linework Revisited
Thanks to a comment posted by Andrew to my Revit Tip - Masking Regions post, I am a step further along on my Revit journey. He correctly pointed out that the Linework tool would be a better choice for getting rid of the unwanted line.
On the Modify ribbon tab, on the View panel, click on the Linework tool, shown below in Revit Architecture 2011.
(As always, click on any reduced-size image to see the image full size. Use the Back button on your browser to return here.)
On the Modify|Linework ribbon tab, on the Line Style Panel, set the Line Style to <Invisible lines> in the Line Style drop down list.
Now you can select the unwanted linework in the View in which you do not want to see it, and make it invisible with a single click. That is far more efficient than using a Masking Region to hide a single line.
If you change your mind later, you can restore the linework you made invisible by using the same Linework tool and setting the Line Style to <By Category> (or any other visible Line Style, if you do not want to use its default appearance).
On the Modify ribbon tab, on the View panel, click on the Linework tool, shown below in Revit Architecture 2011.
(As always, click on any reduced-size image to see the image full size. Use the Back button on your browser to return here.)On the Modify|Linework ribbon tab, on the Line Style Panel, set the Line Style to <Invisible lines> in the Line Style drop down list.
Now you can select the unwanted linework in the View in which you do not want to see it, and make it invisible with a single click. That is far more efficient than using a Masking Region to hide a single line.If you change your mind later, you can restore the linework you made invisible by using the same Linework tool and setting the Line Style to <By Category> (or any other visible Line Style, if you do not want to use its default appearance).
June 01, 2011
Update 2 for ACA 2011 Now Available
You can download Update 2 for AutoCAD® Architecture 2011 here.
According to the Readme, this Update is NOT cumulative; you will need to install Update 1 first, if you have not already done so. Be certain to read through the entire Readme before installing the update. According to the Readme, the following ACA items have been addressed in Update 2:
Annotation Scaling
Detail Components
Doors/Windows
Drawing Management
General UI
Multi-View Blocks
OpenLight
Structural Members
Walls
See my previous article, for the Updates addressed by Update 1.
According to the Readme, this Update is NOT cumulative; you will need to install Update 1 first, if you have not already done so. Be certain to read through the entire Readme before installing the update. According to the Readme, the following ACA items have been addressed in Update 2:
Annotation Scaling
- If two drawing units are different, the annotative blocks of the previous drawing version might be inserted with incorrect scale.
Detail Components
- Some detail components might not be added in the UK profile after installing Update 1.
Doors/Windows
- When you insert doors or windows evenly between the grid line or between walls, the elevation of the inserted doors or windows may result to a zero value.
Drawing Management
- Clearing the XML file in the current project may cause AutoCAD Architecture to crash.
- Renaming or renumbering the sheet in the Project Navigator may cause AutoCAD Architecture to crash.
General UI
- Accessing some tools from the Tool palettes may cause AutoCAD Architecture to crash.
Multi-View Blocks
- Exporting Multi-View Blocks to AutoCAD may result in incorrect sizes.
- In 3D shaded visual styles, a Multi-View Block created from circle with specified thickness might be drawn double.
OpenLight
- When the OpenLight plug-in is installed, the changes in the display configurations may not be maintained.
Structural Members
- When the start offset of a structural member is larger than its logical length, may cause AutoCAD Architecture to crash.
Walls
- Changing the view cube from parallel to perspective from the shortcut menu after selecting a wall may cause AutoCAD Architecture to crash.
- Clicking the Add Vertex button for some walls while editing in-place may cause AutoCAD Architecture to crash.
- Converting a 3D solid object created by extruding profile along a certain path to wall may cause irregular geometry.
- If the walls are with separate wall components which have bottom elevation offset, these walls may not display correctly in plan view.
See my previous article, for the Updates addressed by Update 1.
May 06, 2011
Revit Tip - Masking Regions
This may be old news to more experienced Revit users, but this was not covered in the "basics" training and was not discovered by anyone on my project team during the design and documentation phases. When generating elevations and sections from the Revit model, there will often be "artifacts" in the view that you would not want to see in the final elevation or section. Or there will be items that do not appear as you would like, but the effort to edit the model to get them to show properly in elevation or section is simply not worth it or the overhead of modeling the necessary detail slows the model excessively.
Masking Regions to the rescue! The problem we had with the Masking Regions was that the items to be masked almost always intersected or abutted linework that we wanted to keep. The boundary lines for Masking Regions default to invisible lines, which makes sense, but, unfortunately, if you place the boundary at the linework you want to keep, the mask extends to the midpoint of that linework. This is particularly noticeable on linework with a heavy lineweight, but is true for all linework.
The initial solution was to grip edit the Masking Region and pull it back slightly, to avoid losing desired graphics. This was tedious, and, when done poorly, either left a (smaller) divot in the linework to remain, or left a small part of the line to be masked protruding. While my efforts during construction documents were mostly focused in other areas, I have had to make revisions during construction, and found this process to be very unsatisfactory, until I realized that the boundary lines do not have to be invisible, nor do they all have to be the same.
By matching the Line Style of the boundary lines to that of the linework for segments that align with linework to remain, the Masking Region fully hides the unwanted linework without removing a piece of the linework that is to remain.

Masking Regions to the rescue! The problem we had with the Masking Regions was that the items to be masked almost always intersected or abutted linework that we wanted to keep. The boundary lines for Masking Regions default to invisible lines, which makes sense, but, unfortunately, if you place the boundary at the linework you want to keep, the mask extends to the midpoint of that linework. This is particularly noticeable on linework with a heavy lineweight, but is true for all linework.

The initial solution was to grip edit the Masking Region and pull it back slightly, to avoid losing desired graphics. This was tedious, and, when done poorly, either left a (smaller) divot in the linework to remain, or left a small part of the line to be masked protruding. While my efforts during construction documents were mostly focused in other areas, I have had to make revisions during construction, and found this process to be very unsatisfactory, until I realized that the boundary lines do not have to be invisible, nor do they all have to be the same.
By matching the Line Style of the boundary lines to that of the linework for segments that align with linework to remain, the Masking Region fully hides the unwanted linework without removing a piece of the linework that is to remain.
April 28, 2011
Revit - Rectangle Tool in Families
Here is a tip that I picked up watching one of The Revit Kid's videos a while back, and it has proved to be sufficiently useful that I thought I would make note of it here. When drawing linework that you intend to constrain to Reference Planes in a Revit Family, if you are drawing a rectangle, use the Rectangle tool.
Not only does it allow you to draw four lines with two clicks, but it also allows you to draw those lines in place and then activate the constraints. No need to use the Align tool after drawing the linework.
(As always, you can click on a reduced-to-fit image to see it full size. Use the Back button in your browser to return to the blog article.)

Not only does it allow you to draw four lines with two clicks, but it also allows you to draw those lines in place and then activate the constraints. No need to use the Align tool after drawing the linework.
(As always, you can click on a reduced-to-fit image to see it full size. Use the Back button in your browser to return to the blog article.)
April 25, 2011
Controlling Did You Know Balloon Notifications
If you never made much use of the Communication Center, you may not miss its absense on the InfoCenter toolbar in the upper right corner. (I am assuming that the shipping version and the release candidate beta have the same interface elements and that this was not added back in at the last minute.)
Once you have to manually close a Did You Know message more than one time, you may recall that you were able to have the Did You Know messages close after a period of time that you specified, using the InfoCenter Settings dialog that you accessed from the Communication Center.
Now how are you going to make those settings?
Fortunately, you still can do so, but you need to know how to access the InfoCenter Settings dialog. Open the Options dialog (one way - from the Application Menu - the big red "A" in the upper left corner - choose the Options button at the lower right corner) and on the System tab, in the InfoCenter area in the lower right corner, click the Balloon Notifications button. This will open the InfoCenter Settings dialog and let you change Did You Know messages from Display until closed to Use balloon notification display time. You can set the number of seconds that balloon notifications display and also choose how transparent the balloons are.
If you do not want to see the Did You Know messages at all, you can also just clear the checkmark in the toggle in front of Did You Know messages (or all balloon notifications).

Once you have to manually close a Did You Know message more than one time, you may recall that you were able to have the Did You Know messages close after a period of time that you specified, using the InfoCenter Settings dialog that you accessed from the Communication Center.
Now how are you going to make those settings?Fortunately, you still can do so, but you need to know how to access the InfoCenter Settings dialog. Open the Options dialog (one way - from the Application Menu - the big red "A" in the upper left corner - choose the Options button at the lower right corner) and on the System tab, in the InfoCenter area in the lower right corner, click the Balloon Notifications button. This will open the InfoCenter Settings dialog and let you change Did You Know messages from Display until closed to Use balloon notification display time. You can set the number of seconds that balloon notifications display and also choose how transparent the balloons are.
If you do not want to see the Did You Know messages at all, you can also just clear the checkmark in the toggle in front of Did You Know messages (or all balloon notifications).
Labels:
2012,
ACA,
DYK Balloon,
InfoCenter
April 22, 2011
Autodesk Discussion Groups and IE9
If you have "upgraded" Internet Explorer to Version 9 and have suddenly found that your posts in the Autodesk Discussion Groups are showing up with a blank message body, try turning on Compatibility View.
Supposedly, there is a button for this at the end of the Address Bar, but I did not have one.
I had to turn on the Menu Bar (which I would have done, anyway) and then chose Tools > Compatibility View while the Discussion Group site was up on the active tab, and then I was able to post a reply and have the text show up.
Supposedly, there is a button for this at the end of the Address Bar, but I did not have one.

I had to turn on the Menu Bar (which I would have done, anyway) and then chose Tools > Compatibility View while the Discussion Group site was up on the active tab, and then I was able to post a reply and have the text show up.
Subscribe to:
Posts (Atom)

