February 28, 2021

AMEP: Plumbing Line "Label" with a Leader

A question came up the other day, concerning Plumbing Lines and the "Label Curves" that AutoCAD MEP provides to label those Plumbing Lines. The request was to be able to be able to label a short Plumbing Line - one shorter than the label itself - by offsetting the label and connecting the label back to the Plumbing Line with a leader.

The results of some quick research suggested that Label Curves do not have a leader option, when offset from the Plumbing Line that they are labeling. I am not sure if there is some inherent limitation here, or it just was never part of the specification for the object. They certainly have many useful features, like masking the Pluming Line, if desired, and repeating at a specified distance or a specified number of times - but no leader.

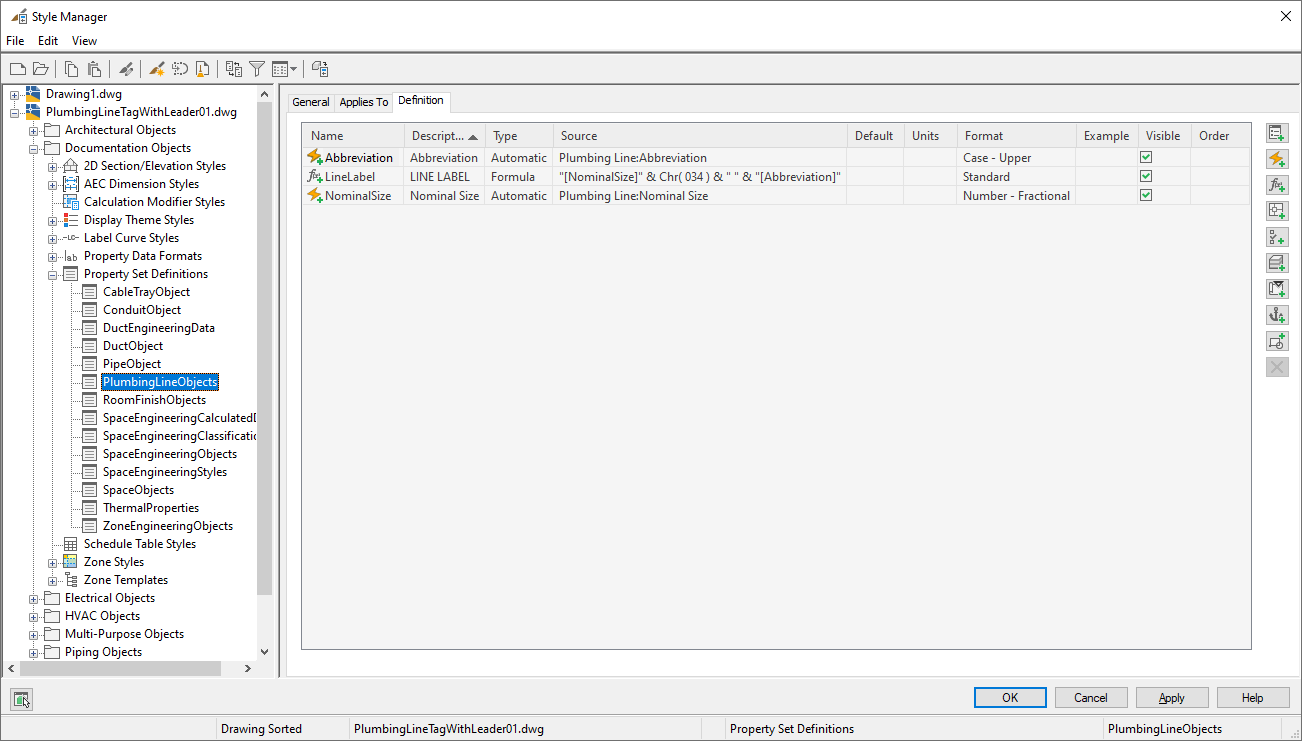
It occurred to me that, for the stated case of a short Plumbing Line, that the masking and repeating features were not necessary, and that a Schedule Tag, which can have an integral leader, could be created that looks just like the Label Curve, if the data displayed by the Label Curve was available in Property Data. It turns out that, at least for the Standard - Pipe With System Label Label Style, which shows the Object Props. and Abbr. System Name, Plumbing Lines have corresponding Automatic Property sources: Nominal Size and Abbreviation. I was able to create a Property Set Definition that applies to Plumbing Lines and includes three properties:
  • Abbreviation, created from the Abbreviation automatic property source. The Case - Upper Property Data Format was applied to this property.
  • NominalSize, created from the Nominal Size automatic property source. Since I was working in imperial units (it is one of my habits), I applied the Number - Fractional Property Data Format to this property.
  • LineLabel, a formula property, creates the string that is to be displayed in the Schedule Tag. It is a simple concatenation of the text equivalent of the NominalSize property, an inches symbol [via Chr(034)], a space and the Abbreviation property. The Standard Property Data Format was applied to this property.
A Schedule Tag can then be created to display the value in the LineLabel property, a Schedule Tag tool can be created for that Schedule Tag, the tool properties can be edited to include a leader and then the tool can be used to place a tag with a leader. The result can be seen in the image below, where the short Plumbing Line segment has both an offset Label Curve and a Schedule Tag with a leader, so you can compare the two.

January 28, 2021

Revit: Tip When Making the Transition from Network to Named User Licenses

Here is something of which I wish I was aware prior to the change over from network to named-user licenses. If all of your users were already set up with BIM 360 Design licenses (which were always named-user) and were always signed into Revit with their Autodesk Account, then this will not be an issue for you. But if you have users that are not signed into Autodesk Account when using Revit under a network license, chances are that their default Revit user names are not the same as the Username on their Autodesk Accounts. Make certain everyone synchronizes and relinquishes all object ownership in all Revit models while still using a network license BEFORE you change them to named user.

Once on named user, your users have to be signed in, and their Revit user names will be "locked" as the Usernames associated with their Autodesk Account. If that differs from their previous user names, they will not be able to synchronize their old local files, nor will they be able to create a new local under their old user names so that they can relinquish ownership of objects.

The users may be able to copy/paste unsynchronized changes, and the central file can be opened detached and then a new central file can be created from the detached copy to get rid of ownership issues (once everyone who can synchronize/relinquish does so), but nobody really wants to do any of that.

You might think no one would ever close Revit having only saved changes locally, or without relinquishing all ownership, but you would be wrong. I have already run into this twice.

January 24, 2021

Network Licenses, Options File, Adding Users to a Group

Not sure I really need to record this knowledge for the future, since we will soon be out of the Autodesk network license business completely. All but 30 of our network licenses made the jump to named-user licenses last Thursday. Perhaps I will post something about that experience, once the dust settles and my anger subsides. Returning to the subject of this post, I needed, for the first time, to set up an options file to limit access to those remaining 30 licenses for those running Revit 2016, since the 2016 (and older) releases of Autodesk software have to be uninstalled and reinstalled to change the license type. In my opinion, that is too much work for something that will no longer be "of right" licensed in two or three months. But we do have a few active projects in Revit 2016 that the project teams do not want to upgrade (or do not want to upgrade at this point in time, due to imminent deadlines). The problem is we were not able to convert everyone over to named user licenses for 2017 and later versions before the end of the grace period, and the unconverted users were taking all of the licenses.

What I discovered this evening/this morning is that when specifying the user names for the group I was creating in the options file, you do NOT include the "@" and the computer name as part of the user name. I had always seen users being reported with their Windows login name followed by "@" and then the name of the computer on which they were running the software that was asking for the license, so I foolishly assumed that was how the user name should be specified. But when I reread the license with the new options file in place, I was not able to get a license myself, and someone who had a license checked out who was on the list was also denied. I panicked, and put back the old options file. I looked at the instructions again, and noticed that the examples only had a user name, without any machine designation. I then added my user name, without a machine name in addition to my user name with a machine name, reread the license, and I was able to get a license. Then I removed my user name with the machine name, and it still worked. Adding the other user with out the machine name allowed that license to also be checked out, convincing me that was the correct approach. So now all users that I want to include have the"@" and machine name removed, and I am fairly confident that will work. I guess I will see Monday morning.

December 04, 2020

Revit: Text Parameter Value Driven by Four or More Yes/No Parameters

Regarding my last post, I would be remiss if I did not point out that FAIR59 also replied, with a more elegant solution that is also easier to expand to 5, 6 or more parameters. Check out that post here.

December 01, 2020

Revit: Text Parameter Value Driven by Four Yes/No Parameters

I came across an interesting request in the Autodesk Revit Architecture forum the other day. The person wanted to have four Yes/No parameters (called A, B, C and D) determine the value of a text parameter (called TEXT), based on the following conditions:
  1. If two or more of the four Yes/No parameters are checked, the value of TEXT is to be "SELECT ANY ONE".
  2. If none of the four Yes/No parameters are checked, the value of TEXT is to be "NO TEXT".
  3. If only the A parameter is checked, the value of TEXT is to be "A".
  4. If only the B parameter is checked, the value of TEXT is to be "B".
  5. If only the C parameter is checked, the value of TEXT is to be "C".
  6. If only the D parameter is checked, the value of TEXT is to be "D".

The solution I devised uses a series of nested if statements to work through all of the possibilities. The condition of the first if statement is an or. Each item in the or is an and of a pair of the Yes/No parameters. There is an and for each possible combination of the four Yes/No parameters. If both items in at least one of the combinations of Yes/No parameters is true, then the entire or evaluates to true. That takes care of all of the situations where two or more of the Yes/No parameters are checked, and "SELECT ANY ONE" is returned.

The else of the first condition then launches a series of if statements that tests whether a given Yes/No parameter is checked, starting with A. If A is checked, "A" is returned; if not, another if statement tests for a check in B. If B is checked, "B" is returned, and so on through to D. If D is checked, "D" is returned; if not, "NO TEXT" is returned.

Here is the formula:
if(or(and(A, B), and(A, C), and(A, D), and(B, C), and(B, D), and(C, D)), "SELECT ANY ONE", if(A, "A", if(B, "B", if(C, "C", if(D, "D", "NO TEXT")))))

And a screen capture:

November 25, 2020

Revit: Extracting Level Names in Dynamo

A few weeks back, I had a request to be able to filter a Door Schedule by the Level to which the Doors in the project were associated. That is a choice if you are only scheduling Doors in the current model, but is not an option if your Schedule includes Doors in linked models. I suggested that a Dyanmo graph could be created that would read the Level of each Door and write the Level name to a separate parameter, which could then be used for filtering. The graph would need to be run in each of the models, and, if there are later changes that add more Doors, re-run. Pretty standard stuff for a Dynamo graph.

There is just one problem with that - the built-in Revit parameter Level does not return just the name of the Level, but instead returns what is shown in the image below.

I ran those results through the String from Object node to be certain the values were seen as strings. (I suppose I should try it without that node to see if it is really necessary, but I have not done so yet.) It may be possible to extract the level name for each item on the list using a series of nodes, or perhaps some code in a code block, but the amateur programmer in me wanted to work out how to do so in Python, and it turned out be be quite simple, using string slicing. The start index of the Level name is one more than the index of the equals sign ("=") and the end index of the slice is the index of the comma. A simple for loop processes each item in the list and appends it to the result list. The image below shows the code.

October 27, 2020

Autodesk Extends Previous Version Access

In case you missed this announcement, starting on November 2, 2020, subscription and maintenance customers will have access to the current version and the five most-recent prior versions. Currently, access is limited to the current version and three prior versions.

Technical support will continue to only be provided for the current version and three prior versions. But for large projects, as well as for those medium to small projects that just never seem to end, this may allow you to avoid having to upgrade files to a newer version due to the original authoring version no longer being available.

July 31, 2020

Emojis in File Names

File this one under, "Just because you can, does not mean you should."

A colleague had called my attention to the fact that, in Windows 10, you are allowed to use emojis in file names. (Press the Window key + . to call up a dialog that allows you to select one.) I was pretty sure AutoCAD would have a problem with that, but I was surprised to find that I was able to create a file called 🍕.dwg and AutoCAD had no problems with it.


I do not recommend doing this with project files. I will also note that I did nothing beyond creating the file. I have not fully tested this. For example, I did not see what happens if I try to externally reference this file, or even just inserting it as a block into another file.

July 10, 2020

Dynamo: Building User Options into a Graph

The goal of the graph on which I was working when I needed to know how to add Shared Parameters to the Other Parameter Group was to allow a user to easily add additional shared parameters that we use to track issued Sheets in our Drawing List Schedule. Our template files have the first ten of these in them, and for some projects, that is enough. Others have many more than ten issuances, particularly those that track issuances during the design phases. We have twenty additional Shared Parameters in our Shared Parameter file; adding more than one of them is tedious, at best.

Using the Parameter.AddSharedParameter node from Erik Falck Jørgensen's Orchid package makes it easy to bulk-add Shared Parameters in a Dynamo graph. For this particular task, however, I wanted to be able to offer the end user the choice of adding the second group of ten parameters, the third group of ten parameters or both the second and third groups of ten parameters, without creating separate graphs for each group of ten additional parameters, and without the user having to go into the graph and make adjustments. My solution was to use a Python Script node to handle the user options. Two separate lists of the Shared Parameter names are created, and two Boolean nodes with Is Inupt set allow the user to choose to include one or both of those lists when the graph is run. The Python Script node has four inputs; two for the lists (IN[0] and IN[2]) and two for the Boolean nodes (IN[1] and IN[3]). The image below shows the simple Python code that gathers the input values and then tests the Boolean values, adding the associated list of Shared Parameter names to the output list if the Boolean is set to True.

In Dynamo Player, when the user finds the graph file and selects the Edit Inputs tool, this is what she or he sees:
Both Booleans are intially set to False. Should the user run the graph with both set to False, the Parameter List result will display the string to which the listOut variable is set if the list is empty: "Select at least one set of Parameters to add. " The user only needs to click on the "switch" displayed for each "Add Issues" Boolean to toggle it to True.

The switch turns green when set to True. Once the desired list(s) are set to True, selecting the Play tool will run the graph and the selected Shared Parameters will be added to the active project. The Parameter List result will display a list of the names of the Shared Parameters that were added.

As always, you can select an image to see it full size.

July 02, 2020

Dynamo: Other Parameter Group

Long time, no post. If anyone is still reading this blog, I hope you and your families are doing well in these trying times. A combination of being busy with work (remotely) and not having anything about which to write caused this rather long gap between posts.

I came across something today that I wanted to document for future reference. I was working on a Dynamo graph to automate the adding of specific shared parameters as project parameters in a Revit project file, using the Parameter.AddSharedParameter node from Erik Falck Jørgensen's Orchid package.

One of the required inputs is the Group under which the parameter will be organized. The particular parameters with which I was dealing are a continuation of ten that we already have in our project template files, and they are located under the "Other" group. The Select BuiltIn Parameter Group node that ships with Dynamo is used to generate the needed value, but PG_OTHER is not on the list from which you select. The first item on the list, INVALID, might not seem like something you would want to select, but in this case, that is the correct choice, to have the parameters created placed under the Other category.