December 31, 2005

Named Page Setups

I have been a big proponent of using Named Page Setups ever since I finally figured out what they were back in ADT 2/AutoCAD 2000. They were all but hidden in the Page Setup/Plot dialogs back then, but well worth the effort to find, as they make restoring commonly used plot settings a breeze.

Anyone who is not familiar with Named Page Setups should take a look at this article in Heidi Hewett's AutoCAD Insider blog. She covers how to set these up in AutoCAD 2005 and 2006 [which also applies to ADT 2005 and 2006], complete with illustrations. ADT users who take advantage of the Drawing Management features should also note that you can access the Page Setup Manager directly from the right-click menu from the Sheets tab in Project Navigator.


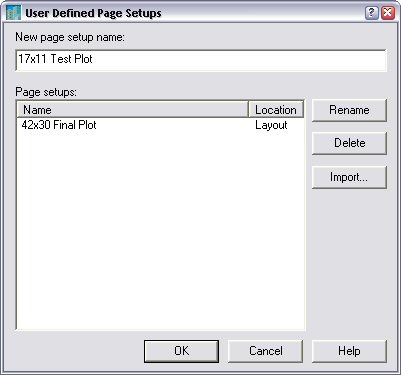
In AutoCAD 2000/ADT 2 through AutoCAD/ADT 2004, the key is knowing that the Add... button in the "Page setup name" area in the upper right, next to the page setup dropdown list, opens the User Defined Page Setups dialog. Before you push that button, set up your plotter and plot settings on the Plot Device and Layout Settings tabs. Then click on the Add... button.


This will call up the User Defined Page Setups dialog.
Type in the name you want to use for your named page setup in the "New page setup name" edit box - at work, I use the name of the plot style table, the name of the printer, the scale, the drawing size and the orientation [portrait/landscape] - and click on OK. Curiously, if you ever want to rename or delete a named page setup or import one or more from another drawing file, you also need to click on the Add... button. Perhaps the button could have had a better name, but until you upgrade to 2005 or later, you will just have to remember that the Add... button provides access to creating and managing Named Page Setups.

Setting up Named Page Setups for your typical plotting tasks and saving them - in your template files, if you have the authority to do so, or in an easy-to-find source file from which you can import them into other drawings - can save you a ton of mouse clicks and makes it easier to get everyone to use the same settings. If you use Sheet Sets [see Heidi's blog for an ongoing series of articles on these] or Project Navigator in ADT, you can take advantage of Named Page Setups when setting up your Publish options [2005 and later only].

December 30, 2005

New URL for Triple D Design Wiki

The URL for the Triple D Design Wiki has been changed. I have updated the link in the sidebar at the right, or you can click here. Thanks again to Beau Turner for setting up and maintaining this resource for the architectural community. You can read more about the recent changes in this article in Beau's will render for food... blog.

December 28, 2005

Schedule Basics Brain Dump for 2006

Matt Dillon posted a tutorial on Schedule Basics to the AutoCAD Architectural Desktop Release 2 Discussion Group over six years ago, when Release 2 was new. Chris Yanchar included the text of that post in his Brain Dump collection [number 13, if you are counting]. I had recently posted the text of that Brain Dump, along with another by Matt, number 15 on creating custom Schedule Tags, in response to a thread in the Autodesk Architectural Desktop 2005 Discussion Group, where I was reminded that things have changed a bit since Release 2. The directions in the original tutorial could no longer be followed verbatim, and while the original poster in the 2005 thread managed to work out how to do things in the current interface, it occurred to me that an update of the tutorial to match the current release was in order. I got my start in understanding the scheduling feature in ADT using Matt's tutorial [thanks again, Matt!] and I imagine quite a few others have done so.

I have taken the liberty of updating the tutorial for ADT 2006, editing the instructions to conform to the 2006 interface, and adding a liberal helping of screen captures. The ADT 2004 Brain Dumps [see this article for links] raised expectations on the graphic quality of Brain Dumps - which, in fairness to the originals, were mostly posts to the Discussion Groups and had no way to incorporate graphics. The updated tutorial can be found in the ZIP file attached to the first post in this thread in the Autodesk Architectural Desktop Content Discussion Group. The ZIP file contains the revised tutorial in two formats: DWF and PDF.

I was planning to update the Schedule Tag tutorial, but given that the following have already been made available, reworking Matt's ADT 2 tutorial seems redundant. Check out these articles on creating Schedule Tags in ADT 2006:

ADT 2006 Tags Illustrated - in this blog
Creating Custom Object Tags in ADT 2006 - in Matt Dillon's blog
Create Custom Tags in Architectural Desktop, the Easy Way - CAD Digest article by Peter Gehring of Synergis

Remember - if you can schedule circles, you can schedule anything!

December 27, 2005

Not Sure What Software to Use? Ask Diana

If you are considering which Autodesk Building Solutions Division product is right for your firm, you can now "talk" to Diana. You can hook up with Diana here. Diana does all of the talking - you will need speakers or headphones to get anything out of this site - you click or type in responses. Diana will ask you a series of questions, which varies based on your responses, then she will come up with a recommendation of the best software for your situation.

I spent enough time this afternoon chatting with Diana to make my wife jealous; fortunately she has been out of the house most of the day and she only reads this blog if I show her an article. I certainly did not try all of the possible responses to Diana's inquiries - for example, I always chose architectural design, rather than structural design or MEP engineering, since that is what I do. I also indicated that I needed my software to do "all of the above" - design faster, evolve designs more efficiently and document more accurately. Most of the time I indicated I was using Architectural Desktop currently, although I did a few runs through saying I either used paper or a non-Autodesk software product.

Given the current heavy marketing push for Revit from Autodesk, it should come as no surprise that in the vast majority of run throughs I did, Revit Building was the product that was recommended. Size of firm, whether you share files with MEP engineers using Autodesk Building Systems or whether you have extensively customized AutoCAD using LISP or VBA seem to have little impact on the recommendation. I found the latter particularly remarkable, especially since Diana notes that maintaining the investment in customization would be an important factor.

The key questions appear to be whether you are currently using design software or paper and whether, if your firm were a teenager, you would
  1. Buy an iPod as soon as you saw one.
  2. Buy an iPod after your friends had done so.
  3. What's an iPod?
If you score high on the Luddite scale on those two questions - using paper and not knowing what an iPod is, you may be recommended ADT, particularly if you indicate that you share files with engineers using ABS.

If you currently use ADT, and you know what an iPod is, you may be asked a third critical question: "Are you interested in Building Information Modeling?" If you answer yes, then Revit Building will be recommended. Only if you answer no will Diana indicate that your current software is right for you.

December 24, 2005

Schedule Table Placeholders

Here is the situation: You have set up a project in Autodesk Architectural Desktop, and you have used the scheduling feature to set up a Schedule Table – for the example here, a door schedule. The project has gone out to bid, a contract is awarded, things are moving along smoothly, when suddenly the Owner wants to make a change. I know that never happens in real life, but lets assume it does for purposes of this article. ;-)

The change involves the deletion of one door. You could simply erase it from the file and refresh your schedule, and the door would disappear from the schedule. But you may not want all record of that door to be lost – you may want to keep at least some vestige of it as a reminder that the original bids included an additional door and that some credit is due back to the Owner, assuming that fabrication and installation are not already complete.

There are several ways you could handle this. Rather than erasing the door, you could release the wall anchor, move the door to a non-plotting layer and leave the door in the schedule. If your schedule has a "Notes" column, you could add text there indicating that the door has been deleted. You might emphasize the deletion by manually drawing a line through the schedule for that door, but then you would need to be careful that the line stayed on the correct door during any later changes to the schedule.

Another way to emphasize that this door has been deleted would be to delete the contents of all of the manual data attached to the door, perhaps copying the Door Style to a new name [appending "DELETED" to the original name might be a good choice] and deleting any style-based manual data. You could also set up a manual property that could be set to "DELETED" for a deleted door, then use formula properties that test for "DELETED" in that property and return a result of an empty string for automatic properties for deleted doors or the appropriate automatic value for non-deleted doors. That can get very complicated, particularly if you are using imperial units and showing a door opening with one of the "preformatted" automatic properties, such as Door Size – PR WxH, as formula properties do not take kindly to passing through strings with embedded double quotation marks.

An alternate method, which can reduce, or, depending upon the data you display in your Schedule Table, eliminate the need for fancy formulas, is to set up a "placeholder object" that will substitute for the deleted door, carrying only the property data you wish to remain in the schedule – in this example, only the door number.

You can find a ZIP file that contains two sample files attached to a post I made to a thread titled Doors & Door Schedules in the Autodesk Architectural Desktop 2005 Discussion Group. It may be helpful to download the ZIP file, extract the drawing files and have them open when going through the balance of this article. The DoorPlaceholderTest-Bidding.dwg file shows the file at the time of bidding, with all three doors in the schedule. The DoorPlaceholderTest-Construction.dwg shows the file after the 101B door has been deleted and replaced by the placeholder object.

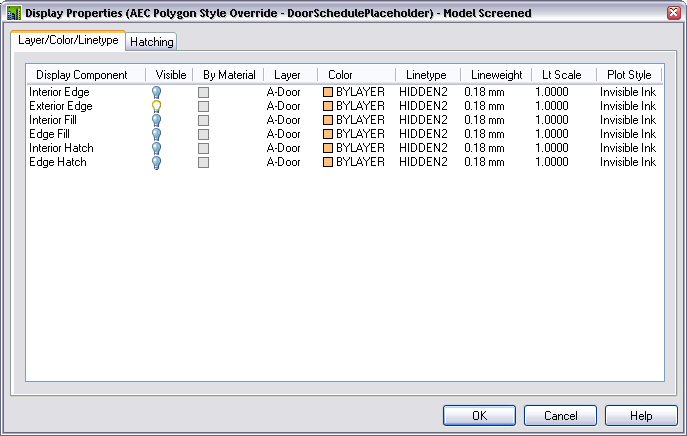
The sample files make use of an AEC Polygon as the placeholder object. Any object could be used, but by chosing a style-based ADT object, you can deal with both object-based and style-based Property Sets. A special AEC Polygon Style was created, called DoorSchedulePlaceholder, with style-level display overrides, turning off all but one component and applying the "Invisible Ink" plot style so the object will not plot. I did notice that in a plot preview, if the placeholder object is in front of other linework the invisible ink plot style overwrote the other linework with the background color. If you are not using "merge pens", you may need to send the placeholder objects to the back of the draw order, so the invisible ink does not overwrite any linework you want to keep. If you are using Xrefs, you may want to experiment with this to see if there are problems with display order. If so, you should be careful not to overlap any plottable objects with the AEC Polygon. If I were doing this all over again, I would probably have chosen to assign the component to a non-plotting layer, instead of using the invisible ink plot style.

Model Display Representation Style Overrides

Model Screened Display Representation Style Overrides


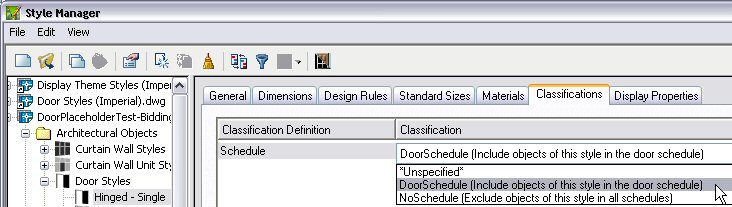
In order to be able to restrict the AEC Polygon Styles that will show up in the schedule to just the placeholder style, a Classification Defintion called "Schedule" was created. This will also allow you to restrict the Property Set Definitions that are used by your schedule to just the placeholder AEC Polygon Style. The Schedule Classification Definition in the sample files has two choices: NoSchedule and DoorSchedule. If you were going to extend the placeholder concept to other schedule types, you could add additional classifications if you wanted to use a different AEC Polygon Style for the placeholders in the other schedules. Note that you will also have to assign the DoorSchedule classification to all of the Door Styles you wish to include in the schedule. You can set any Door Styles that you do not want to have schedule [existing doors, toilet partition doors, etc] as well as any other AEC Polygon Styles to the NoSchedule classificiation, although leaving them unclassified will also exclude them from the schedule. I prefer to set the NoSchedule classification on the style so it is evident that I intentionally excluded that style, rather than simply forgot to set a classification for it.
Setting the Classification in an AEC Polygon Style

Setting the Classification in a Door Style


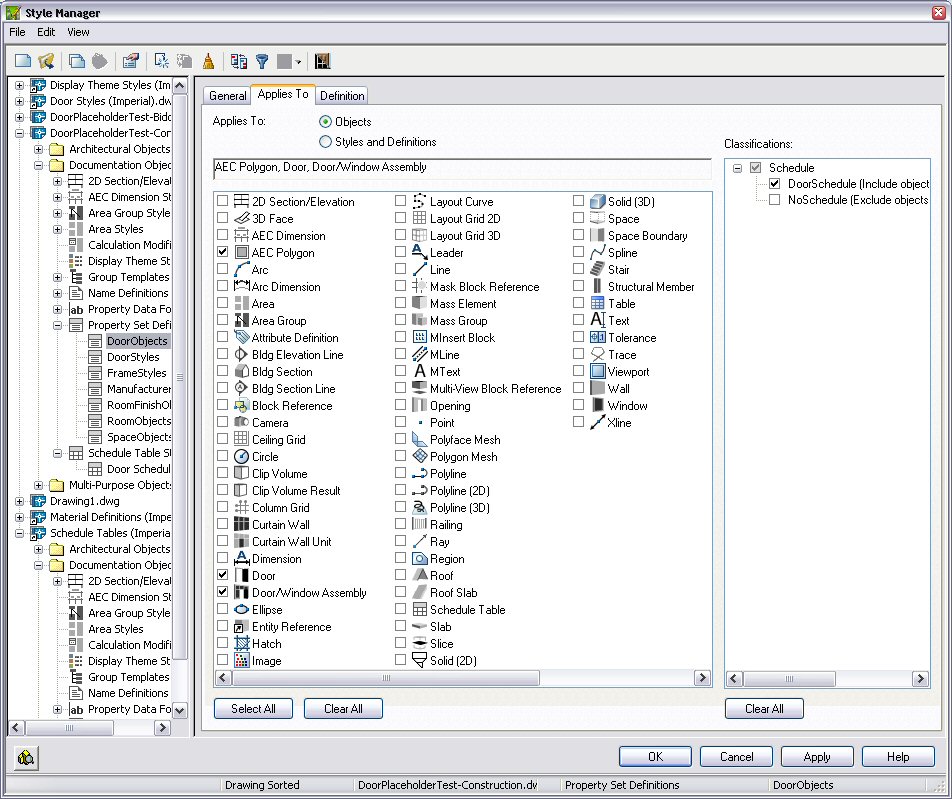
The DoorObjects, DoorStyles and FrameObjects Property Set Definitions, which are used by the out-of-the-box Door Schedule Schedule Table Style, as well as a copy of that Schedule Table Style, renamed to "Door Schedule Room Based", were edited to allow them to apply to AEC Polygon objects or styles, and were restricted to apply to only those objects that had the DoorSchedule classification set in the style. The Applies To tab of the DoorObjects Property Set Definition is shown in the image below, with the object types to which the defintition applies checked on the list box to the left and the classification to which the definition applies checked on the right; the settings on the others is similar.
Applies To Tab For DoorObjects Property Set Definition


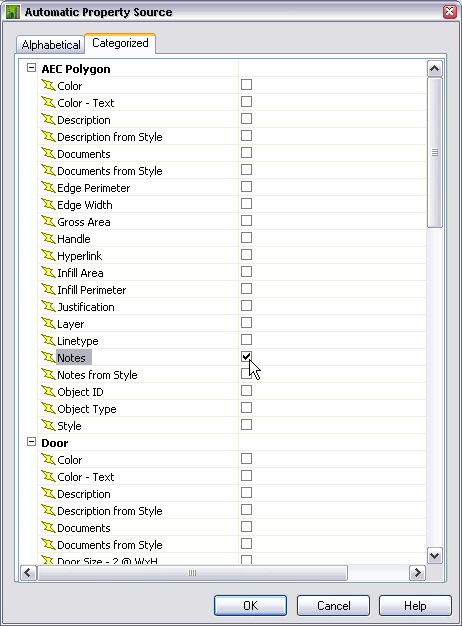
The goal is to have all of the table cells for the deleted object blank, except for the door number in the "Mark" column. Text-type manual properties can simply be set to a null string to achieve this effect. Automatic properties and numeric manual properties will require some modifications to the Property Set Definitions. After adding the AEC Polygon to the Property Set Definitions, you can then edit the automatic properties and assign an appropriate automatic property for AEC Polygons. In the sample file, the "Notes" automatic property for AEC Polygons is used for all the automatic properties in the schedule, and the Notes on the AEC Polygon object is left blank. Edit each automatic property, find the Notes property under the AEC Polygon heading, and hold the CTRL key down while clicking on the box to the right of the Notes property. Holding the CTRL key down makes that selection apply only to the AEC Polygon heading, and keeps the choices for Doors and Door/Window Assemblies as they were. Choosing a property for AEC Polygons for each automatic property in the schedule keeps an AEC Polygon in the schedule from displaying question marks; choosing a property that can be set to display an empty text string allows the data for the placeholder to appear as blank.
Setting the AEC Polygon Source for the Width Automatic Property


The out-of-the-box Door Schedule includes columns for two style-based real-type manual properties for LouverWidth and LouverHeight, from the DoorStyles Property Set Definition. These default to a value of 0, but can not be set to an empty string, since they are expecting a real number value. You could just set these to 0 in the DoorStyles Property Set attached to the DoorSchedulePlaceholder AEC Polygon Style and live with the schedule reporting 0” for the louver width and height, but in order to achieve a totally blank line in the schedule, the sample files renamed the manual properties to LouverWidthUnformatted and LouverHeightUnformatted and changed the Property Data Format assigned to them to Standard. This will allow these to be read by a formula property as a real number without any additional text characters, so they can be passed through without worrying about embedded double quotation marks when using imperial units. You can read more about unformatted properties in these blog articles: Unformatted Properties for Formulas and Unformatted Properites and Numeric Precision.

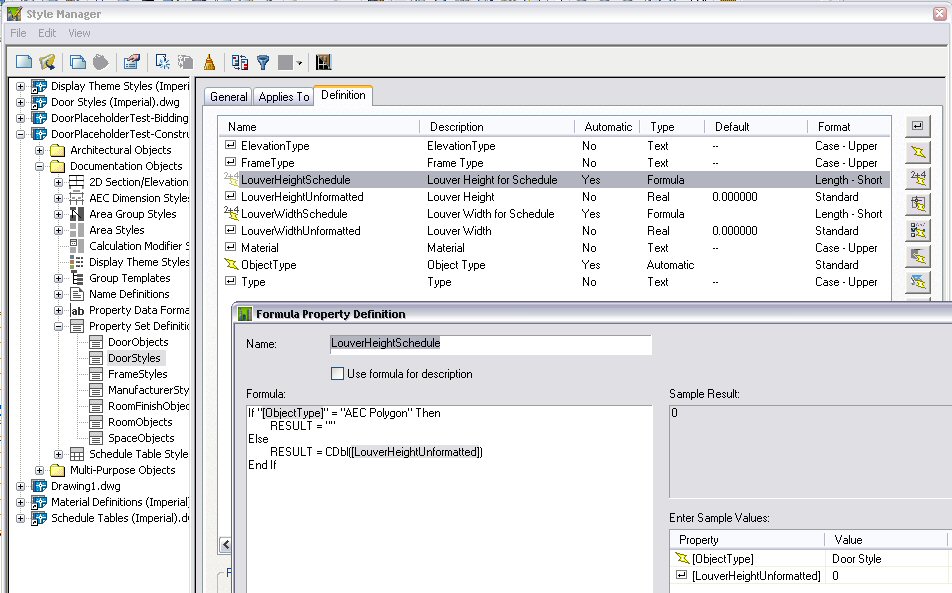
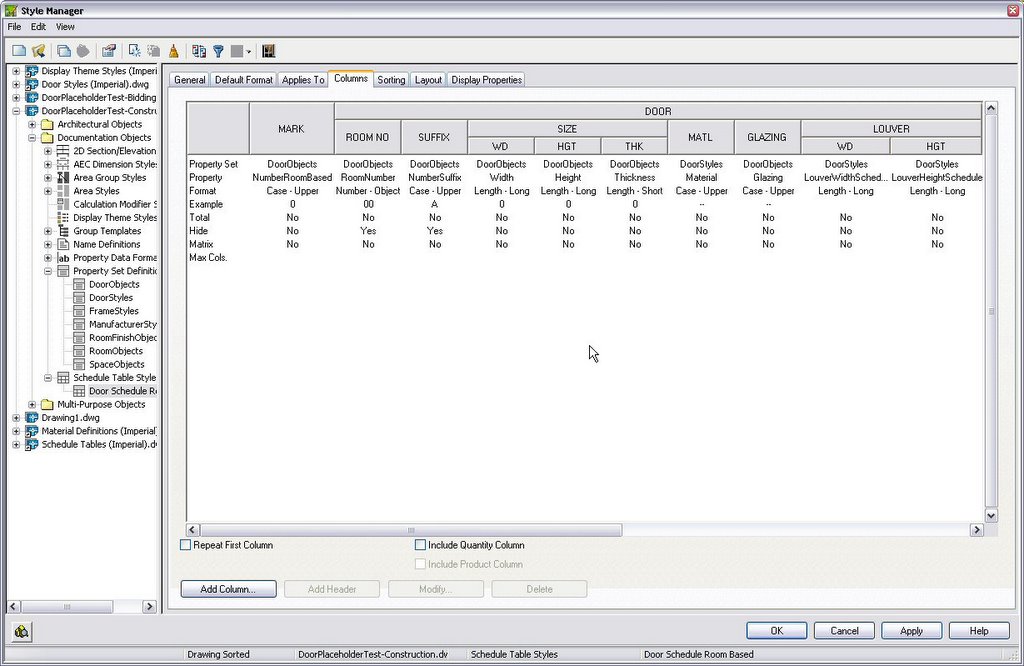
One automatic property, called ObjectType, and two formula properties, called LouverWidthSchedule and LouverHeightSchedule, have been added to the DoorStyles Property Set Definition. ObjectType is an automatic property that reports, oddly enough, the object type. This is used by the formula properties to determine if the object to which they are attached [through the object’s style], is an AEC Polygon. If so, the formula property returns a RESULT of "" [an empty string]. Otherwise, the formula property passes through the value of LouverWidthUnformatted or LouverHeightUnformatted. A Property Data Format is applied to the formula property, so that the imperial formatting is applied if the value is a real number. The Door Schedule Room Based Schedule Table Style was then edited, deleting the old louver width and height columns and replacing them with the formula properties.
DoorStyles Properties, Including LouverHeightSchedule Formula

Door Schedule Room Based Column Defintions [Left Side]


As noted above, all of the text-type manual properties in the Property Set Definitions attached to the placeholder AEC Polygon object were set to "", including those in the style-based DoorStyle Property Set. The results can be seen in the following two images, the first from the "bidding" drawing and the second from the "construction" drawing.
Bidding Version of the Door Schedule

Construction Version of the Door Schedule, After Door is Deleted


I chose not to change the names of the modified Property Set Definitions in my sample file, so that I would not need to change the tags. I would recommend renaming them if you choose to implement a schedule placeholder system based on that outlined here – and modifying your tags to suit – to avoid having any problems with existing files that have the old Property Set Definition in it, or with remembering that you customized these files when migrating to the next release of Autodesk Architectural Desktop.

One final note – I did change the RoomNumber property to use the non-project based Number property for the room number, as the sample files were not done as part of a project. I also modified the out-of-the-box NumberProjectBased property, renaming it NumberRoomBased and changing the formula to "[RoomNumber]" & "[NumberSuffix]" as described in this blog article, although this would not be strictly necessary if you keep the hidden RoomNumber and NumberSuffix columns in the schedule and sort the schedule on those columns, as the out-of-the-box schedule does.

December 23, 2005

Make Object's Layer Current or Draworder Command Not Working

If you try to use the Make Object's Layer Current button from the Layer toolbar or try to execute the DrawOrder command from a menu selection [such as the right click context menu] and you get a message saying that ai_molc or ai_draworder are not defined, then you have a problem with loading the MNL file which defines these functions. An MNL file is a text file that contains LISP statements, including function definitions, that is loaded "automatically" when a menu file [2005 and earlier] or CUI file [2006] of the same root name is loaded. This is a handy way to make certain that functions used by your menu files get loaded with the menu.

If you have customized your menu or CUI file by either starting from scratch or by copying the ADT.mnu or ADT.cui file and renaming it, you also need to copy the ADT.mnl file and rename it with the same root name, as well, to get all of the functions defined therein to load when your customized version of the file loads. If you have already set up an MNL file for your customized menu, but started from scratch, you should copy the contents of the ADT.mnl file into your custom MNL file so that you get the out-of-the-box MNL functions along with your own custom functions.

If you have not customized the ADT menu or CUI file, then check to make certain that the ADT.mnl file exists, in the same folder as the menu/CUI file, and that that folder is in your Support File Search Path on the Files tab of the Options dialog. If it does exist, open the file [use Notepad or any other plain text editor] to see if the c:ai_molc and ai_draworder commands are defined. You may need to do a repair installation [or try searching for the adt.mnl file on the installation disks] if the ADT.mnl file has been altered or corrupted.

The following commands are defined in the ADT 2006 MNL file. If any of these are reported as not defined while using ADT, check that the MNL file[s] associated with the menu/CUI files you are loading include the ADT.mnl file or copy of it [or its contents]:
ai_draworder
c:ai_molc
ai_deselect
c:ai_dim_textabove
c:ai_dim_textcenter
c:ai_dim_texthome
c:xclipframetoggle
F:AecDCSetPalette
F:AecDCSetPalettePath
C:AecRefreshSectionsElevations
C:adt_support
C:adt_training
C:adt_custom
C:adt_ifc
C:AecDCSetImpAppliances
C:AecDCSetImpCasework
C:AecDCSetImpElectric
C:AecDCSetImpEquipment
C:AecDCSetImpFurniture
C:AecDCSetImpPlumbing
C:AecDCSetImpSite
C:AecDCSetImpADTFixtureLayout
C:AecDCSetImpDiv1
C:AecDCSetImpDiv2
C:AecDCSetImpDiv10
C:AecDCSetImpDiv11
C:AecDCSetImpDiv12
C:AecDCSetImpDiv13
C:AecDCSetImpDiv14
C:AecDCSetImpDiv15
C:AecDCSetImpDiv16
C:AecDCSetImpCSIFixtureLayout
C:AecDCSetImpElevationLabels
C:AecDCSetImpChases
C:AecDCSetImpBreakMarks
C:AecDCSetImpDetailMarks
C:AecDCSetImpElevationMarks
C:AecDCSetImpLeaders
C:AecDCSetImpMiscellaneous
C:AecDCSetImpRevisionClouds
C:AecDCSetImpSectionMarks
C:AecDCSetImpTitleMarks
C:AecDCSetImpDoorWindowTags
C:AecDCSetImpObjectTags
C:AecDCSetImpRoomAndFinishTags
C:AecDCSetImpWallTags
C:AecDcSetMetBathroom
C:AecDcSetMetDomestic
C:AecDcSetMetElectric
C:AecDcSetMetKitchen
C:AecDcSetMetOffice
C:AecDcSetMetPipeAndDuct
C:AecDcSetMetSite
C:AecDcSetMetFixtureLayout
C:AecDCSetMetElevationLabels
C:AecDCSetMetChases
C:AecDcSetMetBreakMarks
C:AecDcSetMetDetailMarks
C:AecDcSetMetElevationMarks
C:AecDcSetMetLeaders
C:AecDcSetMetMiscellaneous
C:AecDcSetMetRevisionClouds
C:AecDcSetMetSectionMarks
C:AecDcSetMetTitleMarks
C:AecDcSetMetDoorWindowTags
C:AecDcSetMetObjectTags
C:AecDcSetMetRoomAndFinishTags
C:AecDcSetMetWallTags

December 20, 2005

Underline in Tag But Not in Schedule

I posted a quick sample file showing how a formula property can be used to have your room name underlined in a Schedule Tag but not underlined in a Schedule Table in a post in this thread in the ADT 2006 Discussion Group.

I did this using mostly out-of-the-box content from ADT 2004, making a few modifications to achieve the desired result. The RoomObjects:Name property was renamed RoomObjects:NameSchedule. This is a manual property and is where the user enters the room name, without a "%%u" prefix. This property can be referenced in a Schedule Table where no underlining is desired. A new formula property, RoomObjects:NameTag, was created, and the formula concatenates "%%u" with the RoomObjects:NameSchedule value. This provides the underlined version of the room name, for use in a Schedule Tag.

The Aec3_Room_Tag_P view block of the Aec3_Room_Tag room tag was modified to change the attribute definition's tag to reference the RoomObjects:NameTag property. This gets the room name underlined in the tag.

12/04/2015 UPDATE: Refer to this post for the revised method for doing this in later releases where %%u does not generate an underline.

December 16, 2005

Off Topic Again: Pies

This weekend is Highland Park Boy Scout Troop 5's annual Parent-Son Camping Weekend. The troop goes camping every month, and I try to go along when I can, but December's trip is focused on getting at least one parent out with each boy for some good old-fashioned bonding. We rent a cabin, so that "I'm not sleeping in a tent in this weather" is not an excuse.

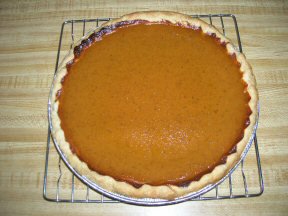
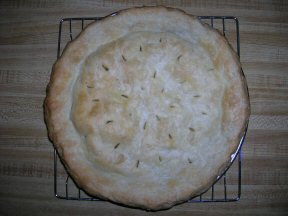
The highlight is the Saturday dinner "feast", when everyone makes their favorite dish and we have a smorgasbord of culinary delights. The kitchen can get rather crowded, so for the last several years I have taken off the day before and made pies for dessert. Here are this year's results:


Pumpkin Pie


Apple Pie


I usually do not bake much during the rest of the year, so you can expect that future posts over the next few months will stay on topic, and that I will not have to rename this blog to The Architect's Oven.

December 13, 2005

Sorting Schedules by Door Numbers with Suffixes

If you have set up a door number property that reads in a room number as the door number, your room numbers are all integers and you only add a suffix to the door number when you have more that one door, you may find that your schedule is sorting all of the doors with suffixes first, followed by the "whole number only" door numbers. You can get the entire list to sort together by forcing the formula to return a string value by changing the formula from:

[RoomNumber][NumberSuffix]

to

"[RoomNumber]" & "[NumberSuffix]"

That will return situations, with and without a alphabetic suffix, as strings, and they should sort together. Remember that you can not simply cut and paste property references in a formula, you need to select them from the lower pane [lower left pane in 2006].

December 11, 2005

Off Topic: Cookies

No, not computer cookies - the edible kind. That is why this is "off topic".

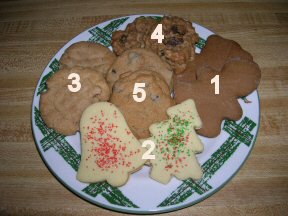
I took a couple of days off from work to be home while cable internet access was installed [finally!], shovel the results of an early-season snowstorm and engage in my annual Christmas cookie baking marathon. I wrapped that up first thing this morning and even got a little Christmas shopping done. I can not upload any of the cookies here, but I can tease you with a picture of the results.


  1. Gingerbread
  2. Sugar
  3. Peanut Butter
  4. Oatmeal Raisin
  5. Chocolate Chip