AutoCAD® Architecture 2013 adds a number of new features to the Display System.
Layer Keys for Display Components
An often wished for feature is now in the program: it is now possible to assign a Layer Key or Layer Overrides to a component of an object, instead of just hard-coding the layer name in the style. If you have ever wanted to have layer control over one or more individual components of an object, but did not want to have the hassle of setting and maintaining those layer names in each style, you can now add Layer Keys or Layer Overrides to a style to have components placed on a particular layer via layer keying.
In general, I find using the display system to control the visibility and appearance of most components of AEC objects to be quite adequate and would just as soon avoid throwing layers into the mix. But there are a few items where it would be nice to be able to control the visibility of a component with a simple Layer Freeze/Thaw, rather than going through the hassle of adding new Display Representations, Display Sets and Display Configurations. For example, we use a zero-width component to display a line that indicates the fire-resistance rating of a Wall, and its display is controled by the assigned Material Definition. There have been projects where, for certain drawings, I wanted to turn off this component, as it was interfering with other graphics. Being able to do so by freezing a layer would be much easier than setting up another Display Representation for materials, editing that for all of the materials in the drawing and then setting up a Display Set and Configuration to use the new Display Representation. Hard-coding a layer name in a Display Representation has always bothered me, as it means future edits if the content needs to be used with a different layer standard. The new Layer Key/Override feature allows source content to be set up that will generate layers based on the current Layer Key Style and avoid having a hard-coded layer name in the Display Representation.
There are a few nuances that you need to master in order to be able to use the new feature. The most important is that your source file (where you store and edit the display settings) cannot have any objects of the type to which you want to add a Layer Key or Layer Override in the file. For Drawing Default settings, this will likely be your template file, so that should not be a major problem. For Style Override settings, you will have to delete any instances of objects of the style being edited prior to being able to edit the override settings, and you will not be able to add any instances afterwards, as that will cause the layer to be resolved and defeat the puropose of using a Layer Key. The Layer Key and Layer Overrides are not available at the Object Display Override level, because, by definition, you have to have an object in the drawing in order to apply the override. This feature does not make much sense as an individual object override, anyway. You cannot access this feature on the Display tab of the Properties palette; you have to edit the settings in a dialog, through Display Manager (Drawing Default settings only) or through Style Manager.
Before starting, make certain that the current Layer Key Style in the source file drawing or template has all of the Layer Keys you wish to assign. If you are going to use custom Layer Keys, be certain that you update the Layer Key Style in your Layer source file with the custom keys, and, if you are not set up to automatically import the Layer Key Style from your Layer source file, in your template files.
In the composite image above, the Swing Component has had the custom DOORSWING Layer Key added by clicking in the blank area in the Layer Key column on the Swing line, and choosing the DOORSWING Layer Key in the Select Layer Key dialog. Once a Layer Key is assigned, the value in the Layer column for that component is cleared, and will remain that way until an object is placed in the file. As previously mentioned, you want it to stay that way in your source file(s), so that the resolution takes place in the target file.
In order to make use of the Layer Overrides, you must first set a Layer Key. If you want to assign a component to a layer, but do not want to create a custom Layer Key, you can use Layer Overrides. Keep in mind that if the resultant layer does not already exist in the drawing, it will be generated based on the attributes of the assigned Layer Key, so choose the Layer Key accordingly, or be prepared to adjust the layer properties after the fact. In the composite image above, the Frame component has the DOOR Layer Key assigned, and then, by clicking on the icon in the Layer Overrides column on the Frame line, a Minor 1 field override of "Fram" was set in the Select Layer Overrides dialog.
Do not forget to change the component attributes from BYBLOCK to BYLAYER for any components to which you assign a Layer Key, unless you only want them on a separate layer and want them to display with the attributes of the main object.
If you make Drawing Default level changes in your template file and then start a new drawing with that template, the Layer Key and, if specified, Layer Override will be resolved when the first object of that type is added to the new drawing. If the resultant layer does not already exist in the drawing file, the layer attributes specified in the current Layer Key Style (as modified by any Layer Overrides set) will be used to generate the layer. If the layer does already exist, the layer will be left as is, just like any other use of a Layer Key. At that time, the Layer Key and Layer Overrides columns will be locked and the resolved layer name will be shown in the Layer column. You can then edit the Display Representation and change the layer name if you so choose - the Layer Key and Layer Overrides are inactive from that point forward, even though the Layer Key name will remain displayed. The same holds true when adding an object that has a Style-level display override in the source file that includes a Layer Key or Layer Key and Layer Override.
There is a way, however, to impose a Layer Key/Override on a file that already has objects within it. When set at the Drawing Default level, with the file open, open the Display Manager (on the Manage ribbon tab, on the Style & Display panel, select the Display Manager tool). In the Display Manager, open a source file that has the unresolved Display Representation in it (such as your template file). Use the Display Manager to copy the Display Representation from the source file to your current file and choose Overwrite Existing.
Select OK to register the change, close the Display Manager and return to the drawing. You will not notice any immediate change, but the Layer Key/Override from the source file has been copied into this file. In order to get this to resolve, you need to execute the "add" command for the object type affected by the Display Representation. For example, start the DOORADD command if you have copied a Door Display Representation. Doing so, even if you cancel before placing an object, will cause the Layer Key/Override to be applied, affecting all existing objects in the file as well.
If you have a drawing with objects of the same style name, but without the Layer Key/Override set (or with it set, but resolved to a previous Layer Key Style), you can use the Style Manager to overwrite the style from a source file with an unresolved Style-level Layer Key/Layer Override. If you have a Tool palette tool referencing the style from such a source file, you can also right click the tool and choose "Re-import..." from the context menu. The only difference here is when you start the "add" command to trigger the resolution of Layer Key/Override, if redefined style is not the current default style, you will have to change to that style on the Design tab of the Properties palette to get the change to take effect.
In all of the above cases, keep in mind that you will not see the effects of the Layer Key/Override if the Display Representation that has the Layer Key/Override set is not active in the currently active Display Set. The change will take place, but until you change the Display Configuration/view direction to a combination that makes the Display Representation that has the Layer Key/Override applied, you will not see it.
Next Article in the Series (ACA 2013: Object Display Enhancements Part 2)
Showing posts with label Layer Key Style. Show all posts
March 30, 2012
October 21, 2008
Generating the Layers in a Layer Key Style
2/13/2019 - Updated to support ACA 2019.
11/2/2017 - Updated to support ACA 2018.
1/26/2017 - Updated to support ACA 2013 through 2017.
4/3/2011 - Updated to support ACA 2012.
1/27/2010 - Updated to support ACA 2010 & 2011.
Making use of the AecGenerateLayerKey function noted in this previous article, along with the code shown there for loading the appropriate ARX file (updated to work for versions from ADT 3.3 through ACD-A 2009), the AutoLISP code shown below will generate all of the layers associated with the Layer Keys in the current Layer Key Style.
Keep in mind that if the drawing file in which the LKL command function is run already has one or more layers with the same name as those defined in the current Layer Key Style, those layers will be left "as is" and will not have the layer attributes that are assigned in the Layer Key Style imposed upon them. If Layer Key Overrides are enabled, any Layer Key Overrides that are set will be applied to the generated layer names.
You can find a ZIP file with the "old" AutoLISP code (supports 3.3 through 2009 only) in this thread in the Autodesk AutoCAD® Architecture Discussion Group. 4/3/2011 - A ZIP file with version 1.2 that supports 3.3 through 2012 has been posted to that thread.
1/26/2017: An updated version that supports 3.3 through 2017 has been posted to this thread in the AutoCAD® Architecture Forum.
11/2/2017: An updated version that supports 2018 has been posted to that same thread, in my post dated 11/2/2017 at 6:54 pm United States Eastern Time Zone Daylight Savings Time (your local date and time may vary).
2/13/2019: An updated version that supports 2019 has been posted to that same thread, in my post dated 2/13/2019 at 9:14 pm United States Eastern Time Zone Standard Time (your local date and time may vary).
11/2/2017 - Updated to support ACA 2018.
1/26/2017 - Updated to support ACA 2013 through 2017.
4/3/2011 - Updated to support ACA 2012.
1/27/2010 - Updated to support ACA 2010 & 2011.
Making use of the AecGenerateLayerKey function noted in this previous article, along with the code shown there for loading the appropriate ARX file (updated to work for versions from ADT 3.3 through ACD-A 2009), the AutoLISP code shown below will generate all of the layers associated with the Layer Keys in the current Layer Key Style.
(defun C:LKL ( ; No arguments.
/ ;_ Local variables:
flag ; Set to T if ARX loaded, nil otherwise.
sacdvr ; String stored in ACADVER system variable.
) ;_ End arguments and local variables.
(setq sacdvr (getvar "ACADVER")) ; Get AutoCAD version.
;; ARXload proper ARX function:
(cond ; cond A.
((= "15.06" sacdvr)
;; ARXload ADT3.3 function:
(if (not (member "aeclayermanagerui30.arx" (arx)))
; If the ARX file is not currently loaded...
(progn ; ...do the following:
(prompt "\nARXloading \"aeclayermanagerui30.arx\". ")
; Display prompt noting file to be loaded.
(if (arxload "aeclayermanagerui30.arx" nil)
; If ARX file loads successfully...
(setq flag T) ; ...set flag to T.
(prompt "\n; error: ARXLOAD failed")
; ...else display prompt and return nil.
) ;_ End if.
) ;_ End progn.
(setq flag T) ; ...else already loaded, set flag to T.
) ;_ End if.
) ;_ End condition A1.
((= "16.0" sacdvr)
;; ARXload ADT2004 function:
(if (not (member "aeclmgrlisp40.arx" (arx)))
; If the ARX file is not currently loaded...
(progn ; ...do the following:
(prompt "\nARXloading \"aeclmgrlisp40.arx\". ")
; Display prompt noting file to be loaded.
(if (arxload "aeclmgrlisp40.arx" nil)
; If ARX file loads successfully...
(setq flag T) ; ...set flag to T.
(prompt "\n; error: ARXLOAD failed")
; ...else display prompt and return nil.
) ;_ End if.
) ;_ End progn.
(setq flag T) ; ...else already loaded, set flag to T.
) ;_ End if.
) ;_ End condition A2.
((= 16.1 (atof sacdvr))
;; ARXload ADT2005 function:
(if (not (member "aeclmgrlisp45.arx" (arx)))
; If the ARX file is not currently loaded...
(progn ; ...do the following:
(prompt "\nARXloading \"aeclmgrlisp45.arx\". ")
; Display prompt noting file to be loaded.
(if (arxload "aeclmgrlisp45.arx" nil)
; If ARX file loads successfully...
(setq flag T) ; ...set flag to T.
(prompt "\n; error: ARXLOAD failed")
; ...else display prompt and return nil.
) ;_ End if.
) ;_ End progn.
(setq flag T) ; ...else already loaded, set flag to T.
) ;_ End if.
) ;_ End condition A3.
((= 16.2 (atof sacdvr))
;; ARXload ADT2006 function:
(if (not (member "aeclmgrlisp47.arx" (arx)))
; If the ARX file is not currently loaded...
(progn ; ...do the following:
(prompt "\nARXloading \"aeclmgrlisp47.arx\". ")
; Display prompt noting file to be loaded.
(if (arxload "aeclmgrlisp47.arx" nil)
; If ARX file loads successfully...
(setq flag T) ; ...set flag to T.
(prompt "\n; error: ARXLOAD failed")
; ...else display prompt and return nil.
) ;_ End if.
) ;_ End progn.
(setq flag T) ; ...else already loaded, set flag to T.
) ;_ End if.
) ;_ End condition A4.
((= 17.0 (atof sacdvr))
;; ARXload ADT2007 function:
(if (not (member "aeclmgrlisp50.arx" (arx)))
; If the ARX file is not currently loaded...
(progn ; ...do the following:
(prompt "\nARXloading \"aeclmgrlisp50.arx\". ")
; Display prompt noting file to be loaded.
(if (arxload "aeclmgrlisp50.arx" nil)
; If ARX file loads successfully...
(setq flag T) ; ...set flag to T.
(prompt "\n; error: ARXLOAD failed")
; ...else display prompt and return nil.
) ;_ End if.
) ;_ End progn.
(setq flag T) ; ...else already loaded, set flag to T.
) ;_ End if.
) ;_ End condition A5.
((or (= 17.1 (atof sacdvr))
(= 17.2 (atof sacdvr))
(= 18.0 (atof sacdvr))
(= 18.1 (atof sacdvr))
(= 18.2 (atof sacdvr))
(= 19.0 (atof sacdvr))
(= 19.1 (atof sacdvr))
(= 20.0 (atof sacdvr))
(= 20.1 (atof sacdvr))
(= 21.0 (atof sacdvr))
(= 22.0 (atof sacdvr))
(= 23.0 (atof sacdvr))
) ;_ End or.
;; ARXload ACA 2008, 2009, 2010, 2011, 2012, 2013, 2014, 2015, 2016, 2017, 2018 or 2019 function:
(if (not (member "aeclmgrlisp.arx" (arx)))
; If the ARX file is not currently loaded...
(progn ; ...do the following:
(prompt "\nARXloading \"aeclmgrlisp.arx\". ")
; Display prompt noting file to be loaded.
(if (arxload "aeclmgrlisp.arx" nil)
; If ARX file loads successfully...
(setq flag T) ; ...set flag to T.
(prompt "\n; error: ARXLOAD failed")
; ...else display prompt and return nil.
) ;_ End if.
) ;_ End progn.
(setq flag T) ; ...else already loaded, set flag to T.
) ;_ End if.
) ;_ End condition A6.
(T
(alert
(strcat
"Unsupported version of AutoCAD is running."
"\nACADVER = "
sacdvr
"."
) ;_ End strcat.
) ;_ End alert.
nil ; Return nil.
) ;_ End condition A7.
) ;_ End cond A.
(if flag
(progn
(mapcar 'AecGenerateLayerKey (AecLayerKeyList))
(alert
(strcat
"\nLayers generated from current Layer Key Style. "
"\nAny previously defined layers not overwritten! "
) ;_ End strcat.
) ;_ End prompt.
) ;_ End progn.
) ;_ End if.
(prin1)
) ;_ End C:LKL.
Keep in mind that if the drawing file in which the LKL command function is run already has one or more layers with the same name as those defined in the current Layer Key Style, those layers will be left "as is" and will not have the layer attributes that are assigned in the Layer Key Style imposed upon them. If Layer Key Overrides are enabled, any Layer Key Overrides that are set will be applied to the generated layer names.
You can find a ZIP file with the "old" AutoLISP code (supports 3.3 through 2009 only) in this thread in the Autodesk AutoCAD® Architecture Discussion Group. 4/3/2011 - A ZIP file with version 1.2 that supports 3.3 through 2012 has been posted to that thread.
1/26/2017: An updated version that supports 3.3 through 2017 has been posted to this thread in the AutoCAD® Architecture Forum.
11/2/2017: An updated version that supports 2018 has been posted to that same thread, in my post dated 11/2/2017 at 6:54 pm United States Eastern Time Zone Daylight Savings Time (your local date and time may vary).
2/13/2019: An updated version that supports 2019 has been posted to that same thread, in my post dated 2/13/2019 at 9:14 pm United States Eastern Time Zone Standard Time (your local date and time may vary).
August 31, 2008
AutoCAD® Architecture 2009 Layer Properties Manager Alert
In developing my future post on Layer Standards, I have noticed that in the 2009 release, any changes made to the Layer Standard, Layer Key Styles or Layer Key Overrides when accessed through the Layer Properties Manager (the ClassicLayer, modal dialog, not the non-modal palette version, which does not have access to the ACD-A layer features) will NOT be saved if these are the only changes being made during that session of the Layer Properties Manager. While less critical for Layer Key Styles and Layer Key Overrides, since these can be accessed outside of the Layer Properties Manager, this is quite serious for Layer Standard changes (imports from other files, creation of new Layer Standards or edits to existing Layer Standards), since the only way to do these is through the Layer Properties Manager.
Fortunately, there is a workaround for this: after completing your Layer Standard, Layer Key Style or Layer Key Override changes from the Layer Properties Manager, before selecting OK, do something directly within the Layer Properties Manager that will result in the Apply button becoming active. My personal favorite is to select the New Layer button, and simply add the default layer (Layer1 if it does not already exist). If you like, you can immediately delete this newly added layer, and then select the OK button.
From what I can tell, it appears that changes made to Layer Standards, Layer Key Styles and Layer Key Overrides from the Layer Properties Manager are being held in a "pending queue" without being applied to the drawing (in memory) when selecting OK in the dialog(s) launched from the Layer Properties Manager toolbar buttons. This would allow for possible remorse while the Layer Properties Manager is still active - I have no problem with those changes being discarded if I select the Cancel button in the Layer Properties Manager. Unfortunately, unlike previous versions, the 2009 Layer Properties Manager dialog starts out with the Apply button disabled, and not only does it not become enabled when a change is made to a Layer Standard, Layer Key Style or Layer Key Override through the Layer Properties Manager, these pending changes also do not appear to trigger the need for acceptance should the OK button be selected. Making a change in the Layer Properties Manager itself does activate the Apply button and also sets something that activates all pending changes when either the Apply or OK buttons are used.
While this should not be necessary, until it is fixed, creating and deleting a bogus layer is a relatively small act to preserve what could be many minutes (hours?) of editing a Layer Key Style or adding descriptions to a Layer Standard.
Fortunately, there is a workaround for this: after completing your Layer Standard, Layer Key Style or Layer Key Override changes from the Layer Properties Manager, before selecting OK, do something directly within the Layer Properties Manager that will result in the Apply button becoming active. My personal favorite is to select the New Layer button, and simply add the default layer (Layer1 if it does not already exist). If you like, you can immediately delete this newly added layer, and then select the OK button.
From what I can tell, it appears that changes made to Layer Standards, Layer Key Styles and Layer Key Overrides from the Layer Properties Manager are being held in a "pending queue" without being applied to the drawing (in memory) when selecting OK in the dialog(s) launched from the Layer Properties Manager toolbar buttons. This would allow for possible remorse while the Layer Properties Manager is still active - I have no problem with those changes being discarded if I select the Cancel button in the Layer Properties Manager. Unfortunately, unlike previous versions, the 2009 Layer Properties Manager dialog starts out with the Apply button disabled, and not only does it not become enabled when a change is made to a Layer Standard, Layer Key Style or Layer Key Override through the Layer Properties Manager, these pending changes also do not appear to trigger the need for acceptance should the OK button be selected. Making a change in the Layer Properties Manager itself does activate the Apply button and also sets something that activates all pending changes when either the Apply or OK buttons are used.
While this should not be necessary, until it is fixed, creating and deleting a bogus layer is a relatively small act to preserve what could be many minutes (hours?) of editing a Layer Key Style or adding descriptions to a Layer Standard.
Labels:
2009,
Layer Key Override,
Layer Key Style,
Layer Standard
August 26, 2008
Layer Standard and Layer Key Style
The automatic layering feature of AutoCAD® Architecture has two components. Most will be familiar with the Layer Key Style, which allows you to specify on what layer a particular AEC item will be placed. The other component is the Layer Standard. While not strictly necessary (a Layer Key Style can be set to Non Standard), having a Layer Standard offers some advantages over not having one.
If the layer names you use do not have any consistent format (random lengths, not broken into subsections with consistent meaning), then a Layer Standard is not for you. If your layer names do use a consistent formatting, then you probably could create a Layer Standard that "enforces" those formatting rules. It will not prevent you from making non-standard layers, but it will make it easier to create standard layers by allowing you to pre-specify values for each field in your standard. You can also associate a description for each pre-specified value, and the descriptions of the various fields will be combined into the Description that appears in the Layer Properties Manager dialog (in the far right column). Having a field-based Layer Standard will also allow you to make use of the Layer Key Overrides feature, in which you can specify an override for one or more of the fields to create a layer name that is modified from the one specified in the Layer Key Style. This can be done globally or be set up on a tool palette tool, to be used only when that tool is used.
The interface for editing Layer Standards has not changed much over the years, and the Brain Dump Matt Dillon wrote for ADT 2 is still a great resource for becoming familiar with the ins and outs of Layer Standards. Unfortunately, the Brain Dump links listed in Chris Yanchar's Between the Walls blog no longer appear to work. I will try to put together a tutorial on Layer Standards and publish it in a future article. Until then, you can take a look at one or more of the Layer Standards that ship with the program and see how they are set up. These are based on the national or international standards prevalent in various area of the world, and it may be wise to adopt the one that applies in the area where you work, rather than to invent your own.
To edit a Layer Standard, open a file that contains one, open the Layer Properties Manager dialog and choose the Layer Standards button on the tool bar at the top of the dialog (first one on the left).
If the layer names you use do not have any consistent format (random lengths, not broken into subsections with consistent meaning), then a Layer Standard is not for you. If your layer names do use a consistent formatting, then you probably could create a Layer Standard that "enforces" those formatting rules. It will not prevent you from making non-standard layers, but it will make it easier to create standard layers by allowing you to pre-specify values for each field in your standard. You can also associate a description for each pre-specified value, and the descriptions of the various fields will be combined into the Description that appears in the Layer Properties Manager dialog (in the far right column). Having a field-based Layer Standard will also allow you to make use of the Layer Key Overrides feature, in which you can specify an override for one or more of the fields to create a layer name that is modified from the one specified in the Layer Key Style. This can be done globally or be set up on a tool palette tool, to be used only when that tool is used.
The interface for editing Layer Standards has not changed much over the years, and the Brain Dump Matt Dillon wrote for ADT 2 is still a great resource for becoming familiar with the ins and outs of Layer Standards. Unfortunately, the Brain Dump links listed in Chris Yanchar's Between the Walls blog no longer appear to work. I will try to put together a tutorial on Layer Standards and publish it in a future article. Until then, you can take a look at one or more of the Layer Standards that ship with the program and see how they are set up. These are based on the national or international standards prevalent in various area of the world, and it may be wise to adopt the one that applies in the area where you work, rather than to invent your own.
To edit a Layer Standard, open a file that contains one, open the Layer Properties Manager dialog and choose the Layer Standards button on the tool bar at the top of the dialog (first one on the left).
August 06, 2007
Details: Welding Symbols Layer Key
Those of you using ADT 2005 or later may have discovered the nifty welding symbols tool on the Basic tool palette in the Detailing tool palette group.
Running this tool opens the Welding Symbols dialog box, which allows you to select from a number of different welding symbol options, and, for those with attributed blocks, provide values for that block's attributes.
Selecting OK results in the insertion of one or more blocks that form the symbol, and allows you to create one or more leaders to point to the place(s) where the weld symbol applies.

The source file for the "WPLG" plug weld block shown above is WPLG.dwg, which, like the other welding symbol blocks, can be found in the C:\Program Files\AutoCAD Architecture 2008\Welding folder if the default file locations were used on installation. The polyline that forms the linework for this block is drawn on Layer 0, with ByLayer properties, so it will inherit the layer, color, linetype and lineweight of the layer on which the block is placed. The attributes are defined on a layer called WELDTEXT, with ByLayer properties. The way Details blocks work is if the layer name on which an object is drawn matches a Layer Key name in the current Layer Key Style, then that object, when inserted into the drawing, will be put on the layer assigned to that Layer Key.
The overall welding symbol is assigned to the ANNOBJ Layer Key, so the block(s) and leaders are placed on the A-Anno-Note layer for the out-of-the-box AIA (256 Color) Layer Key Style, with no overrides set. Unfortunately, the AIA (256 Color) Layer Key Style that has shipped with the program since ADT 2005 does not contain a Layer Key called WELDTEXT. Nor do any of the other out-of-the-box Layer Key Styles that I have examined.
Because of this, ADT/ACD-A simply keeps the attributes on the WELDTEXT layer, as defined in the source file. (As always, click on any "reduced size" image file to see the image full size.)
Fortunately, adding a Layer Key is quite easy, so if you want to get the attributes of your welding symbols on a layer other than WELDTEXT, add a WELDTEXT Layer Key and specify the layer name and properties of the layer on which you want the attributes to be placed. You can edit a Layer Key Style through the Style Manager (Format > Style Manager..., then look in the Multi-Purpose Object folder -OR- Format > Layer Management > Layer Key Styles... from the pulldown menus) or by opening the Layer Manager and selecting the Layer Key Styles button (second from left) on the toolbar at the top of the dialog.


Once you have the Style Manager open and have found and expanded the Layer Key Styles category in the Multi-Purpose Objects folder, select the name of the Layer Key Style you use in the left pane, and then select the Keys tab in the right pane. Left click on the New button at the lower right corner.
In the Name dialog, type WELDTEXT in the edit box and select OK to create a new Layer Key of that name.
Enter a description for the Layer Key, and add a layer name (use the ellipsis button to build a layer name from predefined components in your Layer Standard) and set the layer parameters. I chose color 182, a dark purple, for contrast with the default yellow color. You may wish to choose a different color.
One curious "feature" when adding a new Layer Key that I have never understood is that the Allow Overrides toggles for the new Layer Key are not active. You will need to "Apply" your changes, then reselect the name of your Layer Key Style in the left pane. Now the Allow Overrides toggles are active, and you can, if you wish, check them to allow Layer Key Overrides to be applied to the various components of the layer name.
Once you have tested the new Layer Key, you will want to copy the revised Layer Key Style to your auto-import file. You can find the name and location of this file on the Layering tab of the Drawing Set dialog. If you have the "always import" toggle on that tab checked, the updated Layer Key Style will be imported when opening existing drawings and using any feature that involves a Layer Key. If you do not have the "always import" toggle checked, you will need to update the Layer Key Style in any existing drawings manually. I would recommend having the "always import" toggle checked; if you do not, at the very least you should make certain that your template files do not have a Layer Key Style defined within them, so that new files will always inherit the latest version of the Layer Key Style from the auto-import file.
Note also that in any existing files in which you have already placed a particular attributed welding symbol block, the WELDTEXT layer is already built into the block definition, and you would need to redefine the block manually, then use ATTSYNC to update the attributes of the previously existing instances of that block. But for new drawings, or for blocks not already defined, that have the new Layer Key Style with the WELDTEXT Layer Key, the attributes will now be placed on the layer assigned to the WELDTEXT Layer Key.
Running this tool opens the Welding Symbols dialog box, which allows you to select from a number of different welding symbol options, and, for those with attributed blocks, provide values for that block's attributes.
Selecting OK results in the insertion of one or more blocks that form the symbol, and allows you to create one or more leaders to point to the place(s) where the weld symbol applies.

The source file for the "WPLG" plug weld block shown above is WPLG.dwg, which, like the other welding symbol blocks, can be found in the C:\Program Files\AutoCAD Architecture 2008\Welding folder if the default file locations were used on installation. The polyline that forms the linework for this block is drawn on Layer 0, with ByLayer properties, so it will inherit the layer, color, linetype and lineweight of the layer on which the block is placed. The attributes are defined on a layer called WELDTEXT, with ByLayer properties. The way Details blocks work is if the layer name on which an object is drawn matches a Layer Key name in the current Layer Key Style, then that object, when inserted into the drawing, will be put on the layer assigned to that Layer Key.
The overall welding symbol is assigned to the ANNOBJ Layer Key, so the block(s) and leaders are placed on the A-Anno-Note layer for the out-of-the-box AIA (256 Color) Layer Key Style, with no overrides set. Unfortunately, the AIA (256 Color) Layer Key Style that has shipped with the program since ADT 2005 does not contain a Layer Key called WELDTEXT. Nor do any of the other out-of-the-box Layer Key Styles that I have examined.
Because of this, ADT/ACD-A simply keeps the attributes on the WELDTEXT layer, as defined in the source file. (As always, click on any "reduced size" image file to see the image full size.)
Fortunately, adding a Layer Key is quite easy, so if you want to get the attributes of your welding symbols on a layer other than WELDTEXT, add a WELDTEXT Layer Key and specify the layer name and properties of the layer on which you want the attributes to be placed. You can edit a Layer Key Style through the Style Manager (Format > Style Manager..., then look in the Multi-Purpose Object folder -OR- Format > Layer Management > Layer Key Styles... from the pulldown menus) or by opening the Layer Manager and selecting the Layer Key Styles button (second from left) on the toolbar at the top of the dialog.


Once you have the Style Manager open and have found and expanded the Layer Key Styles category in the Multi-Purpose Objects folder, select the name of the Layer Key Style you use in the left pane, and then select the Keys tab in the right pane. Left click on the New button at the lower right corner.

In the Name dialog, type WELDTEXT in the edit box and select OK to create a new Layer Key of that name.

Enter a description for the Layer Key, and add a layer name (use the ellipsis button to build a layer name from predefined components in your Layer Standard) and set the layer parameters. I chose color 182, a dark purple, for contrast with the default yellow color. You may wish to choose a different color.
One curious "feature" when adding a new Layer Key that I have never understood is that the Allow Overrides toggles for the new Layer Key are not active. You will need to "Apply" your changes, then reselect the name of your Layer Key Style in the left pane. Now the Allow Overrides toggles are active, and you can, if you wish, check them to allow Layer Key Overrides to be applied to the various components of the layer name.
Once you have tested the new Layer Key, you will want to copy the revised Layer Key Style to your auto-import file. You can find the name and location of this file on the Layering tab of the Drawing Set dialog. If you have the "always import" toggle on that tab checked, the updated Layer Key Style will be imported when opening existing drawings and using any feature that involves a Layer Key. If you do not have the "always import" toggle checked, you will need to update the Layer Key Style in any existing drawings manually. I would recommend having the "always import" toggle checked; if you do not, at the very least you should make certain that your template files do not have a Layer Key Style defined within them, so that new files will always inherit the latest version of the Layer Key Style from the auto-import file.
Note also that in any existing files in which you have already placed a particular attributed welding symbol block, the WELDTEXT layer is already built into the block definition, and you would need to redefine the block manually, then use ATTSYNC to update the attributes of the previously existing instances of that block. But for new drawings, or for blocks not already defined, that have the new Layer Key Style with the WELDTEXT Layer Key, the attributes will now be placed on the layer assigned to the WELDTEXT Layer Key.
June 02, 2007
ACA/ADT Layer LISP Functions
10/30/2014 - Updated to include ACA 2015
06/30/2013 - Updated to include ACA 2013 and 2014.
04/03/2011 - Updated to include ACA 2012.
01/27/2010 - Updated to include ACA 2008 - 2011!
AutoCAD® Architecture (ACA) and Autodesk® Architectural Desktop (ADT) ship with an ARX file that contains LISP functions that work with Layer Standards and Layer Keys. Mark Webb of Autodesk posted a synopsis of the LISP functions that were available in the AecLMgrLISP40.arx file that accompanied ADT 2004; you can obtain that synopsis in this thread in the AutoCAD Architecture Customization Discussion Group. Look for my repost on May 8, 2007.
Note that the name of the ARX file changes, depending upon the version you are using.
ADT 2004 - AecLMgrLisp40.arx
ADT 2005 - AecLMgrLisp45.arx
ADT 2006 - AecLMgrLisp47.arx
ADT 2007 - AecLMgrLisp50.arx
ACA 2008 through ACA 2015 - AecLMgrLisp.arx
ADT 3.3 included an ARX file called aeclayermanagerui30.arx; if memory serves, not all of the LISP functions listed in the synopsis noted above are present in that version.
Here is some sample code for loading the proper ARX function, based on the value of the ACADVER system variable. It supports ADT3.3 through ACA 2015.
Note that after running that code, the LISP variable flag will be set to T (true) if the ARX file was already loaded or was successfully loaded and will be set to nil if the ARX file failed to load. Your subsequent code may want to test that value before trying to use one of the LISP routines defined by the ARX file.
One function that many users will find useful is AecGenerateLayerKey function, which takes one argument, the name of a Layer Key as a quoted string. If a layer of that name does not exist in the drawing file, it will be created, using the parameters specified in the current Layer Key Style, and the layer name returned. If a layer of that name already exists, the layer name is returned, but no changes are made to the layer's properties (color, linetype, etc.), even if they do not agree with those set in the Layer Key Style. That is consistent with the way a Layer Key works when called by an ACA/ADT object create command, or by AEC Content. If the specified Layer Key does not exist in the current Layer Key Style, the Layer Key name is returned as a quoted string. No other action is taken, if you want that layer set current, trap the return value, test to see if it is nil and, if not, use the CLAYER system variable or the LAYER command in your routine to set that layer current. This function allows you to add Layer Keying to any custom LISP routines you may have for things that AEC Content alone can not do easily, or which you wrote long before using ADT/ACA.
A pair of functions I found useful when customizing a Layer Standard for my firm were the AecLayerSaveStdAsText and AecLayerLoadStdAsText functions. This allows you to export the contents of a Layer Standard as a formatted text file, open the text file in a text editor, like Notepad, carefully make edits - preserving the proper formatting, then reload the edited file as a Layer Standard in a drawing file. My firm's Layer Standard is based on the U.S. National CAD Standard, and I wanted to have all of the Minor fields available in both Minor1 and Minor2. Rather than enter each field twice in the editor available inside ADT or ACA, I was able to export the Layer Standard to a text file, copy all the Minor1 field values to Minor2 and then reload the text file. I believe I may have tweaked some of the other field values before reloading the file, as well. Much more efficient, and it avoided the possibility of typos when doing the same thing twice.
There are a number of other layer-related functions in the ARX file, for setting Layer Key Overrides, toggling Layer Key Overrides on and off, generating a list of Layer Keys and working with layer snapshots. Take a look at what is available, and make use of those that fit your needs.
06/30/2013 - Updated to include ACA 2013 and 2014.
04/03/2011 - Updated to include ACA 2012.
01/27/2010 - Updated to include ACA 2008 - 2011!
AutoCAD® Architecture (ACA) and Autodesk® Architectural Desktop (ADT) ship with an ARX file that contains LISP functions that work with Layer Standards and Layer Keys. Mark Webb of Autodesk posted a synopsis of the LISP functions that were available in the AecLMgrLISP40.arx file that accompanied ADT 2004; you can obtain that synopsis in this thread in the AutoCAD Architecture Customization Discussion Group. Look for my repost on May 8, 2007.
Note that the name of the ARX file changes, depending upon the version you are using.
ADT 2004 - AecLMgrLisp40.arx
ADT 2005 - AecLMgrLisp45.arx
ADT 2006 - AecLMgrLisp47.arx
ADT 2007 - AecLMgrLisp50.arx
ACA 2008 through ACA 2015 - AecLMgrLisp.arx
ADT 3.3 included an ARX file called aeclayermanagerui30.arx; if memory serves, not all of the LISP functions listed in the synopsis noted above are present in that version.
Here is some sample code for loading the proper ARX function, based on the value of the ACADVER system variable. It supports ADT3.3 through ACA 2015.
(setq sacdvr (getvar "ACADVER"))
;; ARXload proper ARX function:
(cond ; cond A.
((= "15.06" sacdvr)
;; ARXload ADT3.3 function:
(if (not (member "aeclayermanagerui30.arx" (arx)))
; If the ARX file is not currently loaded...
(progn ; ...do the following:
(prompt "\nARXloading \"aeclayermanagerui30.arx\". ")
; Display prompt noting file to be loaded.
(if (arxload "aeclayermanagerui30.arx" nil)
; If ARX file loads successfully...
(setq flag T) ; ...set flag to T.
(prompt "\n; error: ARXLOAD failed")
; ...else display prompt and return nil.
) ;_ End if.
) ;_ End progn.
(setq flag T) ; ...else already loaded, set flag to T.
) ;_ End if.
) ;_ End condition A1.
((= "16.0" sacdvr)
;; ARXload ADT2004 function:
(if (not (member "aeclmgrlisp40.arx" (arx)))
; If the ARX file is not currently loaded...
(progn ; ...do the following:
(prompt "\nARXloading \"aeclmgrlisp40.arx\". ")
; Display prompt noting file to be loaded.
(if (arxload "aeclmgrlisp40.arx" nil)
; If ARX file loads successfully...
(setq flag T) ; ...set flag to T.
(prompt "\n; error: ARXLOAD failed")
; ...else display prompt and return nil.
) ;_ End if.
) ;_ End progn.
(setq flag T) ; ...else already loaded, set flag to T.
) ;_ End if.
) ;_ End condition A2.
((= 16.1 (atof sacdvr))
;; ARXload ADT2005 function:
(if (not (member "aeclmgrlisp45.arx" (arx)))
; If the ARX file is not currently loaded...
(progn ; ...do the following:
(prompt "\nARXloading \"aeclmgrlisp45.arx\". ")
; Display prompt noting file to be loaded.
(if (arxload "aeclmgrlisp45.arx" nil)
; If ARX file loads successfully...
(setq flag T) ; ...set flag to T.
(prompt "\n; error: ARXLOAD failed")
; ...else display prompt and return nil.
) ;_ End if.
) ;_ End progn.
(setq flag T) ; ...else already loaded, set flag to T.
) ;_ End if.
) ;_ End condition A3.
((= 16.2 (atof sacdvr))
;; ARXload ADT2006 function:
(if (not (member "aeclmgrlisp47.arx" (arx)))
; If the ARX file is not currently loaded...
(progn ; ...do the following:
(prompt "\nARXloading \"aeclmgrlisp47.arx\". ")
; Display prompt noting file to be loaded.
(if (arxload "aeclmgrlisp47.arx" nil)
; If ARX file loads successfully...
(setq flag T) ; ...set flag to T.
(prompt "\n; error: ARXLOAD failed")
; ...else display prompt and return nil.
) ;_ End if.
) ;_ End progn.
(setq flag T) ; ...else already loaded, set flag to T.
) ;_ End if.
) ;_ End condition A4.
((= 17.0 (atof sacdvr))
;; ARXload ADT2007 function:
(if (not (member "aeclmgrlisp50.arx" (arx)))
; If the ARX file is not currently loaded...
(progn ; ...do the following:
(prompt "\nARXloading \"aeclmgrlisp50.arx\". ")
; Display prompt noting file to be loaded.
(if (arxload "aeclmgrlisp50.arx" nil)
; If ARX file loads successfully...
(setq flag T) ; ...set flag to T.
(prompt "\n; error: ARXLOAD failed")
; ...else display prompt and return nil.
) ;_ End if.
) ;_ End progn.
(setq flag T) ; ...else already loaded, set flag to T.
) ;_ End if.
) ;_ End condition A5.
((or
(= 17.1 (atof sacdvr))
(= 17.2 (atof sacdvr))
(= 18.0 (atof sacdvr))
(= 18.1 (atof sacdvr))
(= 18.2 (atof sacdvr))
(= 19.0 (atof sacdvr))
(= 19.1 (atof sacdvr))
(= 20.0 (atof sacdvr))
) ;_ End or.
;; ARXload ACA 2008 through 2015 function:
(if (not (member "aeclmgrlisp.arx" (arx)))
; If the ARX file is not currently loaded...
(progn ; ...do the following:
(prompt "\nARXloading \"aeclmgrlisp.arx\". ")
; Display prompt noting file to be loaded.
(if (arxload "aeclmgrlisp.arx" nil)
; If ARX file loads successfully...
(setq flag T) ; ...set flag to T.
(prompt "\n; error: ARXLOAD failed")
; ...else display prompt and return nil.
) ;_ End if.
) ;_ End progn.
(setq flag T) ; ...else already loaded, set flag to T.
) ;_ End if.
) ;_ End condition A6.
(T
(alert
(strcat
"Unsupported version of AutoCAD is running."
"\nACADVER = " sacdvr "."
"\n\nPlease notify Computer Services."
) ;_ End strcat.
) ;_ End alert.
nil ; Return nil.
) ;_ End condition A7.
) ;_ End cond A.
Note that after running that code, the LISP variable flag will be set to T (true) if the ARX file was already loaded or was successfully loaded and will be set to nil if the ARX file failed to load. Your subsequent code may want to test that value before trying to use one of the LISP routines defined by the ARX file.
One function that many users will find useful is AecGenerateLayerKey function, which takes one argument, the name of a Layer Key as a quoted string. If a layer of that name does not exist in the drawing file, it will be created, using the parameters specified in the current Layer Key Style, and the layer name returned. If a layer of that name already exists, the layer name is returned, but no changes are made to the layer's properties (color, linetype, etc.), even if they do not agree with those set in the Layer Key Style. That is consistent with the way a Layer Key works when called by an ACA/ADT object create command, or by AEC Content. If the specified Layer Key does not exist in the current Layer Key Style, the Layer Key name is returned as a quoted string. No other action is taken, if you want that layer set current, trap the return value, test to see if it is nil and, if not, use the CLAYER system variable or the LAYER command in your routine to set that layer current. This function allows you to add Layer Keying to any custom LISP routines you may have for things that AEC Content alone can not do easily, or which you wrote long before using ADT/ACA.
A pair of functions I found useful when customizing a Layer Standard for my firm were the AecLayerSaveStdAsText and AecLayerLoadStdAsText functions. This allows you to export the contents of a Layer Standard as a formatted text file, open the text file in a text editor, like Notepad, carefully make edits - preserving the proper formatting, then reload the edited file as a Layer Standard in a drawing file. My firm's Layer Standard is based on the U.S. National CAD Standard, and I wanted to have all of the Minor fields available in both Minor1 and Minor2. Rather than enter each field twice in the editor available inside ADT or ACA, I was able to export the Layer Standard to a text file, copy all the Minor1 field values to Minor2 and then reload the text file. I believe I may have tweaked some of the other field values before reloading the file, as well. Much more efficient, and it avoided the possibility of typos when doing the same thing twice.
There are a number of other layer-related functions in the ARX file, for setting Layer Key Overrides, toggling Layer Key Overrides on and off, generating a list of Layer Keys and working with layer snapshots. Take a look at what is available, and make use of those that fit your needs.
Labels:
Layer Key Style,
Layer Standard,
LISP
October 03, 2006
Auto-Import Layer Key Style
Autodesk Architectural Desktop provides a way to make certain the Layer Key Style in your drawing files reflects the latest revisions without having to manually import the revised Layer Key Style [or even to know that it has been updated]. The image and procedures shown here were created/developed for ADT 2004, but the same feature is available in later releases.
The Layering tab of the Drawing Setup dialog allows you to specify a Layer Standards/Key File to Auto-Import. If you have not done so already, you will want to establish a file to hold your Layer Standard[s] and Layer Key Style[s]. The AecLayerStd.dwg file holds the out-of-the-box Layer Standards and Layer Key Styles. For the 2004 release, on a standalone, local machine installation, this file is located at:
C:\Documents and Settings\All Users\Application Data\Autodesk\Autodesk Architectural Desktop 2004\R16.0\enu\Layers
The path will be similar, with some minor variation in later releases. If you have a customized installation, particularly if some files were placed on the network for common access by all users, this file could be anywhere, but is likely located with your other content files.
If you have customized or plan to customize either the Layer Standard or the Layer Key Style[s], I would highly recommend starting with a copy of the AecLayerStd.dwg file, renamed to reflect that it has your firm's customizations, to make migration to new releases easier. Be certain to back up any customizations, whether to the AecLayerStd.dwg file or your own custom file.
Having identified the name and location of your central source file for Layer Standards and Layer Key Styles, you will want to make that your Auto-Import file by selecting the ellipsis [...] button to the right of the Layer Standards/Key File to Auto-Import area, navigating to your file and selecting it.
Next, set the Layer Key Style from your source file that you wish to be current, using the dropdown list in the Default Layer Standard area. Then note the toggle at the bottom of that area, labeled "Always import Layer Key Style when first used in drawing". Check that toggle if you wish to automatically update your drawing file with any future changes made to the Layer Key Style in the source file. If you want that to be the default condition for all drawings opened on that computer, for that users, also check the Save As Default toggle in the lower left corner. [You may want to check the settings on the other tabs to be certain they have the desired initial default values set before hitting OK, as the Save As Default toggle affects the entire dialog box.]
Here is how this feature works. The first time you issue an ADT command in a given editing session for that drawing [and any other in which the Always import Layer Key Style when first used in drawing toggle is checked], ADT will check the file specified as the Layer Standards/Key File to Auto-Import to see if the Layer Key Style has been edited and saved more recently than the current drawing file. If so, it will automatically import the Layer Key Style from the source file before making use of the referenced Layer Key. If not, the Layer Key Style in the drawing file will be used. No additional checks on the Layer Key Style will be made during that editing session. If you are told the Layer Key Style has been updated while you are editing a file, you can either use the Style Manager to update it from the source file manually, or save [if you want to keep any unsaved changes], close and reopen the file.
This feature is particularly valuable if you are just implementing ADT and make frequent changes to the Layer Key Style to get things "just right" for your office at the same time others are using ADT for production work.
The Layering tab of the Drawing Setup dialog allows you to specify a Layer Standards/Key File to Auto-Import. If you have not done so already, you will want to establish a file to hold your Layer Standard[s] and Layer Key Style[s]. The AecLayerStd.dwg file holds the out-of-the-box Layer Standards and Layer Key Styles. For the 2004 release, on a standalone, local machine installation, this file is located at:C:\Documents and Settings\All Users\Application Data\Autodesk\Autodesk Architectural Desktop 2004\R16.0\enu\Layers
The path will be similar, with some minor variation in later releases. If you have a customized installation, particularly if some files were placed on the network for common access by all users, this file could be anywhere, but is likely located with your other content files.
If you have customized or plan to customize either the Layer Standard or the Layer Key Style[s], I would highly recommend starting with a copy of the AecLayerStd.dwg file, renamed to reflect that it has your firm's customizations, to make migration to new releases easier. Be certain to back up any customizations, whether to the AecLayerStd.dwg file or your own custom file.
Having identified the name and location of your central source file for Layer Standards and Layer Key Styles, you will want to make that your Auto-Import file by selecting the ellipsis [...] button to the right of the Layer Standards/Key File to Auto-Import area, navigating to your file and selecting it.
Next, set the Layer Key Style from your source file that you wish to be current, using the dropdown list in the Default Layer Standard area. Then note the toggle at the bottom of that area, labeled "Always import Layer Key Style when first used in drawing". Check that toggle if you wish to automatically update your drawing file with any future changes made to the Layer Key Style in the source file. If you want that to be the default condition for all drawings opened on that computer, for that users, also check the Save As Default toggle in the lower left corner. [You may want to check the settings on the other tabs to be certain they have the desired initial default values set before hitting OK, as the Save As Default toggle affects the entire dialog box.]
Here is how this feature works. The first time you issue an ADT command in a given editing session for that drawing [and any other in which the Always import Layer Key Style when first used in drawing toggle is checked], ADT will check the file specified as the Layer Standards/Key File to Auto-Import to see if the Layer Key Style has been edited and saved more recently than the current drawing file. If so, it will automatically import the Layer Key Style from the source file before making use of the referenced Layer Key. If not, the Layer Key Style in the drawing file will be used. No additional checks on the Layer Key Style will be made during that editing session. If you are told the Layer Key Style has been updated while you are editing a file, you can either use the Style Manager to update it from the source file manually, or save [if you want to keep any unsaved changes], close and reopen the file.
This feature is particularly valuable if you are just implementing ADT and make frequent changes to the Layer Key Style to get things "just right" for your office at the same time others are using ADT for production work.
December 05, 2005
Documenting a Layer Key Style
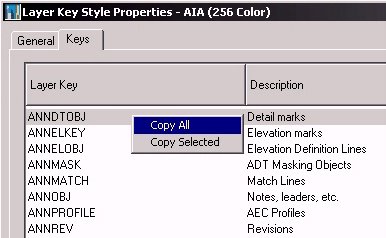
You can copy the contents of an Architectural Desktop Layer Key Style in a "tab delimited" format that can then be pasted into any spreadsheet program that accepts tab-delimited input, such as Excel, or into a word-processing program or even Notepad. All you need to do is edit the Layer Key Style, click on the Keys tab if it is not current, right click in the list box and choose Copy All from the context menu, as shown in the image below.

Edit a layer key style by opening the Style Manager [Format > Style Manager... from the pulldown menus], then expand the Multi-Purpose Objects category and the Layer Key Style item under the drawing file that has the Layer Key Style you wish to document. In ADT 2006, select the Layer Key Style in the left pane; in ADT 2005 or 2006, right click on the Layer Key Style in the left pane and choose Edit... from the context menu. You can also open the Style Manager, filtered for Layer Key Styles, by starting the Layer Manager [the ADT Layer Manager in 2004] and clicking on the Layer Key Styles icon in the upper left corner.
Pasting into spreadsheet program is ideal, because then you can take the information and sort the rows as you like. For example, if you want to know which Layer Keys use a given color, you can sort the rows by the column with the color number. You can also do this in ADT while editing a Layer Key Style by clicking on the header at the top of a column, but this does not always work as desired [sorting on the Plotstyle column in ADT 2004 does not work well - this may have been fixed in later releases].

Edit a layer key style by opening the Style Manager [Format > Style Manager... from the pulldown menus], then expand the Multi-Purpose Objects category and the Layer Key Style item under the drawing file that has the Layer Key Style you wish to document. In ADT 2006, select the Layer Key Style in the left pane; in ADT 2005 or 2006, right click on the Layer Key Style in the left pane and choose Edit... from the context menu. You can also open the Style Manager, filtered for Layer Key Styles, by starting the Layer Manager [the ADT Layer Manager in 2004] and clicking on the Layer Key Styles icon in the upper left corner.
Pasting into spreadsheet program is ideal, because then you can take the information and sort the rows as you like. For example, if you want to know which Layer Keys use a given color, you can sort the rows by the column with the color number. You can also do this in ADT while editing a Layer Key Style by clicking on the header at the top of a column, but this does not always work as desired [sorting on the Plotstyle column in ADT 2004 does not work well - this may have been fixed in later releases].
October 04, 2005
Richard Binning on Copying Layer Keys Between Styles
Richard Binning has posted the follow up to his July 29, 2005 blog post on copying Layer Keys between two Layer Key Styles. That first post provides a downloadable Excel tool to make comparing two Layer Key Styles easier; the new post (October 3, 2005) includes a VBA routine that allows you to copy Layer Keys between Layer Key Styles. Check out both posts in "beside the cursor...". And thanks to Richard for providing such a useful tool to those of us who VBA challenged.
Subscribe to:
Posts (Atom)