NOTE: If you work in a "shared" environment, please consult with your BIM Manager and/or co-workers before modifying an office- or project-standard shared parameters file, project template or title block family.
The first stage is to set things up in Revit. This is done the same way that you would do it to set up a manually updated title block parameter. A quick summary of that follows:
- Create a shared parameter to be used to hold the custom plot stamp text, if you do not already have one. On the Manage ribbon tab, on the Settings panel, select the Shared Parameters tool. Set the appropriate shared parameters file current, select the appropriate parameter group and create the parameter. Set the parameter type to Text and add a tooltip description (2015 release or later), so that others will know the purpose of the shared parameter.

- Add a Project Parameter to your project (for an existing project) or your project template(s) (for future projects). Choose the Shared parameter radio button and then choose the Select button to choose the shared parameter created in Step 1. Select a group under which the parameter will be placed, if the initial "Text" group is not to your liking. Choose the Instance radio button and set the Category to Project Information.

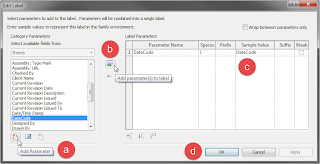
- Edit your title block family or families. In each one, add a Label to display the value of the shared parameter created in Step 1. On the Create tab, on the Text panel, choose the Label tool. In the Edit Label dialog, select the Add Parameter tool in the lower left, and add the shared parameter created in Step 1. Select the newly added Shared Parameter in the Category Parameters list box and select the Add parameter(s) to label tool (green arrow icon). Change the Sample Value for the parameter, if desired, then select OK. Fine tune the location and orientation of the label in your title block family, then save or save as the family, if desired, and load the title block family into your project and/or project template file.


- Three stages of nodes generate the pieces of the numeric date in yyyymmdd format. The DateTime.Now node (Library path = Core > DateTime > Now) generates the current system time and date. In the image below, all of the nodes have a "watch toggle" and they are toggled on, so that the value of the node is displayed below the node. We only need the year, month and day, so the value of that node is passed to the DateTime.Components node (Core > DateTime > Actions > Components), which generates separate numeric values for the listed components. The third stage consists of one ToString node (Core > Builtin Functions > ToString), which converts the numeric year output from the DateTime.Components node to a string (text), and two custom nodes named Integer To String - 2 Char Zero Padding, which convert the month and day output from integers to strings while also assuring a two-character result by adding a "0" at the front of any single-character strings. These custom nodes were created from a number of out-of-the-box nodes; I will discuss the creation of custom nodes and show the inner workings of these nodes in a future article.

- The random three-digit prefix and suffix are generated by two similar sets of nodes. In each, two Number nodes (Core > Input > Number) establish the range of double-precision real number values that the Math.Random node (Core > Math > Actions > Random(value1:double, value2:double)) uses when generating a double-precision random number. I chose 100 and 999 as the boundaries to assure I would get a three-digit (whole number part) result. Note that I had chosen three decimal place display for numbers in Dynamo at the time these screen captures were take, so all numeric values, even integers, display with three decimal places (Settings pulldown menu > Number Format > 0.000). The output of the Math.Random node is passed through the Math.Floor node (Core > Math > Actions > Floor), to convert the double to an integer (rounding down to the next integer value, effectively truncating any fractional amount), prior to using another ToString node to convert the integer to a text string.

- We now have all of the strings we need to create the text value for the plot stamp. A String.Concat node (Core > String > Actions > Concat) takes the five strings (random prefix, year, month, day and random suffix) and combines them into one string. The String.Concat node starts out with one input, string0; you can use the + button to add more inputs and the - button to remove inputs as required by your application.

- Now that we have the nodes required to generate the string we want for the plot stamp, we need to get that value out of Dynamo and into the DateCode parameter in Revit. To do that, we first need to get the ProjectInfo element, which holds the Project Information parameters. Two nodes will do that for us. First, the Categories node (Revit > Selection > Categories) allows you to select from a list of all of the built-in Revit categories, one of which is ProjectInformation. Passing that category to the All Elements of Category node (Revit > Selection > All Elements of Category) selects the ProjectInfo element for the current project. These two nodes do not have a "watch toggle", so I included a Watch node (Core > View > Watch) in the overall graph (not shown in the image below) to view the result of the All Elements of Category node. This is not needed for the Dynamo function to work.

- The Element.SetParameterByName node (Revit > Elements > Element > Actions > SetParameterByName) is where our value gets pushed into the Revit project. It takes three inputs, the element we acquired in Step 7, a string from a String node (Core > Input > String) into which the name of the parameter to be set has been entered (case sensitive, enter the name exactly as it appears in Revit), and the value to be set, which is the concatenated string from Step 6.


This may seem like a lot of work, compared to typing fourteen numbers in a dialog box, and if you only ever use it one time, it is. But you can save the Dynamo file and every time you are about to plot, simply start Dynamo, open the file and select the Run button.
In this admittedly simple example, you can see how easy it is to write a program in Dynamo and have that program interact with Revit. Dynamo takes care of all of the hard work of interfacing with the API; all you need to do is connect the nodes.
No comments:
Post a Comment