In Part 1, we created a custom Fill Pattern from a PAT file to define the grid pattern for an acoustic tile Ceiling. We will add that pattern to a Material in this article, so that it can then be assigned to the finish layer of a Ceiling in Part 3.
- On the Manage ribbon tab, on the Settings panel, select the Materials tool.

- For the purposes of this tutorial, all we care about is the Surface Pattern that will be seen in the contract documents, and the rendered appearance will not be adjusted. If that is also true for you, you can proceed by either creating a new Material from scratch or by duplicating one of the ceiling tile Materials and then editing the duplicate. I will take the latter approach here, as that way the new Material will inherit the graphic settings from the source material, maintaining consistency.
- In the Material Browser, find and select the Acoustic Ceiling Tile 24 x 24 material, which is part of the content supplied with the United States Imperial content in Revit. If you are working in a Metric file, choose an existing Material for a gridded ceiling.

- Right click on the material, and choose Duplicate from the context menu.

- Give the new material a meaningful name. For this example, I chose Acoustic Ceiling Tile 4-24x24_1-48x6.
- Select the Appearance tab. While we will not be setting a grid-specific render image for this Material, we do want to set the Material up with a unique Appearance Asset so that any future change made here will not affect other Materials, and any future change made to the Appearance Asset assigned to the Acoustic Ceiling Tile 24 x 24 Material (or any other Material using the same Appearance Asset) will not affect this Material. In the upper right corner, select the Duplicates this asset. tool. If successful, the name of the Appearance Asset will be changed (by adding a number in parentheses at the end) and the number next to the hand icon will be 0, indicating that this Appearance Asset is shared with no other Material. If you have a render image for this Ceiling, you would assign it here; that is beyond the scope of this tutorial.

- Select the Graphics tab.
- In the Surface Pattern area of the Graphics tab, select the image tile to the right of where it says Pattern.

- In the Fill Patterns dialog, verify that the Pattern Type is set to Model. Then find and select the Fill Pattern created in Part 1.
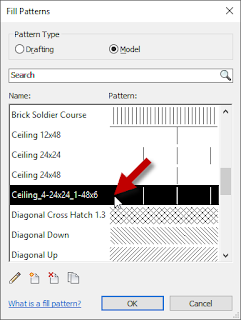
- Select the OK button to ratify the selection and dismiss the Fill Patterns dialog.
- In the Material Browser dialog, verify that the other settings on the Graphics tab are as desired. Assuming you want this ceiling pattern to appear the same one of the source Material (Acoustic Tile 24 x 24, or whatever Material you duplicated) (except for the Fill Pattern used), the settings should be correct.

- Select the OK button to add the new material to your project.


Part 3 will add the new Material to a Ceiling Type.
No comments:
Post a Comment