July 04, 2005
Multi-Line Room Name Formula Improvements
The Architectural Desktop 2005 Discussion Group has a thread discussing how to combine the text from a three-line room name tag into one property for a schedule. I had posted a solution using a series of If/Then/Else statements to perform the needed concatenations, and it works. Hats off to "Draftinations", who suggested a more elegant way of performing the concatenation, using an array. It works perfectly for two lines, and works pretty well for three. The only drawback on the three-line version is if you have something entered on the first and third lines and the second line is blank or composed entirely of one or more spaces - you will get at least two spaces in your final string. That is easily avoided by entering the data properly. I posted a sample three-line version using an array to the thread. Perhaps someday I will have time to see if I can write some additional code to replace back-to-back spaces with a single space.


July 03, 2005
Structure/Flow in Formula Properties: If/Then/ElseIf/Else Construct
INTRODUCTION
You can do many things with formula properties by directly manipulating other property values – such as concatenating strings or calculating a rectangular area by multiplying the rectangle’s length by its width. You may find, however, that for certain scheduling situations, you need a more complex, multi-line formula. Perhaps you need to make several intermediate calculations, or need to test one or more values and take different actions based on the results of each test. One way to do the latter is to make use of an If/Then/ElseIf/Else construct. Keep in mind that once your formula goes beyond a simple single expression, you need to explicitly indicate the final value to be returned by the formula, by assigning that value to “RESULT”, which must be in all capital letters. For a conditional statement like the If/Then/ElseIf/Else construct, each branch that the formula can take must eventually have a RESULT assignment.
SYNTAX
The syntax for the If/Then/ElseIf/Else construct is fairly straightforward and should be familiar to anyone with programming experience – or an understanding of the words if, then and else. The If/Then/ElseIf/Else construct allows you to perform one or more actions if a certain condition is true. If that initial condition is false, you may optionally specify one or more additional test condtions and perform one or more actions associated with the first one of these conditions that is true. If all conditions specified are false, you may optionally specify one or more actions to be taken.
Here is the basic structure of a simple If/Then/ElseIf/Else construct. Explanations of the italicized items are listed below the structure; items shown in blue and enclosed by square brackets are optional. Note that you can further complicate things by nesting an If/Then/ElseIf/Else constructs within another one, by including the additional If/Then/ElseIf/Else construct as one of the statements to be evaluated.
ifcondition
This required statement must evaluate to True or False. See my previous post on operators for the comparison operators you can use to generate True of False in a condtional statement.
ifstatements
One or more optional statements may be placed here. These will be executed when the ifcondition is True.
elseif1condition
elseif1conditionstatements
elseif2condition
elseif2conditionstatements
One or more optional ElseIf “blocks” [the ElseIf, the associated condition, the Then and the optional statements] can be added to an If/Then/ElseIf/Else construct. When the ifcondition is false, any ElseIf conditions will be evaluated, in order, until either the first True ElseIf condition is encountered or all are found to be false. If a true condition is found, any optional statements associated with that ElseIf block are executed. ElseIf blocks must occur before the Else block, if an Else block is used.
elsestatements
When the ifcondition and all ElseIf conditions [if any are provided] are false, any optional elsestatements are executed.
There is a single-line syntax that could be used for very simple If statements, but that can be difficult to read, so I would recommend sticking with the format noted above. Note that in that form, each If must have a corresponding End If, but that an optional ElseIf does not have an End If. Speaking of legibility, indenting the statements to be executed makes it much easier to read than if you leave the statements flush with the If, ElseIf, Else and End If lines.
Here is another tip, to save you potential debugging problems, which I have experienced myself: note carefully that ElseIf has no space in it, whereas End If does.
EXAMPLE
Here is an example of the If/Then/ElseIf/Else construct in action, based on a question that has come up in the Architectural Desktop Discussion Groups several times. Automatic properties are wonderful [no data entry required, beyond that already done to define the object], but there are occasions where you may want to override that value in a schedule. For example, you may be using Space objects to represent rooms, and use the Height automatic property to represent your ceiling height in a room schedule. This works fine for most spaces, but you may have a few that have multi-level ceilings, and would like to be able to make note that the height varies in the schedule, rather than listing only one of two or more heights. This can be done quite easily by using a formula property. You will need the following:
The formula property for this would be:
I have amended my original sample formula, adding "CDbl()" to the [HeightUnformatted] RESULT, so that a whole number would be interpreted as a real number and not an interger. This is necessary for architectural formatting to be applied to the result when there is no override, and the [HeightUnformatted] property contains a whole number.
The following screen shots from Architectural Desktop 2006 show this formula with two test values for the HeightManual property: one with the default empty string, and one with the string “VARIES”. As designed, the formula returns the value of HeightUnformatted in the first case and the string VARIES in the second. Click on the image to view a larger version.
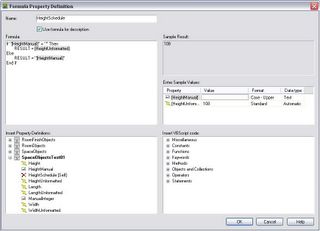
HeightManual set to default empty string.
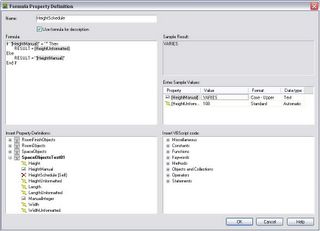
HeightManual set to VARIES.
You can do many things with formula properties by directly manipulating other property values – such as concatenating strings or calculating a rectangular area by multiplying the rectangle’s length by its width. You may find, however, that for certain scheduling situations, you need a more complex, multi-line formula. Perhaps you need to make several intermediate calculations, or need to test one or more values and take different actions based on the results of each test. One way to do the latter is to make use of an If/Then/ElseIf/Else construct. Keep in mind that once your formula goes beyond a simple single expression, you need to explicitly indicate the final value to be returned by the formula, by assigning that value to “RESULT”, which must be in all capital letters. For a conditional statement like the If/Then/ElseIf/Else construct, each branch that the formula can take must eventually have a RESULT assignment.
SYNTAX
The syntax for the If/Then/ElseIf/Else construct is fairly straightforward and should be familiar to anyone with programming experience – or an understanding of the words if, then and else. The If/Then/ElseIf/Else construct allows you to perform one or more actions if a certain condition is true. If that initial condition is false, you may optionally specify one or more additional test condtions and perform one or more actions associated with the first one of these conditions that is true. If all conditions specified are false, you may optionally specify one or more actions to be taken.
Here is the basic structure of a simple If/Then/ElseIf/Else construct. Explanations of the italicized items are listed below the structure; items shown in blue and enclosed by square brackets are optional. Note that you can further complicate things by nesting an If/Then/ElseIf/Else constructs within another one, by including the additional If/Then/ElseIf/Else construct as one of the statements to be evaluated.
If ifcondition Then
    [ifstatements]
[ElseIf elsif1condition Then
    [elseif1statements]]
[ElseIf elsif2condition Then
    [elseif2statements]]
[… insert additional ElseIf conditionsand optional statements as desired]
[Else
    [elsestatements]]
End If
ifcondition
This required statement must evaluate to True or False. See my previous post on operators for the comparison operators you can use to generate True of False in a condtional statement.
ifstatements
One or more optional statements may be placed here. These will be executed when the ifcondition is True.
elseif1condition
elseif1conditionstatements
elseif2condition
elseif2conditionstatements
One or more optional ElseIf “blocks” [the ElseIf, the associated condition, the Then and the optional statements] can be added to an If/Then/ElseIf/Else construct. When the ifcondition is false, any ElseIf conditions will be evaluated, in order, until either the first True ElseIf condition is encountered or all are found to be false. If a true condition is found, any optional statements associated with that ElseIf block are executed. ElseIf blocks must occur before the Else block, if an Else block is used.
elsestatements
When the ifcondition and all ElseIf conditions [if any are provided] are false, any optional elsestatements are executed.
There is a single-line syntax that could be used for very simple If statements, but that can be difficult to read, so I would recommend sticking with the format noted above. Note that in that form, each If must have a corresponding End If, but that an optional ElseIf does not have an End If. Speaking of legibility, indenting the statements to be executed makes it much easier to read than if you leave the statements flush with the If, ElseIf, Else and End If lines.
Here is another tip, to save you potential debugging problems, which I have experienced myself: note carefully that ElseIf has no space in it, whereas End If does.
EXAMPLE
Here is an example of the If/Then/ElseIf/Else construct in action, based on a question that has come up in the Architectural Desktop Discussion Groups several times. Automatic properties are wonderful [no data entry required, beyond that already done to define the object], but there are occasions where you may want to override that value in a schedule. For example, you may be using Space objects to represent rooms, and use the Height automatic property to represent your ceiling height in a room schedule. This works fine for most spaces, but you may have a few that have multi-level ceilings, and would like to be able to make note that the height varies in the schedule, rather than listing only one of two or more heights. This can be done quite easily by using a formula property. You will need the following:
- An unformatted version of the automatic Height property for Spaces. See my blog article on unformatted properties for more on how to set up an unformatted property.
- A manual property with a default value that would never be used as an override for the Height property, to hold the override value. Since in this case we want the override to indicate “VARIES”, the manual property will have its type set to Text, and the default value will be an empty string.
- A formula property, which tests the value in the manual property and, if it is the default value, passes through the unformatted Height property value. If the manual property contains an override value, the override value is passed through. A data format for the Height value is then assigned to the formula property, and this property is the one that is referenced by the Height column in the schedule.
The formula property for this would be:
If "[HeightManual]" = "" Then
    RESULT = CDbl([HeightUnformatted])
Else
    RESULT = "[HeightManual]"
End If
7/5/2005 Update:I have amended my original sample formula, adding "CDbl()" to the [HeightUnformatted] RESULT, so that a whole number would be interpreted as a real number and not an interger. This is necessary for architectural formatting to be applied to the result when there is no override, and the [HeightUnformatted] property contains a whole number.
The following screen shots from Architectural Desktop 2006 show this formula with two test values for the HeightManual property: one with the default empty string, and one with the string “VARIES”. As designed, the formula returns the value of HeightUnformatted in the first case and the string VARIES in the second. Click on the image to view a larger version.
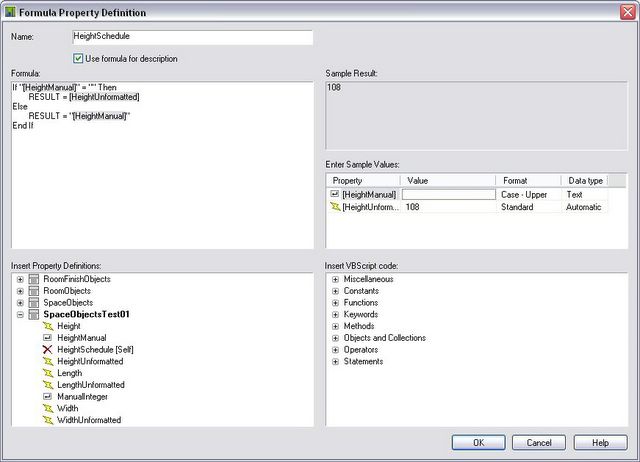
HeightManual set to default empty string.

HeightManual set to VARIES.
June 24, 2005
Customize User Interface Update
An updated DLL file to fix two issues associated with the new Customize User Interface [CUI] feature added to AutoCAD 2006 and related vertical products, including Architectural Desktop 2006 is now available from the Autodesk website.
Be sure to read the "Readme" and follow the installation instructions included therein. A description of the issues resolved is also in the "Readme".
Be sure to read the "Readme" and follow the installation instructions included therein. A description of the issues resolved is also in the "Readme".
June 23, 2005
Matt Dillon on Using Divisions to Manage Design Options
Another post by the master, this time on using the Divisions feature in Project Manager to handle design options. If your work involves designs that can have multiple options for various features - for example, the same house with either a two-car or three-car garage, you will want to check out Matt's tutorial.
June 11, 2005
Assigning Commands to Mouse Buttons in ADT2006
If you have a mouse with more than three buttons, the Autodesk Architectural Desktop Customize User Interface dialog makes programming those additional buttons a breeze. No more assigning a menu action to a function key [by a reference to another menu item, for pop up menus like the SNAP menu], then opening up your mouse software and assigning the action to the mouse button. Now you can set a macro right in the CUI file.
Type CUI at the Command: prompt to open the Customize User Interface dialog. Expand the mouse buttons item and then expand one of the subitems: Click, Shift+Click, Ctrl+Click or Ctrl+Shift+Click, depending upon how you want to activate the macro. Click requires just clicking the mouse button, Shift+Click requires depressing and holding the Shift key, then clicking the mouse button, etc. Finally, select the button you wish to modify [or right click the the menu item to add a new button, and provide a name, description and macro in the Properties area.
The image below shows how I assigned the Object Snap Cursor Menu to my fifth mouse button. Click on the image to see a larger version of it.
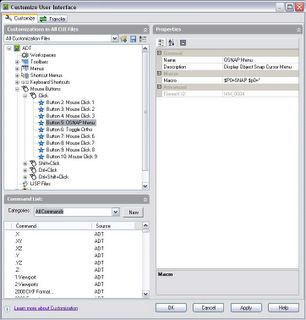
Mouse Button 5 Macro
Type CUI at the Command: prompt to open the Customize User Interface dialog. Expand the mouse buttons item and then expand one of the subitems: Click, Shift+Click, Ctrl+Click or Ctrl+Shift+Click, depending upon how you want to activate the macro. Click requires just clicking the mouse button, Shift+Click requires depressing and holding the Shift key, then clicking the mouse button, etc. Finally, select the button you wish to modify [or right click the the menu item to add a new button, and provide a name, description and macro in the Properties area.
The image below shows how I assigned the Object Snap Cursor Menu to my fifth mouse button. Click on the image to see a larger version of it.

Mouse Button 5 Macro
Book Review: Enhancing CAD Drawings with Photoshop®
Enhancing CAD Drawings with Photoshop®
Scott Onstott, author
Sybex, Inc, publisher
First the disclaimers: I received a reviewer copy of this book. I have worked with the author and publisher of this book as a paid technical editor for a forthcoming book on Architectural Desktop 2006. In my "real" job, my focus is on the production end: code reviews, contract documentation and construction administration. I rarely print or plot in color, and I had never used Photoshop® prior to reviewing this book. [A one-month trial version is included on the CD that comes with the book.] If none of that diminishes your opinion of my opinion, read on.
Scott has put together a great primer for those interested in creating full color architectural presentation drawings on the computer, using Photoshop®. If creating presentation quality images for presenting architectural concepts is something that you find yourself doing from time to time, or is something that you would like to be able to do, this book should be of interest to you. This is especially true for those of you, who, like me, spend the vast majority of work time producing working drawings and who do not have the time required to "play around" with a program as complex as Photoshop to achieve a professional level of competence.
The first three chapters cover the basics of working with Photoshop® from an architectural perspective and will be invaluable to anyone who has not used Photoshop® or a similar program before. Each chapter in the balance of the book addresses a topic of architectural interest, from creating your own entourage library [with the ubiquity of digital cameras, something anyone can do], creating presentation plans and elevations, taking a simple 3D rendering from Autodesk VIZ and turning it into a realistic composite rendering, architectural illustration and presenting the final work to a client. The book is packed with proven techniques - if I can get it to work, anyone can - that will greatly improve the quality of your work and save you hours of time experimenting. Not that experimenting is all bad, and there are many parts of the book where Scott points out opportunities for you to explore additional features and techniques on your own.
In addition to source files for the book's tutorials and the trial version of Photoshop®, the companion CD also includes an AutoLISP routine to automate plotting each layer of a drawing separately and a MAXScript for automating the rendering of each material in an Autodesk VIZ® file one object at a time, with the other objects rendered as a Matte/Shadow, so that they hide the objects behind them. The separate images of the AutoCAD® layers or Autodesk VIZ® objects are then composited in Photoshop®, on separate layers, and enhanced. You may find the time saved by these to be worth more than the cost of the book. I would recommend this book to anyone interested in learning more about producing computer-generated architectural presentation drawings.
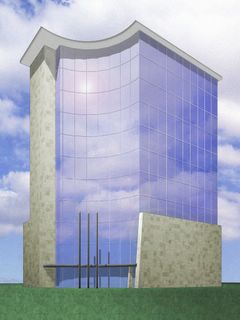
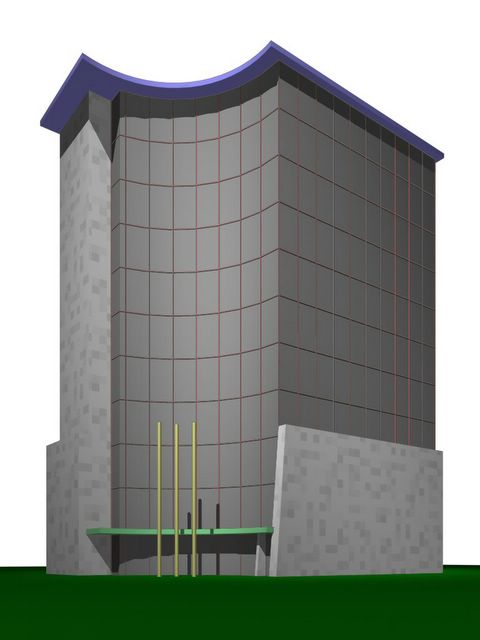
The chapter on creating realistic renderings uses the high-rise building tutorial from Autodesk VIZ® 2005 as a starting point. I chose not to install a trial version of Autodesk VIZ®, but started with the rendering output included on the CD. Following Scott's tutorial, I was able to take the basic rendering from VIZ® ["before" image] and turn it into the rendering shown below ["after" image]. Not bad for someone with no prior Photoshop® experience, if I do say so myself.

Before
After
Scott Onstott, author
Sybex, Inc, publisher
First the disclaimers: I received a reviewer copy of this book. I have worked with the author and publisher of this book as a paid technical editor for a forthcoming book on Architectural Desktop 2006. In my "real" job, my focus is on the production end: code reviews, contract documentation and construction administration. I rarely print or plot in color, and I had never used Photoshop® prior to reviewing this book. [A one-month trial version is included on the CD that comes with the book.] If none of that diminishes your opinion of my opinion, read on.
Scott has put together a great primer for those interested in creating full color architectural presentation drawings on the computer, using Photoshop®. If creating presentation quality images for presenting architectural concepts is something that you find yourself doing from time to time, or is something that you would like to be able to do, this book should be of interest to you. This is especially true for those of you, who, like me, spend the vast majority of work time producing working drawings and who do not have the time required to "play around" with a program as complex as Photoshop to achieve a professional level of competence.
The first three chapters cover the basics of working with Photoshop® from an architectural perspective and will be invaluable to anyone who has not used Photoshop® or a similar program before. Each chapter in the balance of the book addresses a topic of architectural interest, from creating your own entourage library [with the ubiquity of digital cameras, something anyone can do], creating presentation plans and elevations, taking a simple 3D rendering from Autodesk VIZ and turning it into a realistic composite rendering, architectural illustration and presenting the final work to a client. The book is packed with proven techniques - if I can get it to work, anyone can - that will greatly improve the quality of your work and save you hours of time experimenting. Not that experimenting is all bad, and there are many parts of the book where Scott points out opportunities for you to explore additional features and techniques on your own.
In addition to source files for the book's tutorials and the trial version of Photoshop®, the companion CD also includes an AutoLISP routine to automate plotting each layer of a drawing separately and a MAXScript for automating the rendering of each material in an Autodesk VIZ® file one object at a time, with the other objects rendered as a Matte/Shadow, so that they hide the objects behind them. The separate images of the AutoCAD® layers or Autodesk VIZ® objects are then composited in Photoshop®, on separate layers, and enhanced. You may find the time saved by these to be worth more than the cost of the book. I would recommend this book to anyone interested in learning more about producing computer-generated architectural presentation drawings.
The chapter on creating realistic renderings uses the high-rise building tutorial from Autodesk VIZ® 2005 as a starting point. I chose not to install a trial version of Autodesk VIZ®, but started with the rendering output included on the CD. Following Scott's tutorial, I was able to take the basic rendering from VIZ® ["before" image] and turn it into the rendering shown below ["after" image]. Not bad for someone with no prior Photoshop® experience, if I do say so myself.
Before

After
May 26, 2005
More CAD Camp Dates
AUGI CAD Camp may be coming to a city near you. Read more at the CAD Camp Website.
June 7th: St Paul, MN USA (registration open)
August 16th: Orange County, CA USA
August 23rd: Salt Lake City, UT USA
August 30th: Toronto, ON Canada
September 13th: Paramus, NJ USA
September 15th: Cleveland, OH USA
September 27th: Jacksonville, FL USA
September 29th: Boston, MA USA
June 7th: St Paul, MN USA (registration open)
August 16th: Orange County, CA USA
August 23rd: Salt Lake City, UT USA
August 30th: Toronto, ON Canada
September 13th: Paramus, NJ USA
September 15th: Cleveland, OH USA
September 27th: Jacksonville, FL USA
September 29th: Boston, MA USA
May 12, 2005
AUGI ATP Courses for May 2005
There are two courses this month. Ed Jobe returns with the third installment of his ongoing series on VBA and Eric Wing is teaching a course on maintaining office standards, without becoming an ogre. These courses just started this week, and the downloads for the first segment are available. If you are already an AUGI member, login to the website, click on Education in the link bar below the logo and follow the ATP links at the left side. If you are not a member - now is a perfect time to join. Membership is free, as are the ATP courses.
ATP074
Focused VBA: Lesson 3 – Logic, Debugging and Error Handling
Category: Programming
Course Title: ATP074 VBA: Lesson 3
Level: Intermediate
Instructor: Ed Jobe
Course Start: Monday, May 9, 2005
This VBA continued Lesson 3, will introduce some intermediate subjects.
Segment 1 discusses some ideas on programming logic and describes the control structures that VBA has to implement decision-making and flow control.
Segment 2 will discuss what errors are and how to use the tools that come with VBA to prevent them and discover them when they do occur.
Segment 3 will discuss some methods for handling runtime errors.
ATP075
Maintaining CAD standards while avoiding a coup d’état
Category: AutoCAD
Course Title: ATP075 Maintaining CAD Standards
Level: Beginner
Instructor: Eric Wing
Course Start: Monday, May 9, 2005
Setting up office CAD standards is tricky business. Usually decisions that need to be made are done by committee, and take a painfully long time to establish. We all know this. Maintaining CAD standards, however, is the real challenge. How do we make sure people are using the company standards? How do we keep systems stable and running at peak performance regardless of who is driving? Well, organization is one. The other is knowing what tools are available, and how to use them to your advantage. This author doubles as a CAD / network manager, and a nice guy. Two titles that don’t belong in the same sentence.
I use a little organization and some really effective new tools (perhaps just a pinch of medication also) to remain as the CAD manager not the CAD Oppressor.
ATP074
Focused VBA: Lesson 3 – Logic, Debugging and Error Handling
Category: Programming
Course Title: ATP074 VBA: Lesson 3
Level: Intermediate
Instructor: Ed Jobe
Course Start: Monday, May 9, 2005
This VBA continued Lesson 3, will introduce some intermediate subjects.
Segment 1 discusses some ideas on programming logic and describes the control structures that VBA has to implement decision-making and flow control.
Segment 2 will discuss what errors are and how to use the tools that come with VBA to prevent them and discover them when they do occur.
Segment 3 will discuss some methods for handling runtime errors.
ATP075
Maintaining CAD standards while avoiding a coup d’état
Category: AutoCAD
Course Title: ATP075 Maintaining CAD Standards
Level: Beginner
Instructor: Eric Wing
Course Start: Monday, May 9, 2005
Setting up office CAD standards is tricky business. Usually decisions that need to be made are done by committee, and take a painfully long time to establish. We all know this. Maintaining CAD standards, however, is the real challenge. How do we make sure people are using the company standards? How do we keep systems stable and running at peak performance regardless of who is driving? Well, organization is one. The other is knowing what tools are available, and how to use them to your advantage. This author doubles as a CAD / network manager, and a nice guy. Two titles that don’t belong in the same sentence.
I use a little organization and some really effective new tools (perhaps just a pinch of medication also) to remain as the CAD manager not the CAD Oppressor.
Annotation Scaling in Architectural Desktop
Most, if not all, non-scale-dependent annotation content in ADT uses annotation scaling. What that means is that the content is set up to be scaled by both the current drawing scale factor [eg, 96 for 1/8" = 1'-0"] and the current annotation plot size. Both of these are set on the Scale tab of the Drawing Setup dialog.
Content that uses annotation scaling is set up based on the fact that one unit in the content will be the annotation plot size when plotted at the scale that was current when the content was placed. Any attribute in the content that is intended to plot at the annotation plot size is one unit high in the block definition. Some content files use proportionately larger or smaller attribute heights to generate proportionately larger or smaller text. The linework graphics are drawn proportionate to the attributes.
When content that uses annotation scaling is placed, the scale factor is determined by the product of the annotation plot size and the scale factor of the current scale. So, if you have set the annotation plot size to 3/32" and your current plot scale is 1/8" = 1'-0", annotation content will be placed at a scale factor of 3/32 x 96, which is 9. Change the annotation plot size to 1/8", and the content will be placed at a scale factor of 1/8 x 96 = 12.
5/16/2005 Update: You can read a more detailed explanation of scaling in Architectural Desktop Content files in this Knowledge Base article.
Content that uses annotation scaling is set up based on the fact that one unit in the content will be the annotation plot size when plotted at the scale that was current when the content was placed. Any attribute in the content that is intended to plot at the annotation plot size is one unit high in the block definition. Some content files use proportionately larger or smaller attribute heights to generate proportionately larger or smaller text. The linework graphics are drawn proportionate to the attributes.
When content that uses annotation scaling is placed, the scale factor is determined by the product of the annotation plot size and the scale factor of the current scale. So, if you have set the annotation plot size to 3/32" and your current plot scale is 1/8" = 1'-0", annotation content will be placed at a scale factor of 3/32 x 96, which is 9. Change the annotation plot size to 1/8", and the content will be placed at a scale factor of 1/8 x 96 = 12.
5/16/2005 Update: You can read a more detailed explanation of scaling in Architectural Desktop Content files in this Knowledge Base article.
May 06, 2005
Seeing Clearly in ADT2006
A problem with the render material for the Clear Glass material in several of the style source files that ship with Architectural Desktop 2006 has been identified. Rob Finch of Autodesk has posted the steps needed to fix these source files in a post to a thread in the Autodesk Architectural Desktop 2006 Discussion Group, which I have reproduced below. Steps 4 - 6 can also be applied to any files already created in 2006 which do not have the correct render material assigned to the Clear Glass material.
5/8/2005 Update: I had problems getting the clear glass material to update in a test file I did using ADT2006. I have posted a reply indicating this in the Autodesk Architectural Desktop 2006 thread where Rob Finch originally posted the above solution. I will update this post with any new developments that occur.
5/10/2005 Update: Rob Finch posted back with the suggestion to link the file to VIZ Render, then drag the clear glass material tool from the VIZ Render tool palette and drop it into the ADT file. If you can not see the ADT file on screen, you can drag the tool down and hover over the ADT button on the Windows Task bar to bring the ADT window to the top. Move the mouse over the ADT drawing area before releasing the left mouse button to drop the render material into the drawing. Choose to overwrite the existing render material. You will be prompted to create a new ADT material definition that uses the redefined render material; you can choose Cancel. The render material correctly overwrote the old definition using this method, and I can see through the glass material.
- Start Architectural Desktop and open Content Browser.
- Browse down Render Material Catalog to Door and Windows, then Glazing.
- iDrop the "Doors & Windows.Glazing.Glass.Clear" material to a Tool Palette in Architectural Desktop. This could be to any of the palettes as you so choose. The reason for putting it on the Tool Palette, rather than directly into the dwg is to be able to apply it to multiple dwgs.
- Open up each of the styles drawings, in turn, from the relevant units folder, e.g. C:\Documents and Settings\All Users\Application Data\Autodesk\ADT 2006\enu\Styles\Imperial
- Curtain Wall & Curtain Wall Unit Styles (Imperial).dwg
- Door Styles (Imperial).dwg
- Door-Window Assembly Styles (Imperial).dwg
Material Definitions (Imperial).dwg - Window Styles (Imperial).dwg
Same principle for Metric and Metric (D A CH) - Right click on the Glass material and select "Import Render Material". This will cause the Import/Export - Duplicate names dialog to open. In the Merge Styles list, select Overwrite Existing.
- Save and close the drawing. Repeat steps 4 through 6 until all such drawings have been rectified.
5/8/2005 Update: I had problems getting the clear glass material to update in a test file I did using ADT2006. I have posted a reply indicating this in the Autodesk Architectural Desktop 2006 thread where Rob Finch originally posted the above solution. I will update this post with any new developments that occur.
5/10/2005 Update: Rob Finch posted back with the suggestion to link the file to VIZ Render, then drag the clear glass material tool from the VIZ Render tool palette and drop it into the ADT file. If you can not see the ADT file on screen, you can drag the tool down and hover over the ADT button on the Windows Task bar to bring the ADT window to the top. Move the mouse over the ADT drawing area before releasing the left mouse button to drop the render material into the drawing. Choose to overwrite the existing render material. You will be prompted to create a new ADT material definition that uses the redefined render material; you can choose Cancel. The render material correctly overwrote the old definition using this method, and I can see through the glass material.
Subscribe to:
Posts (Atom)