July 26, 2005
Beau Turner on ADT - Mass Tool Palette Generation
Beau Turner has posted an article in his blog on how Autodesk Architectural Desktop 2006 makes generating multiple tools/palettes from a source file much easier than previous versions, where tools were created one at a time.
July 16, 2005
WxH Formula For Windows
In Archtitectural Desktop, doors have special automatic properties that combine the width, height and thickness - or just width and height - into one property so you can display that information in one column of your schedule. Windows, however, do not offer a similar option. Those working with imperial units [feet and inches] may have found that trying to combine width and height properties to which imperial architectural formatting has already been applied in a formula property is not as easy as you might at first think, due to the fact that the symbol for inches is also the delimeter used to represent the extents of strings.
It is possible to create your own W x H formula property for windows, but it will require a little more work that simply combining two pre-formatted strings. I have posted a sample file to the "PSD-Window Size WxH" thread in the Autodesk Architectural Desktop 2005 Discussion Group. This file has a Property Set Definition called WindowObjectsWxH that has two formula properties - one that displays feet, inches and decimal inches and one that displays feet, inches and fractions of an inch, rounded to the nearest eighth of an inch. Each formula uses variables to store the results of the calculations that convert the unformatted inch values into feet, inches and the selected fractional inch option, then puts them all together at the end, using Chr(34) to generate the inch marks.
If you are interested, be certain to get the HxWtest-Imperial_rev1.zip file rather than the first file I posted, as that has corrections and improvements to the feet, inches and decimal inches formula, as noted in the post.
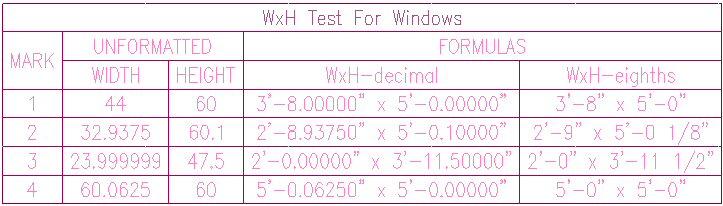
Here is a screen capture of a schedule table that shows the unformatted height and width values for four sample windows, and the way each of the two formulas displays those values.

It is possible to create your own W x H formula property for windows, but it will require a little more work that simply combining two pre-formatted strings. I have posted a sample file to the "PSD-Window Size WxH" thread in the Autodesk Architectural Desktop 2005 Discussion Group. This file has a Property Set Definition called WindowObjectsWxH that has two formula properties - one that displays feet, inches and decimal inches and one that displays feet, inches and fractions of an inch, rounded to the nearest eighth of an inch. Each formula uses variables to store the results of the calculations that convert the unformatted inch values into feet, inches and the selected fractional inch option, then puts them all together at the end, using Chr(34) to generate the inch marks.
If you are interested, be certain to get the HxWtest-Imperial_rev1.zip file rather than the first file I posted, as that has corrections and improvements to the feet, inches and decimal inches formula, as noted in the post.
Here is a screen capture of a schedule table that shows the unformatted height and width values for four sample windows, and the way each of the two formulas displays those values.
Unformatted Properties and Numeric Precision
The out-of-the-box Standard Property Data Format does not add any special formatting to a number [prefix, suffix or architectural/engineering imperial formatting], as noted in a previous blog article. Be aware, however, that it also rounds off values to three decimal places, so any values you bring into your formula from properties using the Standard Property Data format will start out rounded off that way. That may be sufficient accuracy for your task, but when it is not, simply copy the Standard Property Data Format and, in the copy, increase the Precision to the number of places you need. The image below shows a Property Data Format I set up and named Standard-8, using the maximum eight decimal place precision.

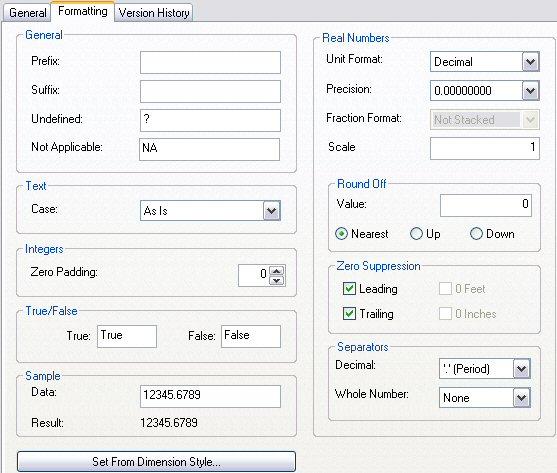
My Custom Standard-8 Property Data Format
July 14, 2005
AUGI CAD Camp Update

Registration is now open for the AUGI CAD Camps in Orange County, CA; Salt Lake City, UT; Columbus, OH; and Toronto, ON.
In addition to these camps noted in a previous blog article
August 16th: Orange County, CA USA (registration open)
August 23rd: Salt Lake City, UT USA (registration open)
August 30th: Toronto, ON Canada (registration open)
September 13th: Paramus, NJ USA (registration opens 7/17)
September 15th: Cleveland, OH USA (registration opens 7/17)
September 27th: Jacksonville, FL USA (registration opens 8/1)
September 29th: Boston, MA USA (registration opens 8/1)
the following dates have also been scheduled:
August 25th: Columbus, OH USA (registration open)
September 22nd: Kansas City, MO USA (registration opens 7/25)
October 18th: Birmingham, AL USA (registration opens 8/22)
October 25th: Denver, CO USA (registration opens 8/29)
July 11, 2005
Chris Yanchar Posts ADT 2006 New Features Presentation
Chris has posted the PowerPoint and sample files that Bill Glennie and Chronis Loulakis presented at TechCamp 2005 in an article in his blog. The presentation highlights the new features in Autodesk Architectural Desktop 2006.
July 09, 2005
Structure/Flow in Formula Properties: Select Case/Case/Case Else/End Select Construct
INTRODUCTION
Here is another VBScript construct that you can use to change the RESULT of your formula based on the current value of a VBScript expression. The expression can be the current value of a property from a Property Set attached to the same object, a variable that you defined earlier in the formula [perhaps by manipulating the values of one or more properties] or a VBScript statement [perhaps operating on a property or a previously defined variable]. The Select Case construct allows you to specify multiple different actions based on the value of that expression. A Select Case construct can be much easier to set up and maintain than a complex If/Then/ElseIf/Else/End If construct, particularly if you start nesting additional If/Then/ElseIf/Else/End If constructs, and it does not require evaluating the expression for each conditional statement. As with the If/Then/ElseIf/Else/End If construct http://architects-desktop.blogspot.com/2005/07/structureflow-in-formula-properties.html, each branch of the Select Case construct must end in assigning the formula properties final value to “RESULT”. Depending upon your needs, the RESULT statement could be after the end of the Select Case block of code, which may simply set other variables to appropriate values. But many times you will set a RESULT in the action statements associated with each case; when doing so, be certain to include a RESULT statement in the action statements for each case branch.
SYNTAX
You start out by giving the expression, then list various possible values and the actions to take when the expression evaluates to that particular value. You can optionally include a Case Else statement to specify actions to be taken if none of the listed cases matches the current value of the expression. It is good programming practice to include a Case Else statement, even if you are one-hundred percent certain that you have covered every possible value in the Case statements, even if all you do there is assign a value that indicates an unexpected even has occurred. Seeing that value will let you know that somehow, the expression has taken on an unexpected value and make debugging your formula that much easier.
The basic structure of the Select Case construct is shown below. Explanations of the italicized items are listed below the structure; items shown in blue and enclosed by square brackets are optional. You can nest Select Case constructs within each other by including one in the action statements to be evaluated when a particular Case is true.
This required element is the value that is compared to the values specified for each Case. It can be an actual value [e.g. 23.0, “String”], a variable [the current value assigned is used], a math or comparison expression [11.0 + 12.0, x > 23.0] or a user-defined or VBScript function that returns a value.
expressionlist1
expressionlist2
These are the values that are compared to the expression; you must provide at least one value for each Case you include in your Select Case construct. You can list multiple values by separating each value by a comma. Each value can be any of the types listed for the expression. When one of these values matches the value of the expression, the action statements associated with that Case are executed. You may have any number of Case blocks of code.
actionstatements1
actionstatements2
One or more statements to be executed when the value for a particular Case matches that of the expression.
elseactionstatements
One or more statements to be executed if none of the Case values match the expression value.
EXAMPLES
This example is based on the way my firm handles door frame types and materials. We designate each frame type with a letter; each type has a particular material associated with it. There are a number of “office standard” types and the letters assigned to these types are reserved for that type; custom types for a particular project never make use of the letter designation assigned to an office standard type. There are certain door types that can have more than one frame type associated with it. Rather than have a separate door style for each door type/frame type combination, our frame type property is in an object-based property set. To avoid have the user have to enter both the frame type designation and the material for office standard frame types, a formula property using a Select Case construct is used to automatically assign the correct material type. A manual property is included in the property set so that the user can specify the material for custom frame types. The Case Else block of code is used to read in and return this value only when the frame type designation is not an office standard one. The following formula shows an example of this concept. It assumes the following:
Anyone familiar with the VBA implementation of the Case Select construct should note that VBScript does not support the To or Is keywords in an expressionlist. These are handy for specifying a range of values to compare to the expression, but are not available in a formula property. One way around this is to set the expression to true or false, using the VBScript constants vbTrue or vbFalse respectively. You can find these in 2006 in the “Insert VBScript code: “ pane in the lower right of the Formula Property Definition dialog, under Constants > Tristate. Then set up your expressionlists with comparison statements that evaluate to true or false. The following example is fairly simple, and could just as easily have been done with an If/Then/Elseif/Else construct. But if you had many ranges, with different actions to take for each range, a Select Case construct may be easier to set up and understand in the future.


Here is another VBScript construct that you can use to change the RESULT of your formula based on the current value of a VBScript expression. The expression can be the current value of a property from a Property Set attached to the same object, a variable that you defined earlier in the formula [perhaps by manipulating the values of one or more properties] or a VBScript statement [perhaps operating on a property or a previously defined variable]. The Select Case construct allows you to specify multiple different actions based on the value of that expression. A Select Case construct can be much easier to set up and maintain than a complex If/Then/ElseIf/Else/End If construct, particularly if you start nesting additional If/Then/ElseIf/Else/End If constructs, and it does not require evaluating the expression for each conditional statement. As with the If/Then/ElseIf/Else/End If construct http://architects-desktop.blogspot.com/2005/07/structureflow-in-formula-properties.html, each branch of the Select Case construct must end in assigning the formula properties final value to “RESULT”. Depending upon your needs, the RESULT statement could be after the end of the Select Case block of code, which may simply set other variables to appropriate values. But many times you will set a RESULT in the action statements associated with each case; when doing so, be certain to include a RESULT statement in the action statements for each case branch.
SYNTAX
You start out by giving the expression, then list various possible values and the actions to take when the expression evaluates to that particular value. You can optionally include a Case Else statement to specify actions to be taken if none of the listed cases matches the current value of the expression. It is good programming practice to include a Case Else statement, even if you are one-hundred percent certain that you have covered every possible value in the Case statements, even if all you do there is assign a value that indicates an unexpected even has occurred. Seeing that value will let you know that somehow, the expression has taken on an unexpected value and make debugging your formula that much easier.
The basic structure of the Select Case construct is shown below. Explanations of the italicized items are listed below the structure; items shown in blue and enclosed by square brackets are optional. You can nest Select Case constructs within each other by including one in the action statements to be evaluated when a particular Case is true.
Select Case expression
     [Case expressionlist1
           [actionstatements1]]
     [Case expressionlist2
           [actionstatements2]]
     […insert additional Case statements,
                 expression lists and action statements here]
     [Case Else
           [elseactionstatements]]
End Select
expression This required element is the value that is compared to the values specified for each Case. It can be an actual value [e.g. 23.0, “String”], a variable [the current value assigned is used], a math or comparison expression [11.0 + 12.0, x > 23.0] or a user-defined or VBScript function that returns a value.
expressionlist1
expressionlist2
These are the values that are compared to the expression; you must provide at least one value for each Case you include in your Select Case construct. You can list multiple values by separating each value by a comma. Each value can be any of the types listed for the expression. When one of these values matches the value of the expression, the action statements associated with that Case are executed. You may have any number of Case blocks of code.
actionstatements1
actionstatements2
One or more statements to be executed when the value for a particular Case matches that of the expression.
elseactionstatements
One or more statements to be executed if none of the Case values match the expression value.
EXAMPLES
This example is based on the way my firm handles door frame types and materials. We designate each frame type with a letter; each type has a particular material associated with it. There are a number of “office standard” types and the letters assigned to these types are reserved for that type; custom types for a particular project never make use of the letter designation assigned to an office standard type. There are certain door types that can have more than one frame type associated with it. Rather than have a separate door style for each door type/frame type combination, our frame type property is in an object-based property set. To avoid have the user have to enter both the frame type designation and the material for office standard frame types, a formula property using a Select Case construct is used to automatically assign the correct material type. A manual property is included in the property set so that the user can specify the material for custom frame types. The Case Else block of code is used to read in and return this value only when the frame type designation is not an office standard one. The following formula shows an example of this concept. It assumes the following:
- The formula property is called FrameMaterial and is the property to be included in the door schedule.
- There is a manual text property called FrameType, which has default value of “--”, into which the user will enter the appropriate letter designation for a given door’s frame type.
- There is a manual text property called FrameMaterialNonStandard, with a default value of “--”, into which the user will enter text indicating the material type of custom frame types. Note that if a standard frame type designation is used, the value of this property will not be used, whether or not the user changes it from the default value.
Select Case “[Frame Type]”
    Case “A”,”D”
        RESULT = “HM”
    Case “B”
        RESULT = “WD”
    Case “C”
        RESULT = “AL”
    Case Else
        RESULT = “[FrameMaterialNonStandard]”
End Select
Our actual formula is quite a bit longer, but the above should get the idea across.Anyone familiar with the VBA implementation of the Case Select construct should note that VBScript does not support the To or Is keywords in an expressionlist. These are handy for specifying a range of values to compare to the expression, but are not available in a formula property. One way around this is to set the expression to true or false, using the VBScript constants vbTrue or vbFalse respectively. You can find these in 2006 in the “Insert VBScript code: “ pane in the lower right of the Formula Property Definition dialog, under Constants > Tristate. Then set up your expressionlists with comparison statements that evaluate to true or false. The following example is fairly simple, and could just as easily have been done with an If/Then/Elseif/Else construct. But if you had many ranges, with different actions to take for each range, a Select Case construct may be easier to set up and understand in the future.
dblWidth = CDbl([WidthUnformatted])
Select Case vbTrue
    Case dblWidth < 36.0
        RESULT = "SMALL"
    Case dblWidth > 36.0
        RESULT = "LARGE"
    Case Else
        RESULT = "STANDARD"
End Select
The following screen shots show the first example formula returning the value "HM" when the FrameType is "D" and returning the value in FrameTypeNonStandard, when the FrameType is "Q", which does not match the any of the values in the Case statements.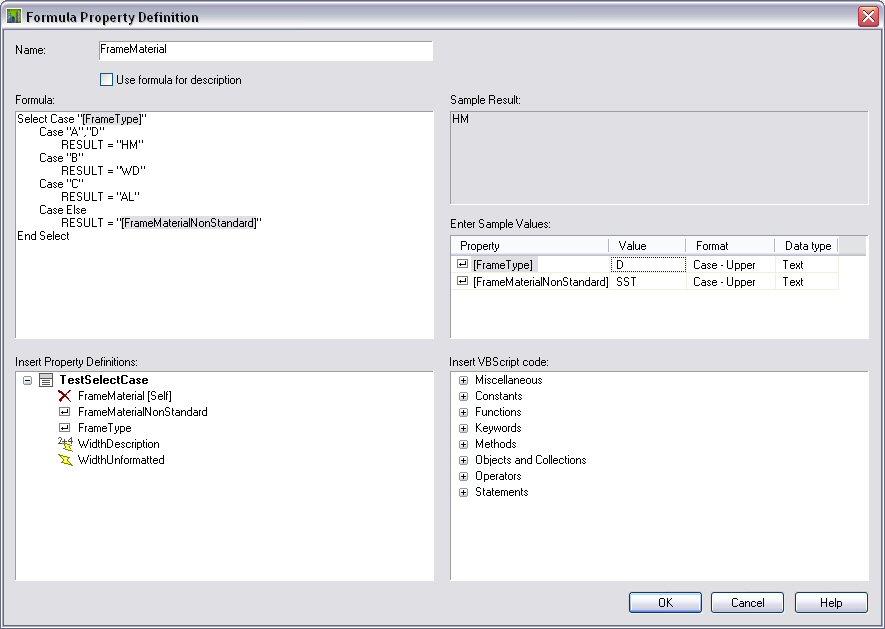
FrameType "D"

FrameType "Q"
Multi-Line Room Name Formula Revisited
I had time to put together a DO WHILE LOOP to strip out any instances of back-to-back spaces that could result from either a blank second line or spaces typed by the user when combining three separate room name lines into one string for use in a schedule. I posted a sample file with the new formula to the Autodesk Architectural Desktop 2005 Discussion Group. For this example, I chose not to use the array method of combining the strings, discussed in a previous blog article, but simply concatenated all three single-line properties with separating spaces. I did use the TRIM function to remove any leading or trailing spaces, then applied the DO loop to replace any back-to-back spaces with a single space.
The formula looks like this:
4/24/2008 UPDATE: I have put the code in a "code box" to avoid having two critical double spaces from being stripped from the code. If you are going to cut and paste this code, rather than look at the sample file linked to above, make certain that there are two spaces between the double quotation marks in the Do While line, and two spaces bewteen the first set of double quotation marks in the Replace function and one space between the second set of double quotation marks. In other words:
Do While InStr(strRoomName, "[SPACE][SPACE]") > 0
and
strRoomName = Replace (strRoomName, "[SPACE][SPACE]", "[SPACE]")
where you will substitute a space character for [SPACE].
Note that the initial strRoomName assignment code is all on one line in my formula; I put it on two lines here to fit the blog format better.
The Trim command takes care of any leading or trailing spaces in the concatenated string. This could happen if NameLine1 or NameLine3 was a null string. The InStr function searches the string for instances of two back to back spaces; it returns an integer representing the position of the first one found, or 0 if none are found. If at least one "double space" is found, the loop is entered. The Replace function goes through the string and replaces all "double spaces" with single spaces. The loop ends here, and the string is tested once again for any "double spaces". There could still be some after the first pass; for example, a string with four spaces in a row would have the first two replaced with one space, then the third and fourth replaced with one space, after one pass of the Replace function, leaving two spaces in a row. By using a loop, the string is run through the Replace function until only single spaces remain. Finally, the processed string is passed as the RESULT of the formula.
Perhaps three-line room name tags are not something you use, but you may find the principles used here can be applied to other situations where you want to combine multiple string properties into one string and can not be certain that there will always be a non-null value in each property.
The formula looks like this:
4/24/2008 UPDATE: I have put the code in a "code box" to avoid having two critical double spaces from being stripped from the code. If you are going to cut and paste this code, rather than look at the sample file linked to above, make certain that there are two spaces between the double quotation marks in the Do While line, and two spaces bewteen the first set of double quotation marks in the Replace function and one space between the second set of double quotation marks. In other words:
Do While InStr(strRoomName, "[SPACE][SPACE]") > 0
and
strRoomName = Replace (strRoomName, "[SPACE][SPACE]", "[SPACE]")
where you will substitute a space character for [SPACE].
strRoomName = Trim("[NameLine1]" & " " &
              "[NameLine2]" & " " & "[NameLine3]")
Do While InStr(strRoomName, "  ") > 0
    strRoomName = Replace (strRoomName, "  ", " ")
Loop
RESULT = strRoomName
Note that the initial strRoomName assignment code is all on one line in my formula; I put it on two lines here to fit the blog format better.
The Trim command takes care of any leading or trailing spaces in the concatenated string. This could happen if NameLine1 or NameLine3 was a null string. The InStr function searches the string for instances of two back to back spaces; it returns an integer representing the position of the first one found, or 0 if none are found. If at least one "double space" is found, the loop is entered. The Replace function goes through the string and replaces all "double spaces" with single spaces. The loop ends here, and the string is tested once again for any "double spaces". There could still be some after the first pass; for example, a string with four spaces in a row would have the first two replaced with one space, then the third and fourth replaced with one space, after one pass of the Replace function, leaving two spaces in a row. By using a loop, the string is run through the Replace function until only single spaces remain. Finally, the processed string is passed as the RESULT of the formula.
Perhaps three-line room name tags are not something you use, but you may find the principles used here can be applied to other situations where you want to combine multiple string properties into one string and can not be certain that there will always be a non-null value in each property.
July 04, 2005
Multi-Line Room Name Formula Improvements
The Architectural Desktop 2005 Discussion Group has a thread discussing how to combine the text from a three-line room name tag into one property for a schedule. I had posted a solution using a series of If/Then/Else statements to perform the needed concatenations, and it works. Hats off to "Draftinations", who suggested a more elegant way of performing the concatenation, using an array. It works perfectly for two lines, and works pretty well for three. The only drawback on the three-line version is if you have something entered on the first and third lines and the second line is blank or composed entirely of one or more spaces - you will get at least two spaces in your final string. That is easily avoided by entering the data properly. I posted a sample three-line version using an array to the thread. Perhaps someday I will have time to see if I can write some additional code to replace back-to-back spaces with a single space.
July 03, 2005
Structure/Flow in Formula Properties: If/Then/ElseIf/Else Construct
INTRODUCTION
You can do many things with formula properties by directly manipulating other property values – such as concatenating strings or calculating a rectangular area by multiplying the rectangle’s length by its width. You may find, however, that for certain scheduling situations, you need a more complex, multi-line formula. Perhaps you need to make several intermediate calculations, or need to test one or more values and take different actions based on the results of each test. One way to do the latter is to make use of an If/Then/ElseIf/Else construct. Keep in mind that once your formula goes beyond a simple single expression, you need to explicitly indicate the final value to be returned by the formula, by assigning that value to “RESULT”, which must be in all capital letters. For a conditional statement like the If/Then/ElseIf/Else construct, each branch that the formula can take must eventually have a RESULT assignment.
SYNTAX
The syntax for the If/Then/ElseIf/Else construct is fairly straightforward and should be familiar to anyone with programming experience – or an understanding of the words if, then and else. The If/Then/ElseIf/Else construct allows you to perform one or more actions if a certain condition is true. If that initial condition is false, you may optionally specify one or more additional test condtions and perform one or more actions associated with the first one of these conditions that is true. If all conditions specified are false, you may optionally specify one or more actions to be taken.
Here is the basic structure of a simple If/Then/ElseIf/Else construct. Explanations of the italicized items are listed below the structure; items shown in blue and enclosed by square brackets are optional. Note that you can further complicate things by nesting an If/Then/ElseIf/Else constructs within another one, by including the additional If/Then/ElseIf/Else construct as one of the statements to be evaluated.
ifcondition
This required statement must evaluate to True or False. See my previous post on operators for the comparison operators you can use to generate True of False in a condtional statement.
ifstatements
One or more optional statements may be placed here. These will be executed when the ifcondition is True.
elseif1condition
elseif1conditionstatements
elseif2condition
elseif2conditionstatements
One or more optional ElseIf “blocks” [the ElseIf, the associated condition, the Then and the optional statements] can be added to an If/Then/ElseIf/Else construct. When the ifcondition is false, any ElseIf conditions will be evaluated, in order, until either the first True ElseIf condition is encountered or all are found to be false. If a true condition is found, any optional statements associated with that ElseIf block are executed. ElseIf blocks must occur before the Else block, if an Else block is used.
elsestatements
When the ifcondition and all ElseIf conditions [if any are provided] are false, any optional elsestatements are executed.
There is a single-line syntax that could be used for very simple If statements, but that can be difficult to read, so I would recommend sticking with the format noted above. Note that in that form, each If must have a corresponding End If, but that an optional ElseIf does not have an End If. Speaking of legibility, indenting the statements to be executed makes it much easier to read than if you leave the statements flush with the If, ElseIf, Else and End If lines.
Here is another tip, to save you potential debugging problems, which I have experienced myself: note carefully that ElseIf has no space in it, whereas End If does.
EXAMPLE
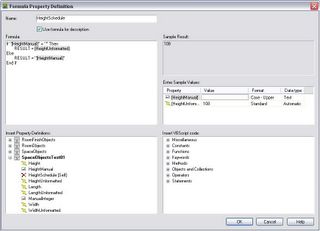
Here is an example of the If/Then/ElseIf/Else construct in action, based on a question that has come up in the Architectural Desktop Discussion Groups several times. Automatic properties are wonderful [no data entry required, beyond that already done to define the object], but there are occasions where you may want to override that value in a schedule. For example, you may be using Space objects to represent rooms, and use the Height automatic property to represent your ceiling height in a room schedule. This works fine for most spaces, but you may have a few that have multi-level ceilings, and would like to be able to make note that the height varies in the schedule, rather than listing only one of two or more heights. This can be done quite easily by using a formula property. You will need the following:
The formula property for this would be:
I have amended my original sample formula, adding "CDbl()" to the [HeightUnformatted] RESULT, so that a whole number would be interpreted as a real number and not an interger. This is necessary for architectural formatting to be applied to the result when there is no override, and the [HeightUnformatted] property contains a whole number.
The following screen shots from Architectural Desktop 2006 show this formula with two test values for the HeightManual property: one with the default empty string, and one with the string “VARIES”. As designed, the formula returns the value of HeightUnformatted in the first case and the string VARIES in the second. Click on the image to view a larger version.
HeightManual set to default empty string.

HeightManual set to VARIES.
You can do many things with formula properties by directly manipulating other property values – such as concatenating strings or calculating a rectangular area by multiplying the rectangle’s length by its width. You may find, however, that for certain scheduling situations, you need a more complex, multi-line formula. Perhaps you need to make several intermediate calculations, or need to test one or more values and take different actions based on the results of each test. One way to do the latter is to make use of an If/Then/ElseIf/Else construct. Keep in mind that once your formula goes beyond a simple single expression, you need to explicitly indicate the final value to be returned by the formula, by assigning that value to “RESULT”, which must be in all capital letters. For a conditional statement like the If/Then/ElseIf/Else construct, each branch that the formula can take must eventually have a RESULT assignment.
SYNTAX
The syntax for the If/Then/ElseIf/Else construct is fairly straightforward and should be familiar to anyone with programming experience – or an understanding of the words if, then and else. The If/Then/ElseIf/Else construct allows you to perform one or more actions if a certain condition is true. If that initial condition is false, you may optionally specify one or more additional test condtions and perform one or more actions associated with the first one of these conditions that is true. If all conditions specified are false, you may optionally specify one or more actions to be taken.
Here is the basic structure of a simple If/Then/ElseIf/Else construct. Explanations of the italicized items are listed below the structure; items shown in blue and enclosed by square brackets are optional. Note that you can further complicate things by nesting an If/Then/ElseIf/Else constructs within another one, by including the additional If/Then/ElseIf/Else construct as one of the statements to be evaluated.
If ifcondition Then
    [ifstatements]
[ElseIf elsif1condition Then
    [elseif1statements]]
[ElseIf elsif2condition Then
    [elseif2statements]]
[… insert additional ElseIf conditionsand optional statements as desired]
[Else
    [elsestatements]]
End If
ifcondition
This required statement must evaluate to True or False. See my previous post on operators for the comparison operators you can use to generate True of False in a condtional statement.
ifstatements
One or more optional statements may be placed here. These will be executed when the ifcondition is True.
elseif1condition
elseif1conditionstatements
elseif2condition
elseif2conditionstatements
One or more optional ElseIf “blocks” [the ElseIf, the associated condition, the Then and the optional statements] can be added to an If/Then/ElseIf/Else construct. When the ifcondition is false, any ElseIf conditions will be evaluated, in order, until either the first True ElseIf condition is encountered or all are found to be false. If a true condition is found, any optional statements associated with that ElseIf block are executed. ElseIf blocks must occur before the Else block, if an Else block is used.
elsestatements
When the ifcondition and all ElseIf conditions [if any are provided] are false, any optional elsestatements are executed.
There is a single-line syntax that could be used for very simple If statements, but that can be difficult to read, so I would recommend sticking with the format noted above. Note that in that form, each If must have a corresponding End If, but that an optional ElseIf does not have an End If. Speaking of legibility, indenting the statements to be executed makes it much easier to read than if you leave the statements flush with the If, ElseIf, Else and End If lines.
Here is another tip, to save you potential debugging problems, which I have experienced myself: note carefully that ElseIf has no space in it, whereas End If does.
EXAMPLE
Here is an example of the If/Then/ElseIf/Else construct in action, based on a question that has come up in the Architectural Desktop Discussion Groups several times. Automatic properties are wonderful [no data entry required, beyond that already done to define the object], but there are occasions where you may want to override that value in a schedule. For example, you may be using Space objects to represent rooms, and use the Height automatic property to represent your ceiling height in a room schedule. This works fine for most spaces, but you may have a few that have multi-level ceilings, and would like to be able to make note that the height varies in the schedule, rather than listing only one of two or more heights. This can be done quite easily by using a formula property. You will need the following:
- An unformatted version of the automatic Height property for Spaces. See my blog article on unformatted properties for more on how to set up an unformatted property.
- A manual property with a default value that would never be used as an override for the Height property, to hold the override value. Since in this case we want the override to indicate “VARIES”, the manual property will have its type set to Text, and the default value will be an empty string.
- A formula property, which tests the value in the manual property and, if it is the default value, passes through the unformatted Height property value. If the manual property contains an override value, the override value is passed through. A data format for the Height value is then assigned to the formula property, and this property is the one that is referenced by the Height column in the schedule.
The formula property for this would be:
If "[HeightManual]" = "" Then
    RESULT = CDbl([HeightUnformatted])
Else
    RESULT = "[HeightManual]"
End If
7/5/2005 Update:I have amended my original sample formula, adding "CDbl()" to the [HeightUnformatted] RESULT, so that a whole number would be interpreted as a real number and not an interger. This is necessary for architectural formatting to be applied to the result when there is no override, and the [HeightUnformatted] property contains a whole number.
The following screen shots from Architectural Desktop 2006 show this formula with two test values for the HeightManual property: one with the default empty string, and one with the string “VARIES”. As designed, the formula returns the value of HeightUnformatted in the first case and the string VARIES in the second. Click on the image to view a larger version.

HeightManual set to default empty string.

HeightManual set to VARIES.
Subscribe to:
Posts (Atom)