The out-of-the-box scale-dependent room tag tools, provided in the Documentation Tool Catalog - Imperial and - Metric, use the new tag tools, just like their single-scale bretheren. Unfortunately, there is no way in the tag tool to specify a scaling type - all tags using the tag tool have annotation scaling applied. For single-scale tags, that would be my preference, but the scale-dependent tags are designed to be inserted at scale factor of 1; the view blocks inside are already pre-scaled for three differenent scales: 1/16" = 1'-0", 1/8" = 1'-0" and 1/4" = 1'-0" for the imperial tag and 1:200, 1:100 and 1:50 for the metric tag. Applying annotation scaling to these tags causes them to be inserted incorrectly under most drawing scale/annotation plot size combinations, including those likely to be used.
I can think of two work-arounds, neither totally ideal, but if scale-dependent tags are important to your workflow, you may need to decide which is the better way to work for you.
Keeping the Out-of-the-box Content and Tool
You can get the out-of-the-box tool to insert the tag at the necessary scale factor of one by setting your drawing scale to be the inverse of your annotation plot size, while placing tags. For example, if you are in an imperial drawing and have 3/32" as your annotation plot size, you can set your scale to a custom scale of 32/3 [10.666666666666666...]. Do this by calling up the Drawing Setup dialog, selecting the Scale tab and choosing Other... from the Scale list. This makes the Custom Scales edit box active - type 32/3 in the edit box and select OK to return to the drawing. Place your scale-dependent tags, then remember to reset the scale to an appropriate value for any subsequent editing. You can also set your annotation plot size to the inverse of your drawing scale. So if your drawing scale is 1/8" = 1'-0", set your annotation plot size to 1/96. Working out the inverses is, of course, much easier for metric users.
Creating an AEC Content File and Tool
The other option is to set up an AEC Content file using the Create AEC Content Wizard and the _AecAnnoScheduleTagAdd custom command, just like all tags were done in previous versions of ADT. On the "second" page of the Wizard, you will want to choose the None radio button under additional scaling [and set the X, Y and Z scale factors to 1, unless your Multi-View Block requires some other scaling factors to work properly]. As in prior versions, you will need to put your finished AEC Content file somewhere under the root folder specified for AEC DesignCenter Content on the AEC Content tab of the Options dialog. You will also need to create a file to hold the Property Set Definitions required by your tag, place that file in the same folder as the tag or one folder above the tag and specify that file as the source file in the _AecAnnoScheduleTagAdd command string. In previous versions, this source file was called PropertySetDefs.dwg, but you can call the file by any name you like, as long as you get the name right in the command string. This is my preferred method of handling scale-dependent tags, but I am bothered by the need to have Property Set Definitions defined in two places - the source file for all of the other tags and the "PropertySetDefs.dwg" needed for the scale-dependent tags.
You can read more about scale-dependent tags here.
Here is hoping that a future version of ADT will allow the user to specify a scaling type in the tool, so that all tags can be kept in the same source file.
1/20/2007 Update: See this post for a way to set up scale-dependent tags without setting special combinations of drawing scale/annotation plot size, needing two source files for Property Set Definitions or "breaking" existing tools by moving the out-of-the-box scheduling source file.
September 24, 2005
September 19, 2005
ADT 2006 Service Pack 1 Available
Service Pack 1 for ADT 2006 is now available from the Autodesk website. As always, read the Readme before installing the Service Pack.
September 17, 2005
Replace Z Value and Copy Definition and Assign Rock
I spent some time today taking a drawing from a furniture vendor where the layout was done with their own 3D/2D blocks and converting it to a simpler, 2D only layout for use as an overlay Xref in our plans. The annoyance of working at home on a weekend was partially offset by the pleasure of being able to turn on the Replace Z Value feature in ADT 2006 and know that no matter what part of the vendor's layout I snapped to while creating my simplified version, my linework would remain a Z=0.
This was an update to a previous plan, so I already had some graphics, including blocks for some of the repeated items. I was pleased to find that the Copy Definition and Assign feature, which I knew worked on ADT style-based objects, also worked on AutoCAD blocks. I had a typical office desk block set up, and there were a few that, were similar, but one worksurface was larger. I was able to place the block I had, select that instance, right click and select the Copy Block Definition and Assign from the context menu. A dialog appeared asking for a name for the new block, offereing the old name with " (2)" appended. After editing the name and clicking OK, all I had to do was REFEDIT the new block instance, stretch the worksurface and save the changes and I was done. No need to remember where the insertion point was or worry if the instance was mirrored and/or rotated. No messy explosion and reblocking under a new name.
Sometimes it is the seemingly smallest improvements which provide the greatest pleasure, particularly if they ease frequently encountered procedures or address a long-standing source of frustration.
September 15, 2005
Rounding to Death
I have had a chance to test my latest file in ADT 2004. When using a Property Data Format to perform rounding, the Up and Down options work as expected when the Round Off Value is set to any of the values I tested, other than 0. That advice applies to 2004, 2005 and 2006.
When using the Nearest option, the results for 2004 are different than for 20054 and 2006. In 2004, the Nearest option appears to work correctly only when the Round Off value is set to 0. You can then set the Precision value and the rounding will take place at the last digit. This limits the Nearest option to rounding to the nearest integer, tenth, hundredth, thousandth...or hundred millionth. If you need to round to the nearest five, nearest 100 or nearest half, you will need to use a formula property or upgrade to 2005 or 2006. For other Round Off Values, positive numbers are always rounded down and negative numbers are always rounded up [closer to zero in both cases].
I also found that there were some numbers that did not round correctly even though the method appears to work reliably for all of the other cases tested. Obviously, I did not test every possible number, so this is not an exhaustive listing, but would be good to keep in mind if you use rounding for critical data.
2.0075, when the Round Off Value is 0.001, rounded nearest incorrectly for both the PDF method and my formula. That was the only tested number in which my formula failed. Perhaps there is some issue with how that number is represented in binary that causes the incorrect rounding. [Note that 7.5, with a Round Off Value of 1, works just fine for both methods, so it does not always happen when rounding a "7" and the next digit is "5".]
-2.0075 and -2.0025 both rounded incorrectly when using the PDF method with Round Off Value set to 0 and the Precision set to 0.001.
September 03, 2005
Rounding Redux
UPDATE, 9/10/2005: Jon Smith of Construction Industry Solutions (COINS) has pointed out that the problem with the rounding using Property Data Formats in my sample file was that I had the Round Value set to "0"; the problem disappears if you use "1" instead. I have confirmed that this is true for ADT 2006 and ADT 2005. I will post back with results in ADT 2004 when I get a chance to try my new test file at work next week. In the mean time, the new test file is available from the same thread in the Autodesk Architectural Desktop Content Discussion Group to which I posted the previous test file.
A third, and, to the relief of those who could not care less about rounding, what I hope to be final post on rounding numerical property data in Autodesk Architectural Desktop 2004, 2005 or 2006. I have taken the test drawing I did in ADT 2004 [see this blog post for more information], brought it into ADT 2006 [so I could take advantage of the enhanced editor - the file should still open and work in ADT 2004] and made some changes. I renamed the properties that tested property data formats to try to achieve rounding, adding "PDF" to their names for easy identification. Since these do not work in the current verisons, you will not want to be copying them. I thought about removing them, but decided that I would leave them in so I would have one file for use in testing future releases. I deleted the formula that used the VBScript Round function to round "nearest" to two decimal places and replaced it with three generic rounding formulas which could be used as a starting point for setting up rounding in an actual application. I added a manual property called TableOrder, so I could control the sorting of the schedule table and keep each line object next to its schedule table row. I have posted a ZIP file that includes a sample file, to the Autodesk Architectural Desktop Content Discussion group, for anyone who would like to download a working example of what is discussed below.
In order to provide flexibility and to match the rounding functionality present in Property Data Formats, I added a new, real number manual property, RoundValue. This provides the equivalent of the Round Off Value in the Property Data Formats. The default value is 1, which rounds to the nearest whole number. To round to two decimal places, enter 0.01. To round to one half, enter 0.5. To round to the nearest 100, enter 100. The math behind the function involves division, so entering 0 would cause an undefined value. The formulas convert an entered value of 0 to 1.
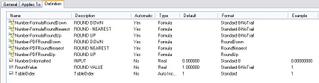
There are three new formulas - one to round up, one to round down and one to round to nearest. I considered setting up nearest to work like the VBScript function, where exactly 5 in the digit beyond the rounding digit would round up for odd numbers in the rounding digit and down for even numbers in the rounding digit. While that may make some sense when the RoundValue is 1 times 10 to some power, for RoundValues like 50, where 275 would round up to 300 but 225 would round down to 200, the "oddness" or "eveness" of the starting number was not readily apparent. I chose to take the easy way out and simply have exactly 5 always round up. The properties in my revised LineObjects Property Set Definition are shown below.
The new formulas also work with negative numbers, should your application require that. I chose to treat negative numbers such that rounding up goes to a higher number and down goes to a smaller number. For example, -10.5 would be rounded up to -10 and down to -11. I changed the function I used for rounding from Fix, used in the previous rounding formulas, to Int, as that handles negative numbers in the way previously described. [For negative numbers, Fix rounds up away from zero and down towards zero; in other words, it rounds up to the greater absolute value. Fix and Int return the same results for positive numbers.]
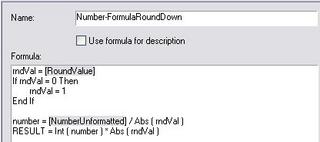
The Number-FormulaRoundDown formula property is the simplest. After converting any zero value in RoundValue to 1, the formula divides the source number by the absolute value of RoundValue, uses the Int function to truncate any decimal portion, then multiplies that whole number portion by the absolute value of RoundValue to arrive at the desired result. The formula, as it appears in ADT 2006, is shown below.
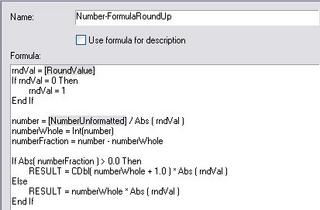
The Number-FormulaRoundUp formula property works in a similar fashion, dividing by the RoundValue, truncating any fraction and multiplying that by the RoundValue, but needs to determine if there is any fractional part that would require rounding up. This is done by storing intermediate results in variables, calculating the fractional part and, if any, adding one to the whole number before finally multiplying it by the absolute value of RoundValue to get the final result. The formula is shown below.
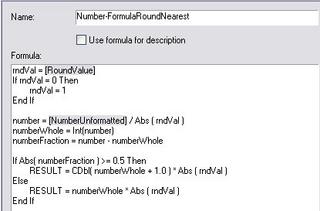
The Number-FormulaRoundNearest formula property is almost identical to the round up property, except that adding one to the whole number value only happens if the fractional part is 0.5 or greater. The formula is shown below.
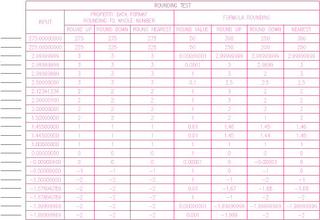
There is a schedule table in the sample file that shows the results of various sample values and, for the formulas, various RoundValues. As before, lines are used as the objects to hold the properties. As previously noted the table is sorted by the vaule in TableOrder; the TableOrder column is hidden in the Schedule Table Style. Feel free to play around with the values assigned to any line to see how the results of the different rounding formulas change.
You should be able to adapt one of these formulas to accomplish any property data rounding needs you may have, until such time as the rounding feature in the Property Data Formats is corrected. When you substitute the property you wish to round for the NumberUnformatted property in the sample file, make certain that you have a number and not a string. Read more about creating unformatted numeric properties in my previous blog article on that subject. Also note that if, for a given formula, the rounding value will always be the same, you do not need to have the RoundValue property, and can enter the number directly in the formula, by replacing each instance of "Abs ( rndVal )" with your desired value [use a positive value]. In that case, you can delete the first five lines, which read in the value of RoundValue and substitute 1 if the value is 0.
A third, and, to the relief of those who could not care less about rounding, what I hope to be final post on rounding numerical property data in Autodesk Architectural Desktop 2004, 2005 or 2006. I have taken the test drawing I did in ADT 2004 [see this blog post for more information], brought it into ADT 2006 [so I could take advantage of the enhanced editor - the file should still open and work in ADT 2004] and made some changes. I renamed the properties that tested property data formats to try to achieve rounding, adding "PDF" to their names for easy identification. Since these do not work in the current verisons, you will not want to be copying them. I thought about removing them, but decided that I would leave them in so I would have one file for use in testing future releases. I deleted the formula that used the VBScript Round function to round "nearest" to two decimal places and replaced it with three generic rounding formulas which could be used as a starting point for setting up rounding in an actual application. I added a manual property called TableOrder, so I could control the sorting of the schedule table and keep each line object next to its schedule table row. I have posted a ZIP file that includes a sample file, to the Autodesk Architectural Desktop Content Discussion group, for anyone who would like to download a working example of what is discussed below.
In order to provide flexibility and to match the rounding functionality present in Property Data Formats, I added a new, real number manual property, RoundValue. This provides the equivalent of the Round Off Value in the Property Data Formats. The default value is 1, which rounds to the nearest whole number. To round to two decimal places, enter 0.01. To round to one half, enter 0.5. To round to the nearest 100, enter 100. The math behind the function involves division, so entering 0 would cause an undefined value. The formulas convert an entered value of 0 to 1.
There are three new formulas - one to round up, one to round down and one to round to nearest. I considered setting up nearest to work like the VBScript function, where exactly 5 in the digit beyond the rounding digit would round up for odd numbers in the rounding digit and down for even numbers in the rounding digit. While that may make some sense when the RoundValue is 1 times 10 to some power, for RoundValues like 50, where 275 would round up to 300 but 225 would round down to 200, the "oddness" or "eveness" of the starting number was not readily apparent. I chose to take the easy way out and simply have exactly 5 always round up. The properties in my revised LineObjects Property Set Definition are shown below.

LineObjects Property Set Definition
The new formulas also work with negative numbers, should your application require that. I chose to treat negative numbers such that rounding up goes to a higher number and down goes to a smaller number. For example, -10.5 would be rounded up to -10 and down to -11. I changed the function I used for rounding from Fix, used in the previous rounding formulas, to Int, as that handles negative numbers in the way previously described. [For negative numbers, Fix rounds up away from zero and down towards zero; in other words, it rounds up to the greater absolute value. Fix and Int return the same results for positive numbers.]
The Number-FormulaRoundDown formula property is the simplest. After converting any zero value in RoundValue to 1, the formula divides the source number by the absolute value of RoundValue, uses the Int function to truncate any decimal portion, then multiplies that whole number portion by the absolute value of RoundValue to arrive at the desired result. The formula, as it appears in ADT 2006, is shown below.

Number-FormulaRoundDown Formula
The Number-FormulaRoundUp formula property works in a similar fashion, dividing by the RoundValue, truncating any fraction and multiplying that by the RoundValue, but needs to determine if there is any fractional part that would require rounding up. This is done by storing intermediate results in variables, calculating the fractional part and, if any, adding one to the whole number before finally multiplying it by the absolute value of RoundValue to get the final result. The formula is shown below.
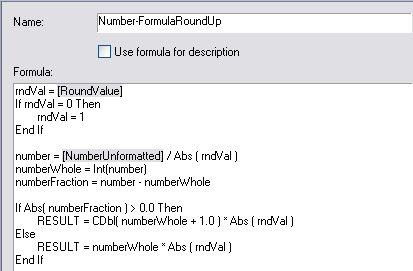
Number-FormulaRoundUp Formula
The Number-FormulaRoundNearest formula property is almost identical to the round up property, except that adding one to the whole number value only happens if the fractional part is 0.5 or greater. The formula is shown below.
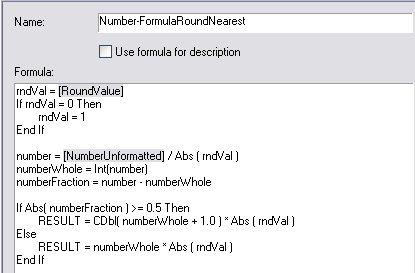
Number-FormulaRoundNearest Formula
There is a schedule table in the sample file that shows the results of various sample values and, for the formulas, various RoundValues. As before, lines are used as the objects to hold the properties. As previously noted the table is sorted by the vaule in TableOrder; the TableOrder column is hidden in the Schedule Table Style. Feel free to play around with the values assigned to any line to see how the results of the different rounding formulas change.

Rounding Test Schedule Table
You should be able to adapt one of these formulas to accomplish any property data rounding needs you may have, until such time as the rounding feature in the Property Data Formats is corrected. When you substitute the property you wish to round for the NumberUnformatted property in the sample file, make certain that you have a number and not a string. Read more about creating unformatted numeric properties in my previous blog article on that subject. Also note that if, for a given formula, the rounding value will always be the same, you do not need to have the RoundValue property, and can enter the number directly in the formula, by replacing each instance of "Abs ( rndVal )" with your desired value [use a positive value]. In that case, you can delete the first five lines, which read in the value of RoundValue and substitute 1 if the value is 0.
Subscribe to:
Posts (Atom)