Showing posts with label Styles Browser. Show all posts

April 30, 2016

ACA/AMEP 2017: Styles Browser Enhancements

Several enhancements have been made to the Styles Browser, first introduced in the 2016 release of AutoCAD® Architecture and AutoCAD® MEP.

Add Directory to Content Library
For reference, the image below shows the Content Drawings Library dialog, as it appears in the 2016 release.
When adding files to the Styles Browser Content Drawings Library, instead of specifying individual files, you can specify a folder, and all of the files within that folder will be included in the library.
As always, you can click on an image to see it full size.

Once a folder is added, you can choose whether or not to include all of the files within any subfolders of that folder as well.
The big advantage here is not in saving a few clicks when setting up the Styles Browser Library (you can add multple source files in one operation), but that once a folder is selected, you can add a file to it at a later date and that file will be included in the Styles Browser Content Library automatically. That will save a lot of effort in a firm with more that a handful of users. One note of caution, including a large number of files in the Content Browser Content Library can result in slow performance as the Styles Browser generates preview images. That applies whether or not you are adding folders, but, particularly with the subfolders option checked, it is easier to add a lot of files, perhaps without even realizing it.

Object Type List Auto Scroll
In 2016, when working in the Object Type drop-down list, expanding a category at the bottom of the list did so, but you would then often need to scroll the list to see some or, in some cases, any of the items under the expanded category.
In 2017, when expanding a category at the bottom of the list, the list will automatically scroll to show the items in the expanded category.
A small, but welcome improvement for those making frequent use of the Styles Browser, particularly for MEP users, as they have more categories and the number of items in those categories is greater than the Multi-Purpose Objects category.

MEP Enhancements
  • Additional Objects: Panels, Devices, Schematic Symbols and Plumbing Fittings, which previously used the "old" Select Style dialog, are now integrated into the Styles Browser.
  • Additional Categories: The addition of the previously noted objects has prompted the replacement of the 2016 all-in-one MEP Objects category with five separate categories: Electrical Objects, HVAC Objects, Piping Objects, Plumbing Objects and Schematic Objects. These five categories remain grouped together, after Multi-Purpose Objects, rather than arranging all categories alphabetically, which would place Multi-Purpose Objects between HVAC Objects and Piping Objects.
  • All System Definitions are now selected in the Styles Browser, rather than the two methods used in 2015 (some objects in Styles Browser, some in the Select System dialog).
  • Routing Preferences for Conduit, Duct and Pipe have been added to the Styles Browser, and a single Routing Preferences content drawing has been provided with the out-of-the-box content as the source file. This will allow these routing preferences to be omitted from template files, and imported only as needed from the source file.

Closing Styles Browser
A new command, STYLESBROWSERCLOSE has been added to allow closing the Styles Browser from the command line. The Styles Browser ribbon tool (Home ribbon tab, Build panel, Tools split button drop-down list, Styles Browser tool) now toggles the display of the Styles Browser. If closed, the tool opens it; if open, the tool closes it. In 2016, the tool only opened the Styles Browser (and, if docked or auto-hidden, deployed it).

This Screencast demonstrates some of these new features, in AutoCAD Architecture.

March 28, 2015

ACA/AMEP 2016: Styles Browser Part 2

The Styles Browser Interface (Continued)
Part 1 focused on the top part of the Styles Browser; this article will examine the style/defintion list box and related controls.

The Styles Browser has a tool bar at the top of the style/defintion list box. Three tools at the right side of this bar control how the styles/definitions are viewed: Preview Size, View Direction and Color Selection. As seen in the image below, the Preview Size tool has a drop-down list which offers four viewing choices: Small, Medium and Large preview images and Details, which shows just names and descriptions in text. Note that selecting the Details option will disable the View Direction and Color Selection tools, as these settings do not apply to the Details view. The icon of the currently selected tool is displayed on the tool button.

The View Direction tool has a drop-down list which offers the six standard othogonal and four standard isometric view directions. The initial default view direction varies with the Object Type selected. As with the Preview Size tool, the icon of the currently selected view direction is displayed on the tool button.

The Color Selection tool has a drop-down that allows you to select the background color of the preview images. The None option uses the palette background color. You can choose from a range of color swatches, including AutoCAD® index colors 1-9, or choose the More Colors option at the bottom to open the standard color selection dialog, offering the full range of Index colors, True Color and Color Books. A Recent Colors section is offered if you choose a color not offered on the pull-down. Setting a background color other than None (such as matching your AutoCAD background color) may be useful if you find it hard to see the preview graphics images with the Styles Browser background color.

When AEC Dimension, Display Theme or Zone are chosen as the Object Type, the tools at the right end of the tool bar will all be disabled, as the only view option for these is Details.

Hovering over a style or definition in the list box will display a Tool Tip, whether or not Tool Tips are enabled in the Options dialog, on the Display tab. Most styles/definitions have a two-stage tool tip; the first stage is all text, listing the style/definition name, description and the source file (or Current Drawing for styles/definitions in the current drawing). If you hover longer, the Tool Tip will expand to include image previews showing that style/definition in isometric, left, front and plan views. There is no expanded Tool Tip with graphics for the AEC Dimension, Display Theme and Zone Object Types.

The tools at the left side of the tool bar control the use of the styles/definitions displayed in the Styles Browser: Import styles, Add object and Apply style to selection. Selecting one of the styles or definition in the list box enables the relevant tools. The Import styles tool will be inactive if a style/definition from the current drawing is selected. The Apply style to selection tool will be inactive if no objects of the selected Object Type are selected in the current drawing. The same three options are available in a context menu when you right click on a style or definition. You can also double click on a style/definition to initiate the ADD command for that object type, using the selected style/definition (imported into the current drawing, if necessary).
When all of the objects that are selected in the current drawing are of the current Object Type and are all of the same style/definition, then that style/definition will be outlined in blue. When a style is selected, the entire style is highlighted in blue. If the cursor moves off of the palette, the blue color is removed, but the selected tool remains highlighted. If you wish to clear the current style/definition selection, press the ESC key.

If the current drawing already has a style/definition of the same name as one in a source file, a green checkmark will appear next to the style(s)/definition(s) in the source file(s). You will not be able to import these styles, and if you choose the Add or Apply options for these styles, the style/definition in the current drawing will be used. You cannot use the Styles Browser to update a style in the current drawing with one of the same name in a source file. Use the Style Manager to do this, when necessary.

All of the usual options for displaying a palette apply to the Styles Browser: Transparency, Auto-hide, Docking and Anchorage. Right click on the palette title spine and use the context menu to choose your display options.

The Styles Browser provides easy access to styles and definitions from office standard source files, project standards files and currently open drawings, without the need to create or maintain an extensive set of tool palettes and tools. When you upgrade to AutoCAD® Architecture 2016, try it out and see if it can improve your workflow.

March 25, 2015

ACA/AMEP 2016: Styles Browser Part 1

A new modeless (can be open while executing other commands) palette has been added to the 2016 releases of AutoCAD® Architecture and AutoCAD® MEP, the Styles Browser. You can use the Styles Browser to quickly review the AEC object styles available in your choice of Content Library Drawings, Project Standard Drawings or Currently Open Drawings. Once you find the desired style, you can import it into the current drawing, add an object using the selected style or assign the selected style to an object of that type already in the drawing. Using the Styles Manager, you can avoid the need to create and maintain a Tool palette tool for every office standard style while still providing easy access to those styles. You can easily add additional source files, when needed for a specific project, to provide access to project-specific content without creating project-specific Tool palettes.

Opening the Styles Browser
As with most everything AutoCAD-related, there are a number of ways to access the Styles Browser.
  • From the ribbon: On the Home ribbon tab, on the Build panel, select the bottom half of the Tools split button, and then choose Styles Browser from the context menu.
  • From the Command line: Type STYLESBROWSER and press the ENTER key.
  • From the Properties pallete with a style-based AEC object selected: On the Design tab, under the Basic category, under the General subcategory, with the Style Preview active, select anywhere in the Style Preview area.
  • From the Properties pallete with a style-based AEC object selected: On the Design tab, under the Basic category, under the General subcategory, with the Style Preview inactive, on the Style property, select the Select a style button (binoculars icon) at the far right side.
As noted for the last two methods using the Properties palette, you must have a style- or definition-based AEC object of a type that is supported by the Styles Browser (see below). When using these methods, the Styles Browser will open with the Object Type pre-set to the type of object selected, with that object's style selected.

The Styles Browser Interface
The top portion of the palette contains three pull-down lists, a Search Style edit box and a button to open the online help to the Styles Browser topic. The selections made in the pull-downs and the search string entered into the edit box, if any, will determine the styles/definitions that you will be offered in the style list box below. While you can visit the pull-downs in any order, it makes the most sense to start from the top and work your way down, in order, as the choices available in the third list will be affected by what is set in the first two.

The Object Type pull-down contains a list of all of the object types that are supported in the Styles Browser, divided into separate sections for Architectural Objects, Documentation Objects and Multi-Purpose Objects. Use the +/- button at the left side of the section headers to expand or contract each section. Select the object type on which you wish to operate. The image below is a composite to show the entire list.

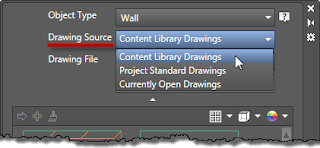
The Drawing Source pull-down offers up to three options for determining the possible drawing sources for styles: Content Library Drawings, Project Standard Drawings or Currently Open Drawings. Content Library files are user-selected files that contain "office standard" styles. These can include the same files you use as source files for your Tool palette tools, and the initial list includes the out-of-the-box style source files. (See below for more on this.) Project Standard Drawings will only be included on the list if you have an ACA Project (Project Browser/Project Navigator) open. As you might expect, Currently Open Drawings will make the styles/definitions in all currently open drawings available.
The third pull-down, Drawing File, allows you to further refine the source files used for the styles/definitions that are displayed. The choices here will vary with the Object Type and Drawing Source selected in the first two pull-down lists. The list starts with All Drawings, which will include all of the drawings included in the selected Drawing Source, plus the current drawing. Current Drawing will only show items from the current drawing. All Without Current Drawing will show styles/definitions only from the file(s) from the specified Drawing Source, but will not include those in the current drawing. These three choices will then be followed by the individual file(s) from the specified Drawing Source, allowing you to limit the items shown to just that one drawing.
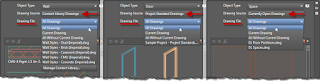
When using Currently Open Drawings as your Drawing Source and only one drawing file open, selecting All Without Current Drawing in the Drawing File drop-down list will result in an empty style/definition list box, since there are no other drawings open. You can only select one item from the Drawing File dropdown list, so you will not, for example, be able to hold down the CTRL key and choose two individual drawings. Similarly, if Project Standard Drawings is selected as the Drawing Source when Project Standards is disabled for the current Project, choosing All Without Current Drawing in the Drawing File drop-down list will also result in an empty style/definition list box.

The final means of affecting the styles/definitions that are shown in the style list box is the Search Style edit box. Any text entered here is compared to the names of the styles/definitions that meet the criteria of the choices made in the three pull-down lists, and only those that match the string are shown. Any portion of the name may be entered; for example, in the image below, only the Wall Styles that have the text Air-2 somewhere in the style name are shown. The entered text is treated as a wild-card string, with an * before and after the text. You cannot, however, type wildcard characters as part of the search string; all typed characters are interpreted literally.

As previously mentioned, you can customize the drawings included when Content Library Drawings is the selected Drawing Source. To do so, select Content Library Drawings as the Drawing Source, and then select the Drawing File pull-down list. At the bottom of the list, select the Manage Content Library button. This will open the Content Drawings Library dialog, in which you can add or remove drawing files from the list of source files for the Object Type selected in the top drop-down list. Make note of the Save as default toggle in the lower left corner. With this toggle unchecked, you can make "temporary" changes to the list of content drawings by adding and/or removing files and selecting OK. For example, if your current project does not have any Walls with brick components, you could remove the brick Wall source file from the list temporarily. Any "temporary" changes will persist, even after closing and reopening the program. You can, however, restore the saved list by reopening the Content Drawings Library dialog and using the Restore button. If you want to change that saved list, make the desired changes, check the Save as default toggle and then select OK.

Once you have made your selections in the drop-down lists, you may wish to save some of that vertical space in the palette. You can do so by selecting the button with the upward pointing arrowhead icon, bewteen the Search Style edit box and the style/defintion list box. This will leave only the Object Type pull-down list and expand the area available to list box. In the collapsed state, you can make changes to the Object Type selection. If you do so, the Drawing Source and Drawing File choices will remain the same, but any text in the Search Style edit box will be cleared. Select the button again (now with a downward pointing arrowhead), to expand the filter controls if you want to make changes or add text to the Search Style edit box.

The final feature in the top portion of the palette is the Help button (speech bubble icon with ?), which provides direct access to the online help topic on the Styles Browser.

In Part 2, the features associated with the style/definition list box, and the ways of using the Style Browser will be covered.