Previous Post in Series: ACA 2011 - Opening Location Changes - Part 2
Another new feature is the ability to place multiple openings at once. As with the relative to grid feature, the multiple openings feature only applies to Doors and Windows. The openings can either be spaced evenly on the selected segment or centered on the segment with a fixed offset between the openings. Relative to grid can be set to either No (use Wall Ends or intersecting Walls) or Yes (use intersection Grid lines) to determine the Wall segment over which the multiple openings will be placed. In the images here, a Window object will be placed with Relative to grid set to Yes.
The sequence of picks and settings is somewhat fussy, so pay close attention to the following. If you prefer, you can also read the Command: line prompts and set the property values there using the command options.
- Start WindowAdd command by whatever means you normally do (eg, tool palette tool).
- Select a Wall in the drawing.
- On the Properties palette, on the Design tab, in the Dimensions category, set the desired Width and Height (or choose the desired Standard size).
- In the Location category, set Relative to grid to the desired value. The value of the Position property does not matter.
- Set the Multiple insert property to Yes. Notice that the Command line prompt now asks you to select a Wall segment. Yes, you will need to select a Wall again, but this time you need to pick the exact segment you want. As you hover over a Wall, notice the solid red line that shows up, in addition to the Wall highlight (assuming you have highlighting while selecting turned on).
 The red line defines the extents of the Wall segment over which the multiple openings will be inserted. When you have the segment you want, select the Wall
 - You can now set the number of openings to insert, either in the Number to insert property or at the Command: line prompt. The initial default value will be the maximum number of openings that can be fit along the selected segment. For the example here, the default was 6, but I changed it to 3.
- In the Location category, choose the desired value for the Spacing property, Equally or Offset.
- If you choose Equally, then the difference between the segment length and the sum of the Widths of the openings, will be divided into equal segments, at the beginning, between each opening and at the end.
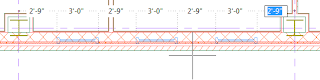
- If you choose Offset, another property, Offset multiples, appears, allowing you to specify the distance between the openings. The entire array is centered on the segment, so the additional space is divided equally to each side.

- If you choose Equally, then the difference between the segment length and the sum of the Widths of the openings, will be divided into equal segments, at the beginning, between each opening and at the end.
- Finally, left click in the drawing area to accept the arrangement ghosted on the screen and continue on with the command in progress (WindowAdd in the example). The Multiple insert property will reset to no, so if you want to add another set of multiple openings of the same object, you will need to start the sequence above from Step 3 (Step 5 if the opening size and Relative to grid are to remain the same).


Next Post in Series: ACA 2011 - Opening Location Changes - Part 4
No comments:
Post a Comment