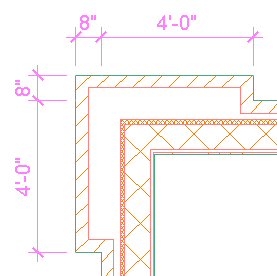
With some additional help from John Mumaw in a follow up reply to the Wall Corner Condition thread in the Autodesk Architectural Desktop Discussion Group, I was able to get wall modifiers to work in creating a projecting brick pier at an outside corner intersection of two walls. See this post for a description of another way to do it with Wall Endcaps. The image above shows the desired end result.
Here are some tips for using plan modifiers for achieving the results above. Credit goes to Mr. Mumaw for most of what follows.
- You will need to draw your walls so that the graph lines extend past their intersecting point, then use a cleaup radius to get the walls to clean up.
- Do not make the modifiers the exact size you need, as that results in the "interesting" results shown below. Notice the "leaking" brick hatch and extra Shrink Wrap/Component line.
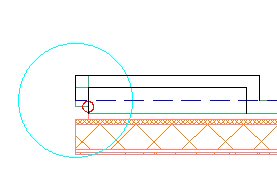
- Instead, make the modifiers some distance longer that you need. You will then need to draw the walls that same extra distance beyond the projection, and the wall cleanup will take care of the "extra" length. I chose to use 2". The image below shows the two polylines I used to create the plan modifiers. Note that the modifiers have not yet been applied to the wall shown in this image, which was drawn from left to right, so the modifiers are at the start of this wall. The brick polyline starts at the outer face of brick, offsets up 8", runs 2" longer than the desired pier length, for a total of 4'-10" and runs back 8" to the brick face. The air gap polyline is offset 4" from the brick polyline, so that the 4" width of the brick is maintained and the start and stop points are at the outer face of the air gap component.
- If you apply the modifiers to a stand-alone wall, a cleanup error will result. This is not a cause for alarm, as this technique only works when the wall cleans up with another wall.
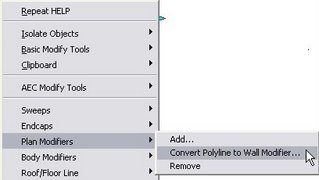
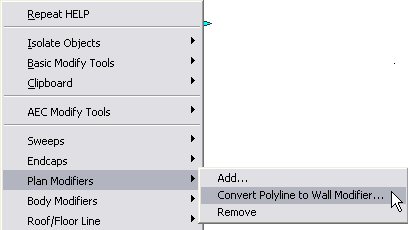
- To create the plan modifier from the drawn polyline, select the wall along which you drew the polylines, right click and choose Plan Modifiers > Convert Polyline to Wall Modifier... from the context menu.
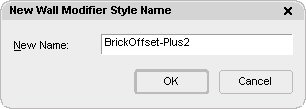
Choose whether or not you want to save the polyline, then give the modifier a meaninful name.
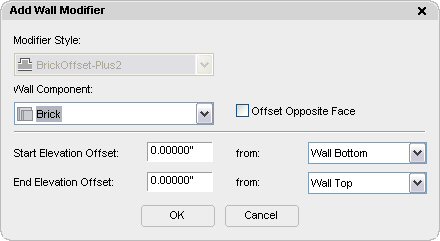
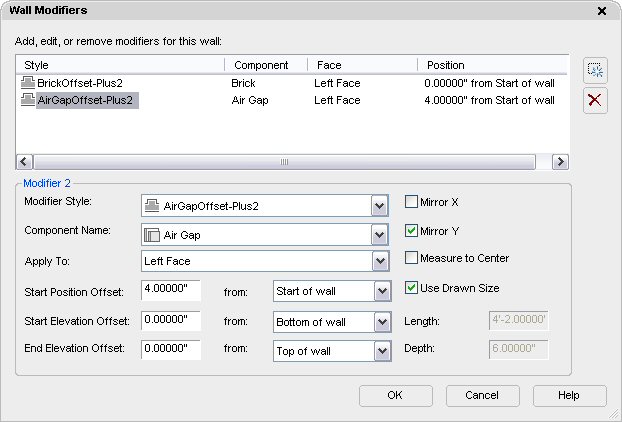
Verify that the correct component is indicated in the Add Wall Modifier dialog, and make certain that the Offset Opposite Face toggle is NOT checked. - The plan modifiers will be attached to the wall you selected. If this wall will be used as one of your corner walls, select the wall, right click and choose Properties. On the Design tab, in the Advanced category and Worksheets subcategory, click on the Plan Modifiers worksheet and check the settings for your modifiers. If your wall style is created like the out-of-the-box wall styles, with the first component at the outside component and the last component to the inside, then you will want the modifiers to be attached to the left face of your components, with the Mirror X and Measure to Center toggles unchecked and the Mirror Y and Use Drawn Size toggles checked. The Start Position Offset for the Brick component should be 0 from the start of wall; the Start Position Offset for the Air Gap component should be the width of the brick component from the start of wall, 4" in this case. If you drew your polylines at the end of a wall, rather than the start, the Air Gap Offset would be -4" from the end of wall.
- If your pier is symetrical, you can use the same plan modifiers for the other wall. Make note of what end of the wall you need the modifiers, start or end. Then select the wall, right click, choose Properties and open the Plan Modifiers Worksheet. Add the modifiers already created by choosing the appropriate name and component, then making certain to check the toggles as noted above. Use a positive offset for the Air Gap component when placing the modifier at the start of wall and a negative offset when placing the modifier at the end of wall.
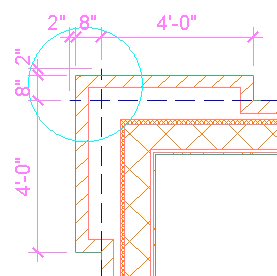
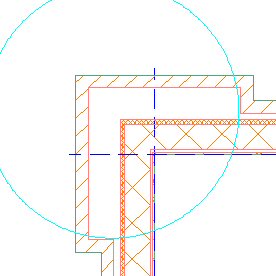
- The image below shows two left justified walls. The vertical wall was drawn from bottom to top and the horizontal wall was drawn from left to right. The wall modifiers shown above have been added to the end of the vertical wall and the start of the horizontal wall. The Graph Display Representation is toggled on so you can see that the graph lines of the two walls were extended 10 total inches beyond their intersecting point, 8" for the brick offset plus 2" for the extra length at which the plan modifiers were drawn. A cleanup radius of 1'-6" was added to each wall at the intersection end so that the walls would clean up with each other, giving the desired result. The minimum cleanup radius here would be 10 times the square root of 2 inches, which you could get by using the grip to stretch each radius to the endpoint of the other wall's graphline.
- You can use other justifications besides left, but you will need to increase the cleanup radius accordingly. Keep in mind that the larger the cleanup radius, the greater the chance that there will be a problem with other walls close to the corner. The images below show baseline and right justified walls using the same modifiers, but with larger cleanup radii to compensate for the greater distance between the graphline endpoints. Note also that the graphline endpoints remain 10" beyond the outer face of the wall.


No comments:
Post a Comment