One way to get a Tool palette tool to properly insert a scale-dependent tag would be to do it the old-fashioned way, by creating a custom-command type AEC Content file using the _AecAnnoScheduleTagAdd command. The old-fashioned infrastructure for doing so, including the ever-popular PropertySetDefs.dwg, is no longer there. And do you really want to have two source files for your Property Set Definitions? The new setup for ADT 2006 and 2007 has a single source file [Schedule Tables (Imperial).dwg, Schedule Tables (Metric).dwg or Schedule Tables Styles.dwg (Metric D A CH)] that holds the out-of-the-box Property Data Formats, Property Set Definitions, Schedule Table Styles and Multi-View Block Definitions, and that file is NOT in the AEC Content folder structure, when content is installed in the default folders.
In order for the _AecAnnoScheduleTagAdd command to work, you need to be able to specify a source file for the Property Set Definitions referenced by the Schedule Tag, and that file needs to be in the same folder as the tag or one folder above. The tag needs to be in the AEC Content folder structure. Unless you are starting a brand new deployment, moving the source file is not an option, as that would break all of the current tools that reference the current location.
There is a solution – use a Windows Shortcut somewhere in the AEC Content folder structure to “include” the folder of the source file, and then place your scale-dependent AEC Content files for your tags in one or more folders below that folder. Create a Tool palette tool by dragging the AEC Content file from the AEC Content tab of DesignCenter onto an editable tool palette.
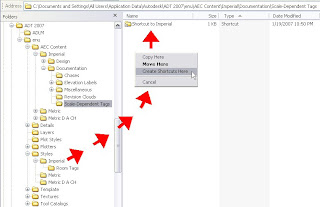 The image above shows the Room Tags folder that I created in the C:\Documents and Settings\All Users\Application Data\Autodesk\ADT 2007\enu\Styles\Imperial\, and illustrates the creation of a Windows Shortcut of the C:\Documents and Settings\All Users\Application Data\Autodesk\ADT 2007\enu\Styles\Imperial\ folder in the C:\Documents and Settings\All Users\Application Data\Autodesk\ADT 2007\enu\AEC Content\Imperial\Documentation\Scale-Dependent Tags folder that I added to the out-of-the-box default installation folders.
To create the AEC Content file, I started a new file “from scratch”. Creating AEC Content is just about the only time I will use that option, and the reason is to create the leanest possible content file. If there are unnecessary block definitions, dimensions styles, and other items in the AEC Content file, they will come along for the ride when inserting the tag. I used the Style Manager to copy the Aec7_Room_Tag_Project_Scale_Dependent Schedule Tag Multi-View Block from the C:\Documents and Settings\All Users\Application Data\Autodesk\ADT 2007\enu\Styles\Imperial\Schedule Tables (Imperial).dwg source file. I inserted an instance of the Aec7_Room_Tag_HiDtl_P view block used by that tag in model space of the file stared from scratch to serve as the icon graphics. Then I ran the PURGE command to get rid of the extra stuff that came along for the ride when copying the Multi-View Block. Finally, I fired up the AEC Content Wizard, which can be found on the Format pulldown, and filled out the three “pages” as shown in the images below. [Click on any image in this blog to see a larger version – excepting those images that were small enough to show full size.]
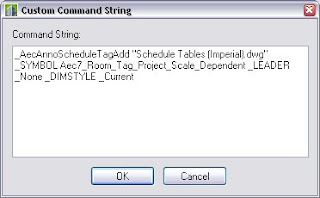
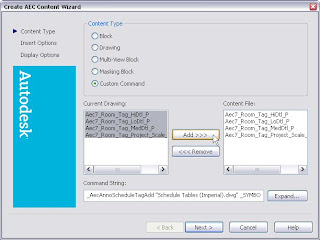 "Page 1": Adding the Multi-View Block and its view blocks to the Content File and specifying the Command String. See the image below for the full string. Be certain to specify the correct Property Set Definition source file name, and, if the name includes any spaces, to enclose the name in double quotation marks.
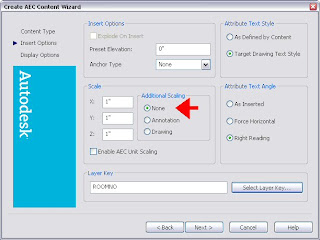 "Page 2": You may prefer different settings, but be certain to specify "None" for additional scaling. Select the appropriate layer key.
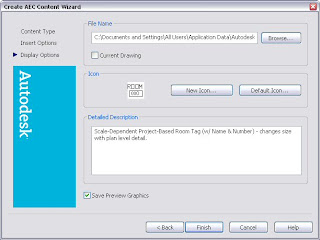 "Page 3": Specify the file location and name for the content file (see details in images below) and provide a detailed description. This description will appear in the bottom-right pane of the DesignCenter when the content file is selected, and will also become the default description for the Tool palette tool.
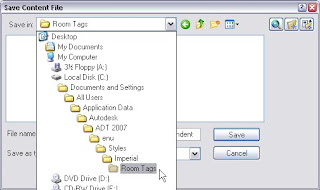
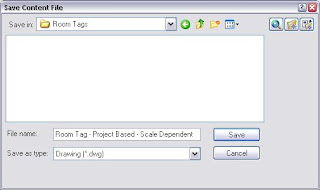 After all your settings are as you like, select the Finish button on the third "page" to create the AEC Content file. The new file shows up in Windows Explorer…
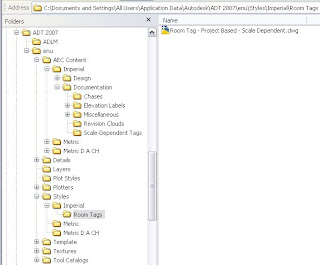 …as well as in the AEC Content tab of the DesignCenter. Note that the Scale-Dependent Tags folder I created under the Imperial Documentation folder now sports a "Shortcut to Imperial" folder within it [the Windows Shortcut], and that has a sub-folder called Room Tags, where I put my new AEC Content file. If you already had DesignCenter open to the Scale-Dependent Tags folder, you will need to collapse the Documentation folder by clicking on the "-" sign in front of it, then re-expand the Documentation folder by clicking on the "+" sign in from of it, to get the new content to show.
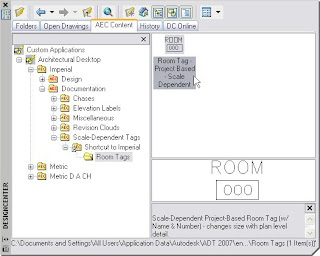 You could use the tag right from DesignCenter, but if you want to have your scale-dependent tag on your tool palette, you can now simply drag-and-drop the AEC Content file from the AEC Content tab in DesignCenter onto an editable tool palette.
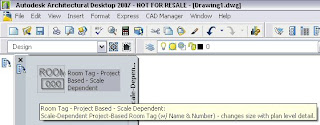 Using either the tool or the content file directly from DesignCenter, you can now place the scale-dependent tag with scale factors of one…
 …and get your tag to display properly when the Low Detail…
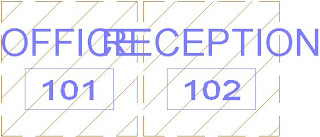 …Medium Detail…
 …and High Detail Display Configurations are set current.
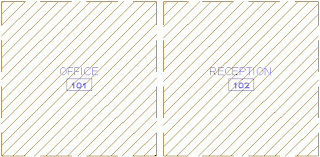 And it was all done without creating a second source file for Property Set Definitions or moving a source file and breaking any existing tools that reference it.
No comments:
Post a Comment
Due to increasing numbers of spam/nonsensical comments, I have now enabled comment moderation. Please allow me some time to review your comment before it appears in the blog.