January 30, 2007
Save the Markers!!!
Thanks to Shaan Hurley for calling my attention to this dire cause. If you are like me, you spent many hours and countless dollars [yen, pounds, insert your local currency here] creating colored presentation drawings by applying felt-tip markers to your drawings while in school or on the job. Those were good times, and now that those fondly remembered markers are endangered, we owe our full support to them!
Be certain to sign the petition, or simply click here to see what all the fuss is about.
January 20, 2007
Scale-Dependent Schedule Tags in ADT 2006 or 2007
The introduction of Schedule Tag tools and the Define Schedule Tag wizard certainly were welcome and made creating single-scale tags ever so much easier. But since the tag tool was set up to always apply annotation scaling – my preferred method for single-scale tags – the scale-dependent tags do not work properly, as they want to be inserted at a scale factor of one.
One way to get a Tool palette tool to properly insert a scale-dependent tag would be to do it the old-fashioned way, by creating a custom-command type AEC Content file using the _AecAnnoScheduleTagAdd command. The old-fashioned infrastructure for doing so, including the ever-popular PropertySetDefs.dwg, is no longer there. And do you really want to have two source files for your Property Set Definitions? The new setup for ADT 2006 and 2007 has a single source file [Schedule Tables (Imperial).dwg, Schedule Tables (Metric).dwg or Schedule Tables Styles.dwg (Metric D A CH)] that holds the out-of-the-box Property Data Formats, Property Set Definitions, Schedule Table Styles and Multi-View Block Definitions, and that file is NOT in the AEC Content folder structure, when content is installed in the default folders.
In order for the _AecAnnoScheduleTagAdd command to work, you need to be able to specify a source file for the Property Set Definitions referenced by the Schedule Tag, and that file needs to be in the same folder as the tag or one folder above. The tag needs to be in the AEC Content folder structure. Unless you are starting a brand new deployment, moving the source file is not an option, as that would break all of the current tools that reference the current location.
There is a solution – use a Windows Shortcut somewhere in the AEC Content folder structure to “include” the folder of the source file, and then place your scale-dependent AEC Content files for your tags in one or more folders below that folder. Create a Tool palette tool by dragging the AEC Content file from the AEC Content tab of DesignCenter onto an editable tool palette.
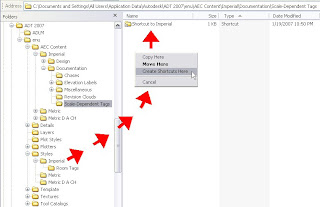
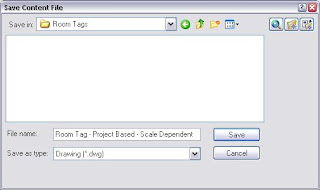
The image above shows the Room Tags folder that I created in the C:\Documents and Settings\All Users\Application Data\Autodesk\ADT 2007\enu\Styles\Imperial\, and illustrates the creation of a Windows Shortcut of the C:\Documents and Settings\All Users\Application Data\Autodesk\ADT 2007\enu\Styles\Imperial\ folder in the C:\Documents and Settings\All Users\Application Data\Autodesk\ADT 2007\enu\AEC Content\Imperial\Documentation\Scale-Dependent Tags folder that I added to the out-of-the-box default installation folders.
To create the AEC Content file, I started a new file “from scratch”. Creating AEC Content is just about the only time I will use that option, and the reason is to create the leanest possible content file. If there are unnecessary block definitions, dimensions styles, and other items in the AEC Content file, they will come along for the ride when inserting the tag. I used the Style Manager to copy the Aec7_Room_Tag_Project_Scale_Dependent Schedule Tag Multi-View Block from the C:\Documents and Settings\All Users\Application Data\Autodesk\ADT 2007\enu\Styles\Imperial\Schedule Tables (Imperial).dwg source file. I inserted an instance of the Aec7_Room_Tag_HiDtl_P view block used by that tag in model space of the file stared from scratch to serve as the icon graphics. Then I ran the PURGE command to get rid of the extra stuff that came along for the ride when copying the Multi-View Block. Finally, I fired up the AEC Content Wizard, which can be found on the Format pulldown, and filled out the three “pages” as shown in the images below. [Click on any image in this blog to see a larger version – excepting those images that were small enough to show full size.]
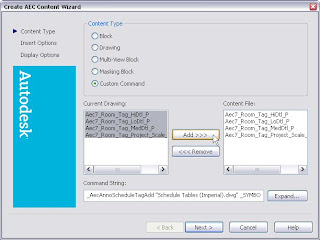
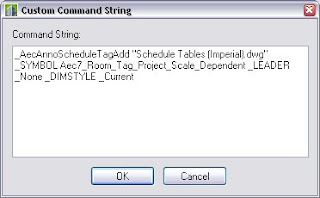
"Page 1": Adding the Multi-View Block and its view blocks to the Content File and specifying the Command String. See the image below for the full string. Be certain to specify the correct Property Set Definition source file name, and, if the name includes any spaces, to enclose the name in double quotation marks.
"Page 2": You may prefer different settings, but be certain to specify "None" for additional scaling. Select the appropriate layer key.
"Page 3": Specify the file location and name for the content file (see details in images below) and provide a detailed description. This description will appear in the bottom-right pane of the DesignCenter when the content file is selected, and will also become the default description for the Tool palette tool.
After all your settings are as you like, select the Finish button on the third "page" to create the AEC Content file. The new file shows up in Windows Explorer…
…as well as in the AEC Content tab of the DesignCenter. Note that the Scale-Dependent Tags folder I created under the Imperial Documentation folder now sports a "Shortcut to Imperial" folder within it [the Windows Shortcut], and that has a sub-folder called Room Tags, where I put my new AEC Content file. If you already had DesignCenter open to the Scale-Dependent Tags folder, you will need to collapse the Documentation folder by clicking on the "-" sign in front of it, then re-expand the Documentation folder by clicking on the "+" sign in from of it, to get the new content to show.
You could use the tag right from DesignCenter, but if you want to have your scale-dependent tag on your tool palette, you can now simply drag-and-drop the AEC Content file from the AEC Content tab in DesignCenter onto an editable tool palette.
Using either the tool or the content file directly from DesignCenter, you can now place the scale-dependent tag with scale factors of one…
…and get your tag to display properly when the Low Detail…
…Medium Detail…
…and High Detail Display Configurations are set current.
And it was all done without creating a second source file for Property Set Definitions or moving a source file and breaking any existing tools that reference it.
One way to get a Tool palette tool to properly insert a scale-dependent tag would be to do it the old-fashioned way, by creating a custom-command type AEC Content file using the _AecAnnoScheduleTagAdd command. The old-fashioned infrastructure for doing so, including the ever-popular PropertySetDefs.dwg, is no longer there. And do you really want to have two source files for your Property Set Definitions? The new setup for ADT 2006 and 2007 has a single source file [Schedule Tables (Imperial).dwg, Schedule Tables (Metric).dwg or Schedule Tables Styles.dwg (Metric D A CH)] that holds the out-of-the-box Property Data Formats, Property Set Definitions, Schedule Table Styles and Multi-View Block Definitions, and that file is NOT in the AEC Content folder structure, when content is installed in the default folders.
In order for the _AecAnnoScheduleTagAdd command to work, you need to be able to specify a source file for the Property Set Definitions referenced by the Schedule Tag, and that file needs to be in the same folder as the tag or one folder above. The tag needs to be in the AEC Content folder structure. Unless you are starting a brand new deployment, moving the source file is not an option, as that would break all of the current tools that reference the current location.
There is a solution – use a Windows Shortcut somewhere in the AEC Content folder structure to “include” the folder of the source file, and then place your scale-dependent AEC Content files for your tags in one or more folders below that folder. Create a Tool palette tool by dragging the AEC Content file from the AEC Content tab of DesignCenter onto an editable tool palette.
The image above shows the Room Tags folder that I created in the C:\Documents and Settings\All Users\Application Data\Autodesk\ADT 2007\enu\Styles\Imperial\, and illustrates the creation of a Windows Shortcut of the C:\Documents and Settings\All Users\Application Data\Autodesk\ADT 2007\enu\Styles\Imperial\ folder in the C:\Documents and Settings\All Users\Application Data\Autodesk\ADT 2007\enu\AEC Content\Imperial\Documentation\Scale-Dependent Tags folder that I added to the out-of-the-box default installation folders.
To create the AEC Content file, I started a new file “from scratch”. Creating AEC Content is just about the only time I will use that option, and the reason is to create the leanest possible content file. If there are unnecessary block definitions, dimensions styles, and other items in the AEC Content file, they will come along for the ride when inserting the tag. I used the Style Manager to copy the Aec7_Room_Tag_Project_Scale_Dependent Schedule Tag Multi-View Block from the C:\Documents and Settings\All Users\Application Data\Autodesk\ADT 2007\enu\Styles\Imperial\Schedule Tables (Imperial).dwg source file. I inserted an instance of the Aec7_Room_Tag_HiDtl_P view block used by that tag in model space of the file stared from scratch to serve as the icon graphics. Then I ran the PURGE command to get rid of the extra stuff that came along for the ride when copying the Multi-View Block. Finally, I fired up the AEC Content Wizard, which can be found on the Format pulldown, and filled out the three “pages” as shown in the images below. [Click on any image in this blog to see a larger version – excepting those images that were small enough to show full size.]
"Page 1": Adding the Multi-View Block and its view blocks to the Content File and specifying the Command String. See the image below for the full string. Be certain to specify the correct Property Set Definition source file name, and, if the name includes any spaces, to enclose the name in double quotation marks.
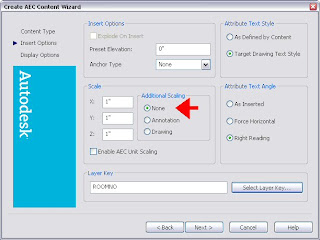
"Page 2": You may prefer different settings, but be certain to specify "None" for additional scaling. Select the appropriate layer key.
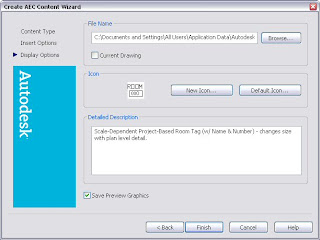
"Page 3": Specify the file location and name for the content file (see details in images below) and provide a detailed description. This description will appear in the bottom-right pane of the DesignCenter when the content file is selected, and will also become the default description for the Tool palette tool.
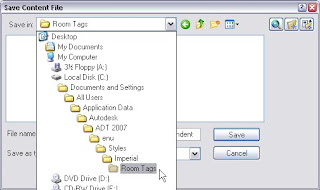
After all your settings are as you like, select the Finish button on the third "page" to create the AEC Content file. The new file shows up in Windows Explorer…
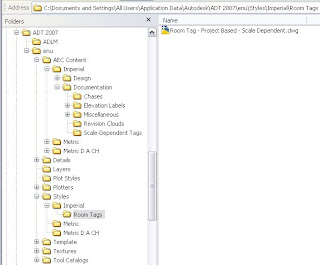
…as well as in the AEC Content tab of the DesignCenter. Note that the Scale-Dependent Tags folder I created under the Imperial Documentation folder now sports a "Shortcut to Imperial" folder within it [the Windows Shortcut], and that has a sub-folder called Room Tags, where I put my new AEC Content file. If you already had DesignCenter open to the Scale-Dependent Tags folder, you will need to collapse the Documentation folder by clicking on the "-" sign in front of it, then re-expand the Documentation folder by clicking on the "+" sign in from of it, to get the new content to show.
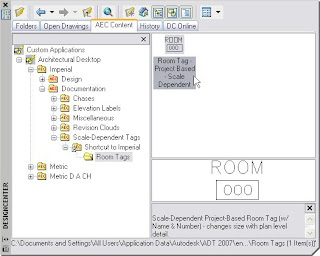
You could use the tag right from DesignCenter, but if you want to have your scale-dependent tag on your tool palette, you can now simply drag-and-drop the AEC Content file from the AEC Content tab in DesignCenter onto an editable tool palette.
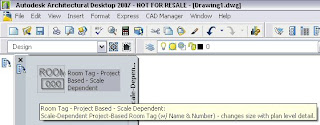
Using either the tool or the content file directly from DesignCenter, you can now place the scale-dependent tag with scale factors of one…
…and get your tag to display properly when the Low Detail…
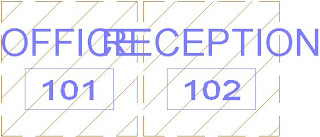
…Medium Detail…
…and High Detail Display Configurations are set current.
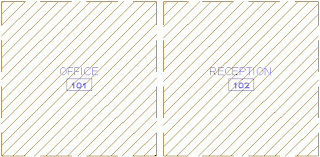
And it was all done without creating a second source file for Property Set Definitions or moving a source file and breaking any existing tools that reference it.
January 14, 2007
Hidden Feature Revealed: The Wall Style Components Browser
The other day I needed to create a new wall style, with double studs with an air space between. I started with an out-of-the-box style that had the right GWB and stud, and adjusted the offset of the "far side" GWB and copied the stud component. Then I remembered that I could copy the air space from another wall style using the Wall Style Components Browser. It occurred to me that I have not read much discussion about this feature, added with the 2004 release, and wondered if it had become "forgotten". If you have forgotten about this feature, or were never introduced to it, read on and add another tool to your Autodesk Architectural Desktop arsenal.
The Wall Style Components Browser allows you to easily add components to a wall style that match the way that component is set up in another style. That can help you maintain consistency across all of your wall styles. Ordinarily, when creating a new wall style, I would suggest starting with a copy of the existing wall style that is closest to what your new wall style needs to be, but for the purposes of illustration, I will create this one from scratch. The partition type I need is an interior metal stud partition that has good acoustic properties as well as a three-hour fire-resistance rating. The image below, taken from the USG Acoustical Assemblies catalog SA200, shows the partition we want to create
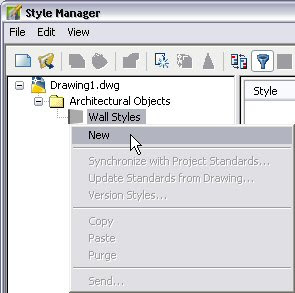
- Start a new drawing using an Autodesk Architectural Desktop template file. I am using the 2007 release for this exercise, and started with the out-of-the-box Aec model (imperial stb).dwt template. Open the Style Manager (one way, Format > Style Manager… from the pulldown menus). Expand the Architectural Objects folder under your new drawing in the left pane, right click on Wall Styles and choose New from the context menu.
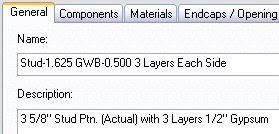
- Give the new wall style a name, I chose Stud-1.625 GWB-0.500 3 Layers Each Side to match the out-of-the-box style-naming convention. In the right pane, select the General tab and add a description of 3 5/8" Stud Ptn. (Actual) with 3 Layers 1/2" Gypsum, again matching the format of the shipping content. If your office has a different convention, by all means follow that.
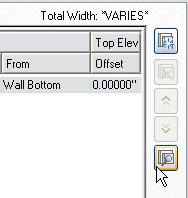
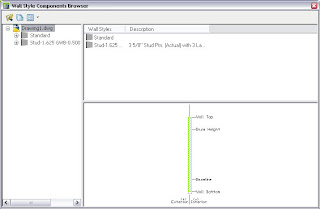
- Select the Components tab. You should have a default component, called "Unnamed". We will be deleting that later, but only after we add another component, as you always need to have at least one component. Click on the Wall Style Components Browser button [the tool tag reads "Wall Style Browser"], the bottom button of the four at the right side of the Components tab.
- The Wall Style Components Browser window opens. There is not much to pick from at this point, since there are no other wall styles in our drawing. We could have used the Style Manager to copy some other styles into our file first, but if we do not need them, why clutter the file with them? Just as you can "open" a file in the Style Manager without actually opening the file, you can "open" a file in the Wall Style Component Browser and access the styles within. Click on the Open drawing icon at the upper left corner, then browse to the location of the file containing the wall style(s) from which you want to copy components. I chose the out-of-the-box Wall Styles – Stud (Imperial).dwg as the source file.
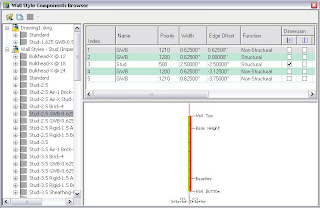
- None of the wall styles in the 2007 version of that file have a half-inch thick GWB component or a 1 5/8" deep stud, but we can bring in a 5/8" thick GWB component and a 2 1/2" stud and modify them. I chose the Stud-2.5 GWB-0.625 2 Layers Each Side wall style. Clicking on this in the left pane displays the components in that wall style and their properties in the top right pane, and a preview of the wall style in the lower right pane.
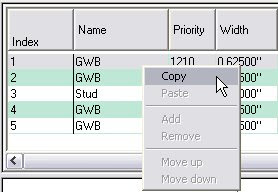
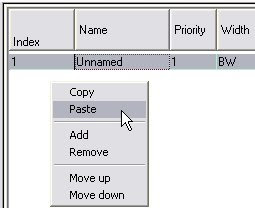
- Select the Index 1 GWB component in the top right pane, right click and choose Copy from the context menu. Now click back in the Style Manager to make that the active window, right click in the right pane under the default component and select paste from the context menu.This will paste the component you copied in the Wall Style Component Browser into your wall style, with the same properties as it had in the source style. If you like, click on the Materials tab and note that the Material Definition assigned to the copied GWB component was also brought along into our style. Not too shabby for a single cut and paste.
- Now we can delete the Unnamed component, by selecting it and clicking on the Remove Component button, second from the top at the left. Edit the GWB component, changing the Priority to 1220 (remember, we have three layers of GWB each side), the Width to 1/2" and the edge offset to 1". Select the edited component, right click, choose Copy from the context menu and finally right click and choose Paste from the context menu, twice, to add two more GWB components. Edit the Index 2 component, changing its Priority to 1210 and Edge Offset to 1/2". Edit the Index 3 component, changing the Priority to 1200 and Edge Offset to 0".
- Go back to the Wall Style Component Browser and copy the Stud component and paste it into the Components tab. Change the Width to 1 5/8" and the Edge Offset to -1 5/8".
- We are in the home stretch now. Select the Index 3 GWB component, right click, Copy, select the Index 4 Stud component, and then right click and Paste. Change the Edge Offset of the Index 5 GWB component to -2 1/8". Select the Index 2 GWB component, right click, Copy, select the Index 5 GWB component, right click and Paste. Change the Edge Offset of the Index 6 GWB component to -2 5/8". Select the Index 1 GWB component, right click, Copy, select the Index 6 GWB component, right click and Paste. Change the Edge Offset of the Index 7 GWB component to -3 1/8".
January 10, 2007
List Definitions - Utility to Import/Export
Jimmy Bergmark of JTB World fame has made available a free utility program that will allow you to import and export List Definitions in ADT 2007 or ABS 2007. I have not yet had time to download this and try it out, but thought I would pass this along for those using the 2007 releases and List Definitions, as you may not want to wait until I find time to do so.
January 09, 2007
Formula Property VBScript Help
It has just dawned on me that I have never published a link to the Microsoft Developer Network VBScript page, from which you can drill down and find all sorts of help on the syntax for VBScript commands. [Click on the image for a larger view.]
Note also that users of ADT 2006 and 2007 can access the help for a specific command "directly" when writing a formula by finding the command in the lower right pane, right clicking on the command and choosing VBScript Help: from the context menu.
January 02, 2007
Printing STB and CTB Files II
Long-time readers (both of you) may recall this post from nearly two years ago. It contains a link to a page on the Autodesk website from which you could download a utility program (tableprint8.exe) that would export the content of a Plot Style file (STB or CTB) to a comma-delimited text file, suitable for printing or opening with a spreadsheet program such as Excel. For those who prefer the challenge of finding that page from the Autodesk home page, you can start there, then click on each of the following links to hop from one page to the next to get there: Home > Building > Products & Services > Autodesk® Architectural Desktop > Training > How-to Articles > Routines, Tools and Add-ons > Plot Tool: CTB and STB Printing.
If you use one of the 2004-format versions of ADT (2004, 2005 or 2006), that is the file you want, and if you have not already downloaded it, you may want to do so soon, as there is not telling when the version on that page will be replaced with the current, 2007 version, tableprint9.exe. If you are already using ADT 2007 (or any other AutoCAD-2007-based product, you can grab tableprint9.exe on this page. For those who like to navigate on the Autodesk site, you can start at the home page and follow these links: Home > Building > Products & Services > Autodesk® Architectural Desktop > Data & Downloads > Utilities & Drivers > CTB and STB Printing Tool for AutoCAD 2007 under the Autodesk® Architectural Desktop 2007 section.
Whichever version you use, be certain to read and follow the installation instructions. The EXE file will need to be copied to the same folder as the acad.exe file.
There are a lot of other interesting items on the intermediate pages, so while clicking on the direct link here will speed you on your way, you may want to explore the other items available when you have a spare moment or two.