On April 15, 2008,
CADaptation released AecBatchStylesEditor
TM 2008, an application that runs inside of either AutoCAD
® Architecture 2008 or AutoCAD
® MEP 2008. The AecBatchStylesEditor greatly enhances the user’s ability to work with styles and definitions in these host applications, particularly when the same, or very similar, settings are required for multiple styles or definitions.
FULL DISCLOSURE: I “know” the two main people at CADaptation, Corey Layton and Brian Winterscheidt, from our mutual involvement with the Autodesk AutoCAD Architecture Discussion Groups. I served as a beta tester for AecBatchStylesEditor 2008 and received a complementary copy of the application for doing so.
AecBatchStylesEditor 2008 allows the user to perform batch edits on the Property Sets, Materials, Classifications and Display Properties associated with multiple styles or definitions. Very often, these settings are the same, or very similar, across multiple (if not all) styles/definitions of a particular object type. With AecBatchStylesEditor 2008, you will still need to create/attach the first instance of one of the previously listed items in the host program the way you do now, but you can then copy that from the style/definition where you created it to as many other styles/definitions of that object type as you like. This frees you from the drudgery of manually making the same edits over and over to multiple styles (and then checking what you did to make certain you really did the exact same thing multiple times). If you do need some minor variation between styles, AecBatchStylesEditor 2008 can get you 90% done very quickly, leaving only the variations to be manually edited. Many operations also allow you pick and choose settings from what you are copying, so you can copy just the subitems that are the same.
The following example should give you and idea of what this application can do. The CADaptation website offers a free trial version that only works on Mass Elements if you want to see the program in action for yourself.
Suppose you were working with the “new” out-of-the-box Space Styles, with their fancy colored fills in Medium Detail,
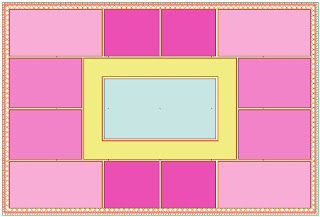
but needed to have those same fills display when the Low Detail Display Configuration is set current. Unfortunately, while the color and layer set for the Low Detail Display Configuration is the same as that for the Medium Detail, the out-of-the-box settings when the Low Detail Display Configuration is chosen display a series of lines at 45 degrees, rather than the solid fill.
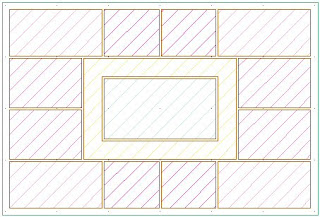
And then, when you go to check just how those color fills were assigned, you discover that it is all done as style-level overrides!

That means changing the hatch type for the Plan Low Detail Display Representation for every Space Style used in the drawing.
AecBatchStylesEditor 2008 can make quick work of this tedious task. This is one of my favorite features in the application, and not just because it is the result of a suggestion I made during the beta process.
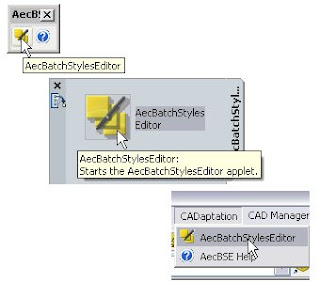
AecBatchStylesEditor 2008 provides a number of ways to start the application:
- Tool Bar Button.
- Tool Palette Tool.
- Pulldown Menu
- Typing AecBatchEdit at the Command: prompt.
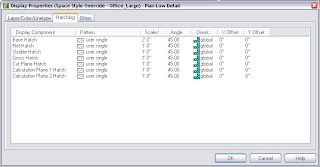
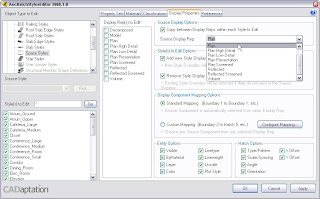
In the AecBatchStylesEditor dialog, I have selected the Display Properties tab, as the change I want to make is to the Display Properties of Space Styles.
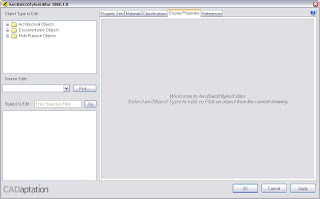
The first step will be to select Space Styles in the Object Type to Edit in the upper left corner. You can also choose an object type and set a source style by using the Pick… button on the left side. If the task at hand is copying the settings from a specific style to one or more other styles, this would be the way to go. Since the sample task involves copying settings from one Display Representation to another Display Representation within each selected style, I will use the tree window to select Space Styles, under the Architectural Objects node (just like Style Manager!). This populates the rest of the tab with data and options, based on the object type selected and the styles of that object type available in the current drawing.
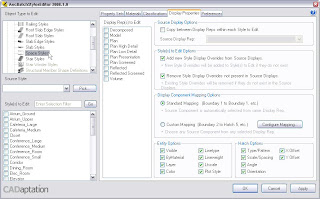
In order to quickly select all styles as styles to edit, I entered an “*” in the Enter Selection Filter edit box (without the quotation marks). This conveniently happens to be the initial default when left clicking in the box. Select the Go button to register the filter, and all of the Space Styles within the drawing will be checked in the Styles to Edit list box at the lower left. If you wanted to, you could uncheck any that you did not wish to edit.
In the Source Display Options area in the upper right of the Display Properties tab, I checked the Copy between Display Reps within each Style to Edit. This grays out the Source Style option on the left side, because instead of one style serving as the source, the values of the source Display Representation of each individual style will be copied to the Display Representation(s) to be edited in that same style. I then chose the Plan Display Representation as the Source Display Rep, using the drop down list isn the Source Display Options Area.
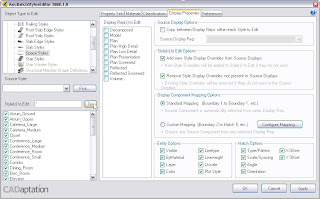
Doing this automatically checks the Plan Display Representation in the Display Rep(s) to Edit list. The final step is to check the Plan Low Detail Display Representation in that same list, as this is the one to which I want to copy the settings from the Plan Display Representation.
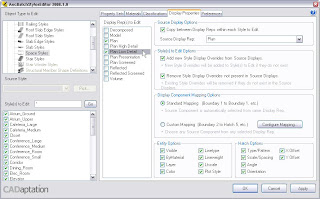
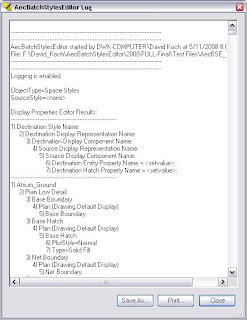
Since I want to copy all settings between the corresponding Display Representations and I want to maintain them as style-level overrides, I am done with making settings. If I wanted to be more selective, I could use the other areas on the right side of the dialog to narrow down the settings to be copied or to set up a custom mapping of settings. Selecting OK tells the application to make the selected changes, and after processing all of the Space Styles in my test drawing file, the AecBatchStylesEditor Log dialog appears, as I have the logging option enabled, on the Preferences tab. This dialog displays a listing of the changes that were made, and I can save it to a text file if I wish, for later examination.
Closing the log dialog returns me to my drawing file, with an offer to save the drawing, since I also have that option enabled on the Preferences tab. More importantly, my Low Detail Display now shows solid hatches, just like the Medium Detail Display,
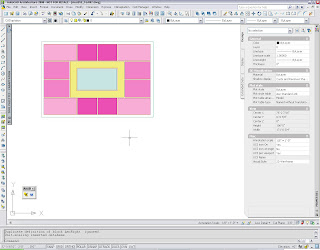
and all 38 of the Space Styles that were in this drawing have had the Low Detail Display Representation Style-level Display Override edited to match the Medium Detail Display Representation in just a few minutes.
If the out-of-the-box Display Settings are not exactly to your firm’s liking, but you have been putting off making changes because of all of the repetitive editing that might need to be done, or if you have wanted to create new Display Configurations with new Display Representation Sets and new Display Representations, but were overwhelmed by the enormous task of making all of the settings (particularly if they are the same as the settings for an existing Display Representation for all but a few object types), then you will definitely want to take a look at what this application can do. If you make use of style-level display overrides (whether out-of-the-box or custom), you can also use this application to push any drawing-default level changes you make to components that were not the reason for the override, without having to edit each override manually. Unless you are extremely underpaid, one or two uses on what would have been complicated or repetitious tasks will save you enough time to recoup the cost of the application, and every use after that is gravy.


